Wednesday, 30 June 2010

Chronometer.OnChronometerTickListener()

Modify from the previous exercise "Android Chronometer", Chronometer.OnChronometerTickListener() is implemented. Chronometer.OnChronometerTickListener() is a callback that notifies when the chronometer has incremented on its own.

Chronometer.OnChronometerTickListener()

Inside Chronometer.OnChronometerTickListener(), the elapsed time in millisecons can be get from: SystemClock.elapsedRealtime() - myChronometer.getBase().

AndroidChronometer.java
package com.exercise.AndroidChronometer;

import android.app.Activity;
import android.os.Bundle;
import android.os.SystemClock;
import android.view.View;
import android.widget.Button;
import android.widget.Chronometer;
import android.widget.Toast;

public class AndroidChronometer extends Activity {
/** Called when the activity is first created. */
@Override
public void onCreate(Bundle savedInstanceState) {
super.onCreate(savedInstanceState);
setContentView(R.layout.main);

final Chronometer myChronometer = (Chronometer)findViewById(R.id.chronometer);
Button buttonStart = (Button)findViewById(R.id.buttonstart);
Button buttonStop = (Button)findViewById(R.id.buttonstop);
Button buttonReset = (Button)findViewById(R.id.buttonreset);

buttonStart.setOnClickListener(new Button.OnClickListener(){

@Override
public void onClick(View v) {
// TODO Auto-generated method stub
myChronometer.start();
}});

buttonStop.setOnClickListener(new Button.OnClickListener(){

@Override
public void onClick(View v) {
// TODO Auto-generated method stub
myChronometer.stop();

}});

buttonReset.setOnClickListener(new Button.OnClickListener(){

@Override
public void onClick(View v) {
// TODO Auto-generated method stub
myChronometer.setBase(SystemClock.elapsedRealtime());

}});

myChronometer.setOnChronometerTickListener(
new Chronometer.OnChronometerTickListener(){

@Override
public void onChronometerTick(Chronometer chronometer) {
// TODO Auto-generated method stub
long myElapsedMillis = SystemClock.elapsedRealtime() - myChronometer.getBase();
String strElapsedMillis = "Elapsed milliseconds: " + myElapsedMillis;
Toast.makeText(AndroidChronometer.this, strElapsedMillis, Toast.LENGTH_SHORT).show();
}}
);
}
}


Download the files.

Tuesday, 29 June 2010

New Android 2.2 Software Update for Nexus One phones

Starting today, Nexus One users will begin to receive the Android 2.2 (codenamed Froyo) over-the-air software update on their phones. This update provides some great new features including support for making your handset a portable hotspot and support for Adobe Flash within the browser. For a complete list of everything we�ve included in Android 2.2, please see the Android 2.2 Platform Highlights.

In order to access the update, you will receive a message on your phone's notification bar. Just download the update, wait for it to install, and you should be all set. This update will be rolled out gradually to phones - and most users will receive the notification by the end of the week . We hope you enjoy these new features.

source: Nexus One | News and Updates Monday, June 28, 2010


Eclipse Helios with Android SDK


Eclipse Helios released with Eclipse 3.6.0. I have tried to install on ubuntu 10.04. The installation is same as Install Android SDK on Eclipse 3.5 Galileo, in Ubuntu 9.10. Except that you have to download Eclipse IDE for Java Developers from Eclipse web site, instead of install using Synaptic Package Manager.

Win7Tip: Set Default DNS Search Domains

Problem: You need to set up Windows to use default Internet search domains for your company. This way you can just enter host names. For example, http://hr instead of http://hr.mycompany.com.


Solution: You can add default search domains pretty easily. The only thing that is hard is to find the actual dialog box to enter the information. :) To get to the dialog do the following.


  1. Click on Start -> Control Panel -> View Network Status and Tasks.

  2. Then on the upper left side of the screen click Change Adapter Settings.

  3. Right click the network adapter you are using. Choose Properties.

  4. Select one of the Internet Protocol drivers (either will work). Click Properties.

  5. In the Protocol Dialog, click the Advanced button.

  6. Click the DNS tab.

  7. Halfway down the page you will see a box labeled "Append these DNS Suffixes". Enter your company domains here. For example:


region.mycompany.com

mycompany.com


That is it. Simple. :)

Android Chronometer

Chronometer is a class that implements a simple timer.

You can give it a start time in the elapsedRealtime() timebase, and it counts up from that, or if you don't give it a base time, it will use the time at which you call start(). By default it will display the current timer value in the form "MM:SS" or "H:MM:SS", or you can use setFormat(String) to format the timer value into an arbitrary string.

Android Chronometer
main.xml


<?xml version="1.0" encoding="utf-8"?>
<LinearLayout xmlns:android="http://schemas.android.com/apk/res/android"
android:orientation="vertical"
android:layout_width="fill_parent"
android:layout_height="fill_parent"
>
<TextView
android:layout_width="fill_parent"
android:layout_height="wrap_content"
android:text="@string/hello"
/>
<Chronometer
android:id="@+id/chronometer"
android:layout_gravity="center_horizontal"
android:layout_width="fill_parent"
android:layout_height="wrap_content"
/>
<Button
android:id="@+id/buttonstart"
android:layout_width="fill_parent"
android:layout_height="wrap_content"
android:text="Start"
/>
<Button
android:id="@+id/buttonstop"
android:layout_width="fill_parent"
android:layout_height="wrap_content"
android:text="Stop"
/>
<Button
android:id="@+id/buttonreset"
android:layout_width="fill_parent"
android:layout_height="wrap_content"
android:text="Reset"
/>
</LinearLayout>


AndroidChronometer.java

package com.exercise.AndroidChronometer;

import android.app.Activity;
import android.os.Bundle;
import android.os.SystemClock;
import android.view.View;
import android.widget.Button;
import android.widget.Chronometer;

public class AndroidChronometer extends Activity {
/** Called when the activity is first created. */
@Override
public void onCreate(Bundle savedInstanceState) {
super.onCreate(savedInstanceState);
setContentView(R.layout.main);

final Chronometer myChronometer = (Chronometer)findViewById(R.id.chronometer);
Button buttonStart = (Button)findViewById(R.id.buttonstart);
Button buttonStop = (Button)findViewById(R.id.buttonstop);
Button buttonReset = (Button)findViewById(R.id.buttonreset);

buttonStart.setOnClickListener(new Button.OnClickListener(){

@Override
public void onClick(View v) {
// TODO Auto-generated method stub
myChronometer.start();
}});

buttonStop.setOnClickListener(new Button.OnClickListener(){

@Override
public void onClick(View v) {
// TODO Auto-generated method stub
myChronometer.stop();

}});

buttonReset.setOnClickListener(new Button.OnClickListener(){

@Override
public void onClick(View v) {
// TODO Auto-generated method stub
myChronometer.setBase(SystemClock.elapsedRealtime());

}});


}
}


Download the files.


related article: Chronometer.OnChronometerTickListener()

Friday, 25 June 2010

JQuery: Prevent Scrolling to the Top of a Page

JQuery LogoProblem: Each JQuery click event scrolls to the top of the HTML page.


Solution: Often, links (<a href="#">) are used to create buttons with JQuery and JavaScript applications. When the internal link "#" is used the default behavior for that link is to go to the top of the page. However, in many situations, this is not the desired behavior. There are two ways to prevent this behavior.


First, simply return false at the end of your method.

return false;


Second, use the JQuery preventDefault method on the event.

e.preventDefault();


Thanks for this StackOverflow article on the subject.

Thursday, 24 June 2010

Apply custom adapter to ListView for RSS Reader

With the help of the exercise "Custom ArrayAdapter, with different icons", we know how to create our custom ListView. Now we go back to the old exercise of RSS Reader "A simple RSS reader III, show details once item clicked".

Apply custom adapter to ListView for RSS Reader
Modify the Rss Reader exercise to have a custom ListView, in which both title and PubDate will be displayed on each item in the ListView.

Create /res/layout/row.xml
<?xml version="1.0" encoding="utf-8"?>
<LinearLayout xmlns:android="http://schemas.android.com/apk/res/android"
android:layout_width="fill_parent"
android:layout_height="wrap_content"
android:orientation="vertical">
<TextView
android:id="@+id/listtitle"
android:textSize="22px"
android:layout_width="fill_parent"
android:layout_height="wrap_content"/>
<TextView
android:id="@+id/listpubdate"
android:textSize="10px"
android:layout_width="fill_parent"
android:layout_height="wrap_content"/>
</LinearLayout>


Modify AndroidRssReader.java to create a new class MyCustomAdapter extends ArrayAdapter, with getView() overrided. setListAdapter using the custom adapter.
package com.exercise.AndroidRssReader;

import java.io.IOException;
import java.net.MalformedURLException;
import java.net.URL;
import java.util.List;

import javax.xml.parsers.ParserConfigurationException;
import javax.xml.parsers.SAXParser;
import javax.xml.parsers.SAXParserFactory;

import org.xml.sax.InputSource;
import org.xml.sax.SAXException;
import org.xml.sax.XMLReader;

import android.app.ListActivity;
import android.content.Context;
import android.content.Intent;
import android.os.Bundle;
import android.view.LayoutInflater;
import android.view.View;
import android.view.ViewGroup;
import android.widget.ArrayAdapter;
import android.widget.ListView;
import android.widget.TextView;

public class AndroidRssReader extends ListActivity {

private RSSFeed myRssFeed = null;

public class MyCustomAdapter extends ArrayAdapter<RSSItem> {

public MyCustomAdapter(Context context, int textViewResourceId,
List<RSSItem> list) {
super(context, textViewResourceId, list);
}

@Override
public View getView(int position, View convertView, ViewGroup parent) {
// TODO Auto-generated method stub
//return super.getView(position, convertView, parent);

View row = convertView;

if(row==null){
LayoutInflater inflater=getLayoutInflater();
row=inflater.inflate(R.layout.row, parent, false);
}

TextView listTitle=(TextView)row.findViewById(R.id.listtitle);
listTitle.setText(myRssFeed.getList().get(position).getTitle());
TextView listPubdate=(TextView)row.findViewById(R.id.listpubdate);
listPubdate.setText(myRssFeed.getList().get(position).getPubdate());

if (position%2 == 0){
listTitle.setBackgroundColor(0xff101010);
listPubdate.setBackgroundColor(0xff101010);
}
else{
listTitle.setBackgroundColor(0xff080808);
listPubdate.setBackgroundColor(0xff080808);
}

return row;
}
}

/** Called when the activity is first created. */
@Override
public void onCreate(Bundle savedInstanceState) {
super.onCreate(savedInstanceState);
setContentView(R.layout.main);

try {
URL rssUrl = new URL("http://www.gov.hk/en/about/rss/govhkrss.data.xml");
SAXParserFactory mySAXParserFactory = SAXParserFactory.newInstance();
SAXParser mySAXParser = mySAXParserFactory.newSAXParser();
XMLReader myXMLReader = mySAXParser.getXMLReader();
RSSHandler myRSSHandler = new RSSHandler();
myXMLReader.setContentHandler(myRSSHandler);
InputSource myInputSource = new InputSource(rssUrl.openStream());
myXMLReader.parse(myInputSource);

myRssFeed = myRSSHandler.getFeed();

} catch (MalformedURLException e) {
// TODO Auto-generated catch block
e.printStackTrace();
} catch (ParserConfigurationException e) {
// TODO Auto-generated catch block
e.printStackTrace();
} catch (SAXException e) {
// TODO Auto-generated catch block
e.printStackTrace();
} catch (IOException e) {
// TODO Auto-generated catch block
e.printStackTrace();
}

if (myRssFeed!=null)
{
TextView feedTitle = (TextView)findViewById(R.id.feedtitle);
TextView feedDescribtion = (TextView)findViewById(R.id.feeddescribtion);
TextView feedPubdate = (TextView)findViewById(R.id.feedpubdate);
TextView feedLink = (TextView)findViewById(R.id.feedlink);
feedTitle.setText(myRssFeed.getTitle());
feedDescribtion.setText(myRssFeed.getDescription());
feedPubdate.setText(myRssFeed.getPubdate());
feedLink.setText(myRssFeed.getLink());

MyCustomAdapter adapter =
new MyCustomAdapter(this, R.layout.row, myRssFeed.getList());
setListAdapter(adapter);

}
}

@Override
protected void onListItemClick(ListView l, View v, int position, long id) {
// TODO Auto-generated method stub
Intent intent = new Intent(this,ShowDetails.class);
Bundle bundle = new Bundle();
bundle.putString("keyTitle", myRssFeed.getItem(position).getTitle());
bundle.putString("keyDescription", myRssFeed.getItem(position).getDescription());
bundle.putString("keyLink", myRssFeed.getItem(position).getLink());
bundle.putString("keyPubdate", myRssFeed.getItem(position).getPubdate());
intent.putExtras(bundle);
startActivity(intent);
}
}


Download the files.

next: Simple RSS Reader, with Options Menu to reload RSS


Wednesday, 23 June 2010

HTML5: Google Creates HTML5 Web Site

Interested in HTML5 and Chrome development? If you are, check out HTML5 Rocks. Lot's of great information on HTML5 and Chrome. Definitely a must read for web developers interested in the subject.

Tuesday, 22 June 2010

TinyUmbrella supports iOS 4

There is a readme.rtf to the right. Please read it before posting comments. If the answer to your question is in the readme, I will delete your comment.


Thanks (I'm trying to keep the comments section clean) :)


Thank you all for your donations - you are the most generous crowd in any scene! I have some cool things planned for future releases of TinyUmbrella - stay tuned.


Changes:

  • 4.00.53:

    • Fixed some windows library loading issues. Hopefully this should help many of you still experiencing the detection foobar on iPhone4.

    • Fixed "Kick Device Out of Recovery" on all windows versions.


  • 4.00.49:


    • This is more of a debug build - If you are having issues with the device detection please run this build and feel free to private pastie the umbrella*.log (found in your home directory) file in the comments below.


      • Windows: \Documents and Settings\<username>\umbrella#.log

      • Windows 7 (and vista?): \Users\<username>\umbrella#.log

      • MAC: /Users/<username>/umbrella#.log


    • No worries the data is 4096 RSA encrypted even if you tell the world the data in the log no one will be able to decrypt it but me.

    • Yes there is some device data in the log its effectively everything you tell iTunes and I already have access to anyway. The only purpose for it is to help figure out how the device detection is breaking.


  • 4.00.45: Well that was fun...


    • Ok so I've finally narrowed down the issues with detection.

    • I've also found that Windows 'Kick out of recovery' isn't working quite yet... (Use irecovery for now as I'm fixing this)


  • 4.00.31: I've updated the ReadMe. It now answers most questions.


    • Fixed more device detection.

    • Cleaned up some code.


  • 4.00.26:


    • Added 'Kick Device Out of Recovery' which will reboot your device that is stuck in recovery mode (if, in-fact, the iOS is still bootable). If the device cannot boot you may be put back into recovery mode.

    • This button is for iPhone4 restores that end with 1004. In this state the restore completed but the phone needs to be 'helped' to finish the recovery.


  • 4.00.24:


    • Fixed a fatal bug causing device detection to fail (will my stupid mistakes ever end?)


  • 4.00.23:


    • Phone4 support

    • iOS4 support

    • Completely rewrote TSS shsh cache parsing to parse each shsh and cache the blobs themselves with the pdigest and ecid (or bbsnum for iphone4)

    • Fixed offline parsing of the xml

    • Major refactor of classes and utilities.

    • iPhone4 SHSH query REQUIRES phone to be connected to get bbsnum and bb gold cert id.   


  • 4.00.22: Some users have complained about device detection. This addresses that issue.

  • 4.00.20: I've made some significant changes to the TSS and internal processing of TinyUmbrella.


UPDATE: Sorry folks 4.00.23 screwed up device detection. (It's what happens when you are dev + quality assurance). If you've already saved your shsh don't worry THAT doesn't get affected by my botch :) To check if you have your shsh Check your /Users//.shsh directory on OSX on windows check C:/Documents and Settings//.shsh and for windows 7 check C:/Users//.shsh


I'll have an update out very soon that will be much better tested. Again sorry for the stupid mistake. In the meantime I'll rollback to 4.00.22 since it seemed like it worked a bit better (but blew up if you were offline)


IMPORTANT: If you desire to restore your iPhone4 to iOS4, make sure you uninstall Wi-Fi Sync before trying to do so. I've apparently had the same issue a few other folks had. What. A. Nightmare.


Another note for iPhone4 users - in order to obtain your SHSH you MUST have the device attached. I read 3 values from the phone that are necessary to get your iPhone4 iOS 4 SHSH. Eventually I may parameterize those via the advanced options but the values are very ugly and difficult to obtain outside of a custom utility.


I've added preliminary support for iPhone4. This is as far as I can go without having the device in front of me. So far restores on the iPhone4 are not perfect. They error out locally but the restore does complete - it just needs to be helped along. (Much like downgrades where the baseband update fails). I'll try to put the functionality in TinyUmbrella to fix this.


Also, Mac users. Copy the app OUT OF THE DMG. The reason you are getting the repeating password prompts is because you ran the app from within the DMG. This is bad. Copy it anywhere and you'll be fine.


TinyUmbrella has been updated to support iOS 4. You can now save your iOS 4 SHSH regardless of whether your iDevice is jailbroken. See the download links to the right. (Linux support is there - just buggy - Sorry I'm working on the segfaults posixninja :P)


I've tested this with iTunes > 9. (Up to and including 9.2)

  • iPhone 3GS

  • iPod Touch 3G

  • iPod Touch 2G

  • iPad (No changes as 4.0 hasn't been released for iPad)

If you have an iPhone 3G you don't need to save your SHSH.


As always, please comment with any issues or send me an email. (Or send me a tweet)


Enjoy

World Cup Page with All the Info

I found it, I found it! A web page with all the world cup info in one place. You can see everything at a glance.  ESPNSoccernet Bracket

Problem of onTouchEvent(MotionEvent, MapView) on MapView

It's a follow-up of my old article "Move the marker on MapView". In the article, onTouchEvent(MotionEvent, MapView) was overrided to handle user touching on screen to update the marker. It work fine on Android emulator, BUT TOTALLY NO WORKING on true phone, such as Nexus One. It seem that the onTouchEvent(MotionEvent, MapView) cannot be triggered. I don't know why!

Instead of onTouchEvent(MotionEvent, MapView), I override onTap(GeoPoint, MapView) and test on Nexus One. It work as expect.

public boolean onTap(GeoPoint p, MapView mapView) {
String strLocation = String.valueOf((float)p.getLongitudeE6()/1000000)
+ " : "
+ String.valueOf((float)p.getLatitudeE6()/1000000);
Toast.makeText(AndroidMapView.this, strLocation, Toast.LENGTH_LONG).show();
// TODO Auto-generated method stub
//return super.onTap(p, mapView);

myMapView.getOverlays().remove(0);

CenterLocation(p);

return true;
}

4 iPad News Sites from the Big Boys

Some of the higher traffic sites now have iPad specific URLs. So now you can get all your iPad news with a single click.


  1. CNET - iPad

  2. CrunchGear - iPad

  3. SlashGear - iPad

  4. TUAW - iPad


Obtain a Maps API Key for Your Signing Certificate

If you are looking for obtain Map API for debug on emulator in your local development platform, refer to the article "Obtaining a Maps API Key, for debug".

If you are going to deploy a Android application with MapView, you have to obtain a Maps API Key for Your Signing Certificate.

You have to get the MD5 Fingerprint of Your Signing Certificate. Refer to last article "Sign and deploy Android App", you know where is your keystore and alias. Start a Terminal, switch to the folder of the keystore, type the command with your own alias_name and my-release-key.keystore.

$ keytool -list -alias alias_name -keystore my-release-key.keystore

get the MD5 Fingerprint of Your Signing Certificate

Now you can log-in with your Google account and go to Sign Up for the Android Maps API.

Accept the terms and conditions, fill in with your MD5 fingerprint, and Generate API Key.

Monday, 21 June 2010

Sign and deploy Android App

So far all my exercise run on emulator in local development platform. In order to make it runnable on true device, it have to be signed and deployed to apk file.

It's a easy way in Eclipse to sign a Android App.

- In Eclipse, right click the proect and select Export...
Sign and deploy Android App

- Select Android -> Export Android Application then click Next.
Sign and deploy Android App

- Browse to select project, it should be selected already, just click Next.
Sign and deploy Android App

-
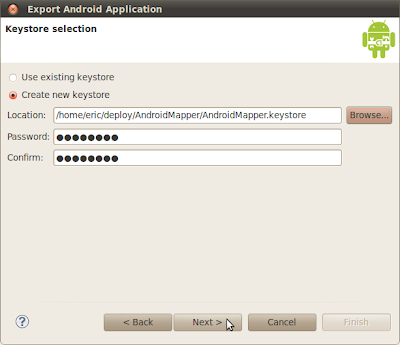
Select Create neww keystore it it's the first time you create keystore for a project.
Select the location of keystore you want to create.
Enter and confirm password
Sign and deploy Android App

- Enter some info. for the certificate, then Next
Sign and deploy Android App

- Browse to select the target location you want to save the generated apk file, then click Finish.
Sign and deploy Android App

- Now, you can upload the generated apk file to internet and lets Android device to download and install.

Java: Derby/JavaDB Database Basics

Duke WavingAt work today I had to do a little database troubleshooting and had to learn a little bit about JavaDB which is really the Apache Derby database. So I'm creating this post to record some of that information for future reference.


Documentation

You can download the documentation from Apache Derby Documentation Page. There are manuals for all versions of the db. NetBeans 6.8 is using Derby 10.5. If you need quick access to the SQL reference materials, there are links to the online Derby Reference in HTML. The reference contains detailed information on SQL syntax and functions.


SQL Shell

Today I really needed access to an interactive SQL shell for Derby, just like the mysql command for MySQL. One actually exists for Derby. Its call IJ and if you are using Windows and NetBeans its located in:

C:\Program Files\sges-v3\javadb\bin\ij.bat.


If you navigate to that directory, you can start up the shell by typing ij. The only thing that is a little tricky and different, is that before you can access a database, you must issue a connect command. For example, something like this:

ij> connect 'jdbc:derby://localhost:1527/dbname;create=true;user=user;password=pass;';


Once the connection is established you can issue normal SQL statements. I was attempting to change the starting value for an auto generated ID field. To reset the counter to 5, I could issue a command like this:

ALTER TABLE table-name ALTER column-name RESTART WITH 5;


Of course in the end, this was not really the problem. lol. But, issuing the command eventually nudged me in the right direction.

Mashable App for iPad

One of my favorite web sites has released a free app for the iPad. The Mashable app is essentially a wrapper for the Mashable site. It downloads the HTML stories from Mashable and caches them. This allows you to quickly and easily browse stories and topics. Here is what the app looks like in portrait.


Clicking on the Navigation button brings up a popup list of site categories.


Of course if you put the app in portrait mode, the list of categories is always displayed.


Simple, yet elegant. Nicely done.

Saturday, 19 June 2010

4 Places to Talk About Your iPad

Looking for a place to talk about your iPad?  Here are some forum sites you might check out.

  1. Apple Forums - Mostly support forums but includes discussions on Applications and Accessories too.

  2. MacRumors - A complete set of forums on all things Mac including the iPhone and the iPad.

  3. tipb Forums - Since the forums are for The iPhone Blog (tipb), totally focused on iPhone and iPad.

  4. everythingiCafe - Another everything Apple kind of forum.


Google Command Line Tool

Google LogoTalk about retro, Google has come out with a set of command line tools for accessing Google services. For example, you can do something like this:

$ google blogger post --blog "My blog" --tags "python, googlecl, development" my_post.html


Written in Python, you should be able to run them from any operating system.

Friday, 18 June 2010

Win7Tip: Change File Time Stamps with Cygwin and Touch

Problem: I need to change the time stamp of Windows files, but I don't what to buy or install some silly shareware application.


Solution: Install Cygwin and use the Unix touch utility to modify the timestamp.


  1. Start Cygwin.

  2. Change to your C: drive: cd /cygdrive/c

  3. Navigate to your file.

  4. Use the touch command.

  5. For example, set the date to Jan 6, 2010 at 4:20pm:

    touch -d '6 Jan 2010 16:20' myfile.txt


That's all there is too it.

Thursday, 17 June 2010

Check Your Qwest DSL Download Speed on a Regular Basis

Well I just found out my DSL modem was running at 1.5 Mbps when I have been paying for 5 Mbps. Finally, got hold of tech support and they had me reset my modem and voila, back to 5 mbps. Apparently, Qwest modems can "randomly" do this and it is up to me to check my connection speed on a regular basis to make sure my modem hasn't reset its speed!


Is this any way to treat your customer who is paying hundreds of dollars a year for your service? Plus the first tech support person I got hung up on me (no profanity from me or anything, 2nd tech support person was very nice). So I'm a little angry about the whole thing. This doesn't sound like a "random" thing to me. Sounds more like a good way to throttle your customers without their knowledge. How much have I overpaid for my service over the last couple of years?


Anyway, I found this simple bandwidth test that seems to be easy to use and pretty accurate: http://www.speakeasy.net/speedtest/


If you are a Qwest DSL customer, run the test and make sure you are getting your money's worth.


Wednesday, 16 June 2010

ListView with icon loaded from internet

With the last exercise "Load ImageView with bitmap from internet", we can now modify the the former exercise "Using convertView in getView() to make ListView efficient" to load the icon from internet, instead of loading from our resources.

ListView with icon loaded from internet

please note that in order to permit the App to access to internet, we have to grand it permission of "android.permission.INTERNET"; refer to the last exercise "Load ImageView with bitmap from internet"

Keep usng the /res/layout/row.xml as previous exercise, "ListView, with icon".

AndroidList.java
package com.exercise.AndroidList;

import java.io.IOException;
import java.io.InputStream;
import java.net.HttpURLConnection;
import java.net.URL;
import java.net.URLConnection;

import android.app.ListActivity;
import android.content.Context;
import android.graphics.Bitmap;
import android.graphics.BitmapFactory;
import android.os.Bundle;
import android.view.LayoutInflater;
import android.view.View;
import android.view.ViewGroup;
import android.widget.ArrayAdapter;
import android.widget.ImageView;
import android.widget.ListView;
import android.widget.TextView;
import android.widget.Toast;

public class AndroidList extends ListActivity {

String image_URL=
"https://blogger.googleusercontent.com/img/b/R29vZ2xl/AVvXsEhksTzch5dDj7Re1S7swjNTOTGXJt5Z8hdF7qRSSs3xA98mE4h_-Qac-JjoEI8K4KWGXi76p0f8zuoac9xHCSSzrv5BMmfUyg3EBtdcrIMf_yuc2bITFMb92LpdUi6n1AILG5pmkGI26Ql9/s1600-r/android.png";

public class MyCustomAdapter extends ArrayAdapter<String> {

Bitmap bm;

public MyCustomAdapter(Context context, int textViewResourceId,
String[] objects) {
super(context, textViewResourceId, objects);
// TODO Auto-generated constructor stub

BitmapFactory.Options bmOptions;
bmOptions = new BitmapFactory.Options();
bmOptions.inSampleSize = 1;
bm = LoadImage(image_URL, bmOptions);

}

@Override
public View getView(int position, View convertView, ViewGroup parent) {
// TODO Auto-generated method stub
//return super.getView(position, convertView, parent);

View row = convertView;

if(row==null){
LayoutInflater inflater=getLayoutInflater();
row=inflater.inflate(R.layout.row, parent, false);
}

TextView label=(TextView)row.findViewById(R.id.weekofday);
label.setText(month[position]);
ImageView icon=(ImageView)row.findViewById(R.id.icon);

icon.setImageBitmap(bm);

return row;
}
}

String[] month = {
"January", "February", "March", "April",
"May", "June", "July", "August",
"September", "October", "November", "December"
};

/** Called when the activity is first created. */
@Override
public void onCreate(Bundle savedInstanceState) {
super.onCreate(savedInstanceState);
//setContentView(R.layout.main);
/*setListAdapter(new ArrayAdapter<String>(this,
R.layout.row, R.id.weekofday, DayOfWeek));*/
setListAdapter(new MyCustomAdapter(AndroidList.this, R.layout.row, month));
}

@Override
protected void onListItemClick(ListView l, View v, int position, long id) {
// TODO Auto-generated method stub
//super.onListItemClick(l, v, position, id);
String selection = l.getItemAtPosition(position).toString();
Toast.makeText(this, selection, Toast.LENGTH_LONG).show();
}

private Bitmap LoadImage(String URL, BitmapFactory.Options options)
{
Bitmap bitmap = null;
InputStream in = null;
try {
in = OpenHttpConnection(URL);
bitmap = BitmapFactory.decodeStream(in, null, options);
in.close();
} catch (IOException e1) {
}
return bitmap;
}

private InputStream OpenHttpConnection(String strURL) throws IOException{
InputStream inputStream = null;
URL url = new URL(strURL);
URLConnection conn = url.openConnection();

try{
HttpURLConnection httpConn = (HttpURLConnection)conn;
httpConn.setRequestMethod("GET");
httpConn.connect();

if (httpConn.getResponseCode() == HttpURLConnection.HTTP_OK) {
inputStream = httpConn.getInputStream();
}
}
catch (Exception ex)
{
}
return inputStream;
}

}


next: Load ListView in background AsyncTask


Load ImageView with bitmap from internet

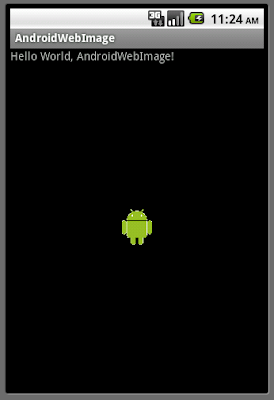
It's a simple way to load ImageView with a bitmap from internet, via http connection.

Load ImageView with bitmap from internet

In order to load something from internet, the AndroidManifest.xml have to be modified to grand permission for internet access.
<?xml version="1.0" encoding="utf-8"?>
<manifest xmlns:android="http://schemas.android.com/apk/res/android"
package="com.exercise.AndroidWebImage"
android:versionCode="1"
android:versionName="1.0">
<application android:icon="@drawable/icon" android:label="@string/app_name">
<activity android:name=".AndroidWebImage"
android:label="@string/app_name">
<intent-filter>
<action android:name="android.intent.action.MAIN" />
<category android:name="android.intent.category.LAUNCHER" />
</intent-filter>
</activity>

</application>
<uses-sdk android:minSdkVersion="4" />
<uses-permission android:name="android.permission.INTERNET" />
</manifest>


Modify main.xml to include a ImageView
<?xml version="1.0" encoding="utf-8"?>
<LinearLayout xmlns:android="http://schemas.android.com/apk/res/android"
android:orientation="vertical"
android:layout_width="fill_parent"
android:layout_height="fill_parent"
>
<TextView
android:layout_width="fill_parent"
android:layout_height="wrap_content"
android:text="@string/hello"
/>
<ImageView
android:id="@+id/image"
android:scaleType="center"
android:layout_width="fill_parent"
android:layout_height="fill_parent"
/>
</LinearLayout>


java code:
package com.exercise.AndroidWebImage;

import java.io.IOException;
import java.io.InputStream;
import java.net.HttpURLConnection;
import java.net.URL;
import java.net.URLConnection;

import android.app.Activity;
import android.graphics.Bitmap;
import android.graphics.BitmapFactory;
import android.os.Bundle;
import android.widget.ImageView;

public class AndroidWebImage extends Activity {

String image_URL=
"https://blogger.googleusercontent.com/img/b/R29vZ2xl/AVvXsEhksTzch5dDj7Re1S7swjNTOTGXJt5Z8hdF7qRSSs3xA98mE4h_-Qac-JjoEI8K4KWGXi76p0f8zuoac9xHCSSzrv5BMmfUyg3EBtdcrIMf_yuc2bITFMb92LpdUi6n1AILG5pmkGI26Ql9/s1600-r/android.png";

/** Called when the activity is first created. */
@Override
public void onCreate(Bundle savedInstanceState) {
super.onCreate(savedInstanceState);
setContentView(R.layout.main);

ImageView bmImage = (ImageView)findViewById(R.id.image);
BitmapFactory.Options bmOptions;
bmOptions = new BitmapFactory.Options();
bmOptions.inSampleSize = 1;
Bitmap bm = LoadImage(image_URL, bmOptions);
bmImage.setImageBitmap(bm);
}

private Bitmap LoadImage(String URL, BitmapFactory.Options options)
{
Bitmap bitmap = null;
InputStream in = null;
try {
in = OpenHttpConnection(URL);
bitmap = BitmapFactory.decodeStream(in, null, options);
in.close();
} catch (IOException e1) {
}
return bitmap;
}

private InputStream OpenHttpConnection(String strURL) throws IOException{
InputStream inputStream = null;
URL url = new URL(strURL);
URLConnection conn = url.openConnection();

try{
HttpURLConnection httpConn = (HttpURLConnection)conn;
httpConn.setRequestMethod("GET");
httpConn.connect();

if (httpConn.getResponseCode() == HttpURLConnection.HTTP_OK) {
inputStream = httpConn.getInputStream();
}
}
catch (Exception ex)
{
}
return inputStream;
}

}


Monday, 14 June 2010

Using convertView in getView() to make ListView efficient

Refer to document of Android Developers about getView(); it's stated that :

convertView - The old view to reuse, if possible. Note: You should check that this view is non-null and of an appropriate type before using. If it is not possible to convert this view to display the correct data, this method can create a new view.

If the convertView is null, we have to run the code below to create a new View.
LayoutInflater inflater=getLayoutInflater();
row=inflater.inflate(R.layout.row, parent, false);

If convertView is NOT null, we can simple re-use the convertView as the new View. It will happen when a new row appear and a old row in the other end roll out.

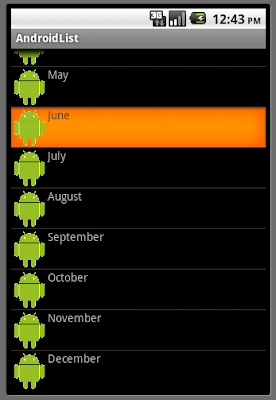
There are only seven elements in DayOfWeek[], it's not enough to demo this case. So we modify to use month[] of 12 elements.

Using convertView in getView() to make ListView efficient

Note the change in the method getView():

AndroidList.java changed from last exercise "Custom ArrayAdapter, with with different icons".
package com.exercise.AndroidList;

import android.app.ListActivity;
import android.content.Context;
import android.os.Bundle;
import android.view.LayoutInflater;
import android.view.View;
import android.view.ViewGroup;
import android.widget.ArrayAdapter;
import android.widget.ImageView;
import android.widget.ListView;
import android.widget.TextView;
import android.widget.Toast;

public class AndroidList extends ListActivity {

public class MyCustomAdapter extends ArrayAdapter<String> {

public MyCustomAdapter(Context context, int textViewResourceId,
String[] objects) {
super(context, textViewResourceId, objects);
// TODO Auto-generated constructor stub
}

@Override
public View getView(int position, View convertView, ViewGroup parent) {
// TODO Auto-generated method stub
//return super.getView(position, convertView, parent);

View row = convertView;

if(row==null){
LayoutInflater inflater=getLayoutInflater();
row=inflater.inflate(R.layout.row, parent, false);
}

TextView label=(TextView)row.findViewById(R.id.weekofday);
label.setText(month[position]);
ImageView icon=(ImageView)row.findViewById(R.id.icon);

if (month[position]=="December"){
icon.setImageResource(R.drawable.icon);
}
else{
icon.setImageResource(R.drawable.icongray);
}

return row;
}
}

String[] month = {
"January", "February", "March", "April",
"May", "June", "July", "August",
"September", "October", "November", "December"
};

/** Called when the activity is first created. */
@Override
public void onCreate(Bundle savedInstanceState) {
super.onCreate(savedInstanceState);
//setContentView(R.layout.main);
/*setListAdapter(new ArrayAdapter<String>(this,
R.layout.row, R.id.weekofday, DayOfWeek));*/
setListAdapter(new MyCustomAdapter(AndroidList.this, R.layout.row, month));
}

@Override
protected void onListItemClick(ListView l, View v, int position, long id) {
// TODO Auto-generated method stub
//super.onListItemClick(l, v, position, id);
String selection = l.getItemAtPosition(position).toString();
Toast.makeText(this, selection, Toast.LENGTH_LONG).show();
}

}

Custom ArrayAdapter, with different icons.

In the last exercises "A simple ListView, extends ListActivity", "ListView, with icon" and "Implement onListItemClick() of ListActivity", all use the build-in ArrayAdapter with standard layout in each row. All row have the same icon.

In this article, a custom ArrayAdapter will be created. The method getView() have to be re-implement. Such that we can have a List with different icons on each row.

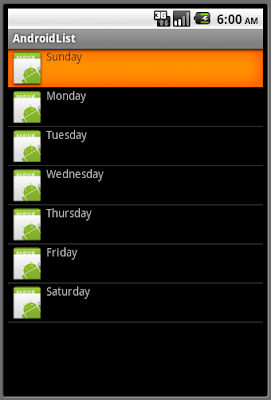
In this exercise, we will show original icon come from Project Wizard for Sunday, and a gray icon for all others.

Custom ArrayAdapter, with with different icons.

Create folder /res/drawable and save the gray icon inside.
icongray.png

Keep usng the /res/layout/row.xml as previous exercise, "ListView, with icon".

AndroidList.java
package com.exercise.AndroidList;

import android.app.ListActivity;
import android.content.Context;
import android.os.Bundle;
import android.view.LayoutInflater;
import android.view.View;
import android.view.ViewGroup;
import android.widget.ArrayAdapter;
import android.widget.ImageView;
import android.widget.ListView;
import android.widget.TextView;
import android.widget.Toast;

public class AndroidList extends ListActivity {

public class MyCustomAdapter extends ArrayAdapter<String> {

public MyCustomAdapter(Context context, int textViewResourceId,
String[] objects) {
super(context, textViewResourceId, objects);
// TODO Auto-generated constructor stub
}

@Override
public View getView(int position, View convertView, ViewGroup parent) {
// TODO Auto-generated method stub
//return super.getView(position, convertView, parent);
LayoutInflater inflater=getLayoutInflater();
View row=inflater.inflate(R.layout.row, parent, false);
TextView label=(TextView)row.findViewById(R.id.weekofday);
label.setText(DayOfWeek[position]);
ImageView icon=(ImageView)row.findViewById(R.id.icon);

if (DayOfWeek[position]=="Sunday"){
icon.setImageResource(R.drawable.icon);
}
else{
icon.setImageResource(R.drawable.icongray);
}

return row;
}
}

String[] DayOfWeek = {"Sunday", "Monday", "Tuesday",
"Wednesday", "Thursday", "Friday", "Saturday"
};

/** Called when the activity is first created. */
@Override
public void onCreate(Bundle savedInstanceState) {
super.onCreate(savedInstanceState);
//setContentView(R.layout.main);
/*setListAdapter(new ArrayAdapter<String>(this,
R.layout.row, R.id.weekofday, DayOfWeek));*/
setListAdapter(new MyCustomAdapter(AndroidList.this, R.layout.row, DayOfWeek));
}

@Override
protected void onListItemClick(ListView l, View v, int position, long id) {
// TODO Auto-generated method stub
//super.onListItemClick(l, v, position, id);
String selection = l.getItemAtPosition(position).toString();
Toast.makeText(this, selection, Toast.LENGTH_LONG).show();
}

}
***********
It's a programmatic pitfall here:
in getView(), Condition checking of String ("Sunday") should be checked with:
(DayOfWeek[position].equals("Sunday"))

"==" not always work! refer String Comparison: equals()? ==?
***********

Download the files.

next: Using convertView in getView() to make ListView efficient

Saturday, 12 June 2010

JQuery Tip: Select List Item with Deselect

JQuery LogoHow do select an item from a list? Well this is what I came up with as part of my iPhone/iPad experiments. Using JQuery, a click event is bound to each <li> element. When an item is clicked, the picked class is assigned to that item. The background is changed to show the selected item.


One additional feature of this example, when a selected item is clicked, it is deselected. This is accomplished by a simple check if the current item has the picked class assigned. JQuery makes this code really simple.

See Example

Here is a snippet of the source code.


 8:  <style type="text/css">
9:.ThinListTable { width:480px;}
10:.ThinListTable ul{ list-style-type:none; border:2px solid black; padding:0px; border-bottom:0px;}
11:.ThinListTable li{ border-bottom:2px solid black; padding:4px; margin:0px;}
12:.picked{ background:#EDEDED; }
13: </style>
14:<script type="text/javascript">
15:
16:// View Source
17:function getSource(){
18: window.open("view-source:" + location.href);
19: return;
20:}
21:
22:// Mouse Handler
23:function mouseHandler(e){
24: // Add Picked Class
25: if ($(this).hasClass('picked')) {
26: $(this).removeClass('picked');
27: } else {
28: $(".picked").removeClass('picked');
29: $(this).addClass('picked');
30: }
31:}
32:
33:function start(){
34: // Bind all li
35: $('.ThinListTable li').bind('click', mouseHandler);
36:}
37:
38:$(document).ready(start);
39:</script>
40:


Update: Changed the link to the example page. Moved it on the server.

Implement onListItemClick() of ListActivity

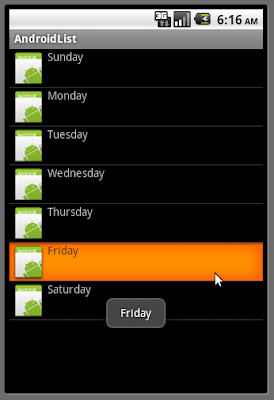
Modify the java code of the last exercise "ListView, with icon" to add listener of onListItemClick()

Implement onListItemClick() of ListActivity

AndroidList.java
package com.exercise.AndroidList;

import android.app.ListActivity;
import android.os.Bundle;
import android.view.View;
import android.widget.ArrayAdapter;
import android.widget.ListView;
import android.widget.Toast;

public class AndroidList extends ListActivity {

String[] DayOfWeek = {"Sunday", "Monday", "Tuesday",
"Wednesday", "Thursday", "Friday", "Saturday"
};

/** Called when the activity is first created. */
@Override
public void onCreate(Bundle savedInstanceState) {
super.onCreate(savedInstanceState);
//setContentView(R.layout.main);
setListAdapter(new ArrayAdapter<String>(this,
R.layout.row, R.id.weekofday, DayOfWeek));
}

@Override
protected void onListItemClick(ListView l, View v, int position, long id) {
// TODO Auto-generated method stub
//super.onListItemClick(l, v, position, id);
String selection = l.getItemAtPosition(position).toString();
Toast.makeText(this, selection, Toast.LENGTH_LONG).show();
}
}


next: Custom ArrayAdapter, with with different icons.


ListView, with icon

Last exercise display a ListView in simplest form with plain text only. This exercise describe how to add a icon in ListView.

ListView, with icon

create a new file in /res/layout/row.xml, to setup our layout on each row.
<?xml version="1.0" encoding="utf-8"?>
<LinearLayout xmlns:android="http://schemas.android.com/apk/res/android"
android:layout_width="fill_parent"
android:layout_height="wrap_content"
android:orientation="horizontal">
<ImageView
android:id="@+id/icon"
android:layout_width="wrap_content"
android:layout_height="wrap_content"
android:src="@drawable/icon"/>
<TextView
android:id="@+id/weekofday"
android:layout_width="wrap_content"
android:layout_height="wrap_content"/>
</LinearLayout>


AndroidList.java
package com.exercise.AndroidList;

import android.app.ListActivity;
import android.os.Bundle;
import android.widget.ArrayAdapter;

public class AndroidList extends ListActivity {

String[] DayOfWeek = {"Sunday", "Monday", "Tuesday",
"Wednesday", "Thursday", "Friday", "Saturday"
};

/** Called when the activity is first created. */
@Override
public void onCreate(Bundle savedInstanceState) {
super.onCreate(savedInstanceState);
//setContentView(R.layout.main);
setListAdapter(new ArrayAdapter<String>(this,
R.layout.row, R.id.weekofday, DayOfWeek));
}
}


next: Implement onListItemClick() of ListActivity


Related article:
- Custom Spinner with icon

A simple ListView, extends ListActivity

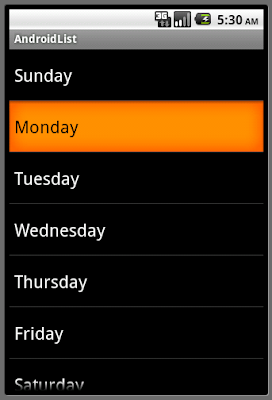
It's the simplest form of ListView, extends ListActivity. The list is displayed as a single line of plain text, using the simple Android built-in layout "android.R.layout.simple_list_item_1".

A simple ListView, extends ListActivity

package com.exercise.AndroidList;

import android.app.ListActivity;
import android.os.Bundle;
import android.widget.ArrayAdapter;

public class AndroidList extends ListActivity {

String[] DayOfWeek = {"Sunday", "Monday", "Tuesday",
"Wednesday", "Thursday", "Friday", "Saturday"
};

/** Called when the activity is first created. */
@Override
public void onCreate(Bundle savedInstanceState) {
super.onCreate(savedInstanceState);
//setContentView(R.layout.main);
setListAdapter(new ArrayAdapter<String>(this,
android.R.layout.simple_list_item_1, DayOfWeek));
}
}


next: ListView, with icon


Wednesday, 9 June 2010

All Things iPhone 4

Engadget has a great summary of all things iPhone 4.


The improved display and better battery life are the real draws for me. The better cameras are nice too. I will be getting one, but probably not right away, a few weeks or months after release.

Tuesday, 8 June 2010

Is Twitter Really All That Great?

I ran across this article today on Digg: Bye Bye Birdie: Why Twitter is On the Outs. It makes some interesting points to go along with interesting statistics. Only 3% of twitter users have 100 or more followers.


For all its flaws, Facebook does a much better job of connecting me to people I actually know.I have used Twitter now for about 6 months, I am beginning to agree with the article, what is the point?  Unless you are already famous, there does not seem to be much of a point to the service. How is anyone going to find you in the endless sea of tweets?

Android background thread, by implementing Thread object, provided with a Runnable object.

In last exercise "Android background thread, by extending Thread", a thread was created by implementing a object of a new class extends Thread. It's another way to create a thread, implement a object of Thread class with a Runnable object provided. Actually, both version have the same out, difference in implementation only.

main.xml is same as last exercise "Android background thread, by extending Thread"

AndroidBackgroundThread.java
package com.exercise.AndroidBackgroundThread;

import android.app.Activity;
import android.os.Bundle;
import android.os.Handler;
import android.os.Message;
import android.view.View;
import android.widget.TextView;
import android.widget.Toast;

public class AndroidBackgroundThread extends Activity {

Thread backgroundThread;
TextView myText;
boolean myTextOn = true;
boolean running = false;

Handler handler = new Handler(){

@Override
public void handleMessage(Message msg) {
// TODO Auto-generated method stub
//super.handleMessage(msg);
if (myTextOn){
myTextOn = false;
myText.setVisibility(View.GONE);
}
else{
myTextOn = true;
myText.setVisibility(View.VISIBLE);
}
}

};

void setRunning(boolean b){
running = b;
}

/** Called when the activity is first created. */
@Override
public void onCreate(Bundle savedInstanceState) {
super.onCreate(savedInstanceState);
setContentView(R.layout.main);

myText = (TextView)findViewById(R.id.mytext);

Toast.makeText(this, "onCreate()", Toast.LENGTH_LONG).show();
}


@Override
protected void onStart() {
// TODO Auto-generated method stub
super.onStart();

Toast.makeText(this, "onStart()", Toast.LENGTH_LONG).show();

backgroundThread = new Thread(new Runnable(){

@Override
public void run() {
// TODO Auto-generated method stub
while(running){
try {
Thread.sleep(1000);
} catch (InterruptedException e) {
// TODO Auto-generated catch block
e.printStackTrace();
}
handler.sendMessage(handler.obtainMessage());
}
}

});

setRunning(true);
backgroundThread.start();
}

@Override
protected void onStop() {
// TODO Auto-generated method stub
super.onStop();

boolean retry = true;
setRunning(false);

while(retry){
try {
backgroundThread.join();
retry = false;
} catch (InterruptedException e) {
// TODO Auto-generated catch block
e.printStackTrace();
}

}

Toast.makeText(this, "onStop()", Toast.LENGTH_LONG).show();

}
}


Download the files.

Direct TV Bricked All their DVRs?

Did Direct TV Brick all their DVRs last night?  That appears to be the case. A lot of people are reporting the DVRs no longer work this morning.


The suggested fix. Unplug your DVR for 15 seconds. Plug back in. Unplug for 15 seconds. Plug back in.


I have tried this twice and it did not work for me. My DVR appears to be a boat anchor now. Folks on twitter are reporting that it worked for them. Someone in their software group is in big trouble this morning. :)


Update: If the above does not work for you, hit the red reset button twice, or reset your DVR twice in 30 minutes. Once I hit the reset button, I could turn on my DVR with the button on the front of the machine. But the DVR still did not respond to the remote after I turned it off again. After the second reset, all seems to be good.

Monday, 7 June 2010

Android background thread, by extending Thread

Android background thread, by extending Thread

In this exercise, a new class, BackgroundThread, was created by extending Thread class. The object of this class run in background thread. A TextView will be toggled between on and off by this background thread. In Android, only the UI thread can modify UI elements, the method run in background thread cannot modify UI elements directly. So we have to implement a Handler, the background thread will send a Message to the Handler to change Visibility of the TextView.

Android background thread, by extending Thread

main.xml
<?xml version="1.0" encoding="utf-8"?>
<LinearLayout xmlns:android="http://schemas.android.com/apk/res/android"
android:orientation="vertical"
android:layout_width="fill_parent"
android:layout_height="fill_parent"
>
<TextView
android:layout_width="fill_parent"
android:layout_height="wrap_content"
android:text="@string/hello"
/>
<TextView
android:id="@+id/mytext"
android:layout_width="fill_parent"
android:layout_height="wrap_content"
android:text="This Text will be Turn ON/OFF triggered by a background thread."
/>
</LinearLayout>


AndroidBackgroundThread.java
package com.exercise.AndroidBackgroundThread;

import android.app.Activity;
import android.os.Bundle;
import android.os.Handler;
import android.os.Message;
import android.view.View;
import android.widget.TextView;
import android.widget.Toast;

public class AndroidBackgroundThread extends Activity {

BackgroundThread backgroundThread;
TextView myText;
boolean myTextOn = true;


public class BackgroundThread extends Thread {

boolean running = false;

void setRunning(boolean b){
running = b;
}

@Override
public void run() {
// TODO Auto-generated method stub
//super.run();
while(running){
try {
sleep(1000);
} catch (InterruptedException e) {
// TODO Auto-generated catch block
e.printStackTrace();
}
handler.sendMessage(handler.obtainMessage());
}
}

}

Handler handler = new Handler(){

@Override
public void handleMessage(Message msg) {
// TODO Auto-generated method stub
//super.handleMessage(msg);
if (myTextOn){
myTextOn = false;
myText.setVisibility(View.GONE);
}
else{
myTextOn = true;
myText.setVisibility(View.VISIBLE);
}
}

};


/** Called when the activity is first created. */
@Override
public void onCreate(Bundle savedInstanceState) {
super.onCreate(savedInstanceState);
setContentView(R.layout.main);

myText = (TextView)findViewById(R.id.mytext);

Toast.makeText(this, "onCreate()", Toast.LENGTH_LONG).show();

}


@Override
protected void onStart() {
// TODO Auto-generated method stub
super.onStart();

backgroundThread = new BackgroundThread();
backgroundThread.setRunning(true);
backgroundThread.start();
Toast.makeText(this, "onStart()", Toast.LENGTH_LONG).show();
}

@Override
protected void onStop() {
// TODO Auto-generated method stub
super.onStop();

boolean retry = true;
backgroundThread.setRunning(false);

while(retry){
try {
backgroundThread.join();
retry = false;
} catch (InterruptedException e) {
// TODO Auto-generated catch block
e.printStackTrace();
}

}

Toast.makeText(this, "onStop()", Toast.LENGTH_LONG).show();

}
}


Download the files.

another version: Android background thread, by implementing Thread object, provided with a Runnable object.

Related article:
- ProgressDialog + Thread