Sunday, 31 October 2010

How to take ScreenShots of Android Emulator (or true Device)

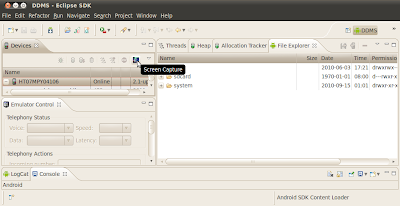
To take screenShots

Switch to DDMS Perspective in Eclipse
- Click Windows on the manu bar of Eclipse
- Select Open Perspective
- Select DDMS(or from other...)

Select the device in Devices pane
(The device can be Android Emulator, or connected true device)

Click Screen Capture icon in Device pane


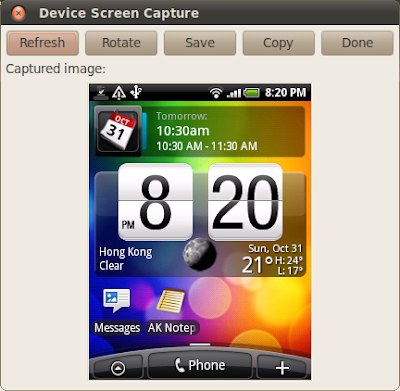
It's the screen captured of a true device, HTC Wildfire.

Tuesday, 26 October 2010

Google are giving away 10,000 Google TV devices. To you.

In order to encourage a new generation of TV developers to come forward, Google are planning to give away 10,000 Google TV devices to help developers start building for TV.

In Adobe MAX conference, Google gave away more than 3,000 Google TV devices to attendees. Additionally, Google will be reaching out to thousands of web developers in the Google Code community to offer them a free device. Finally, if you are a professional web developer who wants to help make the Google TV experience even better and you don�t happen to fall into one of those two groups, you can submit an entry to our Google TV Web Developer Promotion and include a short summary about the type of interesting website your company would like to create or optimize for Google TV. Google are planning to select 2,500 winners from those entries to receive a free Google TV device.

To get started building websites for Google TV, we�ve provided new documentation and a Google TV Web forum to help developers better engage in the process. We�re excited to see what you all come up with. Happy coding!

Source: Google Code Blog: We�re giving away 10,000 Google TV devices. To you.

Monday, 25 October 2010

Mozilla Browser Interface Design with HTML and CSS?

Firefox LogoThe Mozilla org is experimenting with defining the browser user interface with HTML, CSS and JavaScript. Technologizer has the story with links here.


This could be really cool stuff. This would provide quite a bit of flexibility in the interface.

Saturday, 23 October 2010

TinyUmbrella 4.1.12 Released

TinyUmbrella 4.1.12 is available and has many bugfixes and features. Hope it helps! BTW Check out the FAQ above or in the quick links under HELP!


  • Save All SHSHs - Click on 'Show All SHSHs' and the Save SHSH button changes to Save All SHSHs

  • Exit Recovery - Right Click on a recovery device and 'Exit Recovery'

  • Change device name - Double click on a Known Device to change its name.

Preferences:
  • When connecting a device, prefer my custom device name over the name set on the device - This preference will use the name(s) you set over the name found on the device. Useful for folks with many friends that have phones named 'iphone'

Home Screen Battery Widget

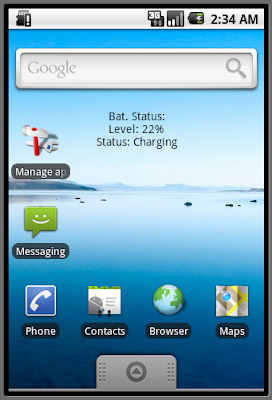
It's a simple Battery Widget, with battery level and charging status displayed on Android Home Screen.

Home Screen Battery Widget

Create a layout file of our widget, simple with a TextView only - /res/layout/androidbatterywidget_layout.xml.
<?xml version="1.0" encoding="utf-8"?>
<LinearLayout xmlns:android="http://schemas.android.com/apk/res/android"
android:orientation="vertical"
android:layout_width="fill_parent"
android:layout_height="fill_parent"
>
<TextView
android:id="@+id/level"
android:layout_width="fill_parent"
android:layout_height="wrap_content"
android:gravity="center"
android:textColor="#000000"
/>
</LinearLayout>


The provider info, /res/xml/androidbatterywidgetproviderinfo.xml.
<appwidget-provider xmlns:android="http://schemas.android.com/apk/res/android"
android:minWidth="146dp"
android:minHeight="72dp"
android:initialLayout="@layout/androidbatterywidget_layout"
>
</appwidget-provider>


Implement AndroidBatteryWidgetProvider.java, it's our AppWidgetProvider.
It show "waiting" initially, and start our Service in onUpdate() method.
package com.exercise.AndroidBatteryWidget;

import android.appwidget.AppWidgetManager;
import android.appwidget.AppWidgetProvider;
import android.content.ComponentName;
import android.content.Context;
import android.content.Intent;
import android.widget.RemoteViews;

public class AndroidBatteryWidgetProvider extends AppWidgetProvider {


@Override
public void onUpdate(Context context, AppWidgetManager appWidgetManager,
int[] appWidgetIds) {
// TODO Auto-generated method stub
updateWidget(context);
context.startService(new Intent(context, MyBatteryReceiver.class));
}

public void updateWidget(Context context){
RemoteViews updateViews = new RemoteViews(context.getPackageName(), R.layout.androidbatterywidget_layout);
updateViews.setTextViewText(R.id.level, "waiting!");

ComponentName myComponentName = new ComponentName(context, AndroidBatteryWidgetProvider.class);
AppWidgetManager manager = AppWidgetManager.getInstance(context);
manager.updateAppWidget(myComponentName, updateViews);
}

}


Implement MyBatteryReceiver.java.
In onCreate(), it register the BroadcastReceiver, myReceiver, to receive the event of Intent.ACTION_BATTERY_CHANGED. And also update widget in myReceiver.onReceive().
package com.exercise.AndroidBatteryWidget;

import android.app.Service;
import android.appwidget.AppWidgetManager;
import android.content.BroadcastReceiver;
import android.content.ComponentName;
import android.content.Context;
import android.content.Intent;
import android.content.IntentFilter;
import android.os.BatteryManager;
import android.os.IBinder;
import android.widget.RemoteViews;

public class MyBatteryReceiver extends Service {

private int batterylevel = 0;
private String batteryStatus ="";

private BroadcastReceiver myReceiver = new BroadcastReceiver()
{
@Override
public void onReceive(Context context, Intent intent)
{
String action = intent.getAction();
if (action.equals(Intent.ACTION_BATTERY_CHANGED))
{
batterylevel = intent.getIntExtra("level", 0);

int status = intent.getIntExtra("status", BatteryManager.BATTERY_STATUS_UNKNOWN);
String strStatus;
if (status == BatteryManager.BATTERY_STATUS_CHARGING){
batteryStatus = "Charging";
} else if (status == BatteryManager.BATTERY_STATUS_DISCHARGING){
batteryStatus = "Dis-charging";
} else if (status == BatteryManager.BATTERY_STATUS_NOT_CHARGING){
batteryStatus = "Not charging";
} else if (status == BatteryManager.BATTERY_STATUS_FULL){
batteryStatus = "Full";
} else {
batteryStatus = "";
}

updateAppWidget(context);
}
}

public void updateAppWidget(Context context){
RemoteViews updateViews = new RemoteViews(context.getPackageName(), R.layout.androidbatterywidget_layout);
updateViews.setTextViewText(R.id.level,
"Bat. Status:\n" +
"Level: " + batterylevel + "%\n" +
"Status: " + batteryStatus);

ComponentName myComponentName = new ComponentName(context, AndroidBatteryWidgetProvider.class);
AppWidgetManager manager = AppWidgetManager.getInstance(context);
manager.updateAppWidget(myComponentName, updateViews);
}
};

@Override
public IBinder onBind(Intent arg0) {
// TODO Auto-generated method stub
return null;
}

@Override
public void onCreate() {
// TODO Auto-generated method stub
super.onCreate();

IntentFilter intentFilter = new IntentFilter();
intentFilter.addAction(Intent.ACTION_BATTERY_CHANGED);
registerReceiver(myReceiver, intentFilter);
}

@Override
public void onDestroy() {
// TODO Auto-generated method stub
super.onDestroy();
unregisterReceiver(myReceiver);
}

}


Modify AndroidManifest.xml to include receiver and server in our application.
<?xml version="1.0" encoding="utf-8"?>
<manifest xmlns:android="http://schemas.android.com/apk/res/android"
package="com.exercise.AndroidBatteryWidget"
android:versionCode="1"
android:versionName="1.0">
<application android:icon="@drawable/icon" android:label="@string/app_name" android:debuggable="true">
<receiver android:name=".AndroidBatteryWidgetProvider" >
<intent-filter>
<action android:name="android.appwidget.action.APPWIDGET_UPDATE" />
</intent-filter>
<meta-data android:name="android.appwidget.provider"
android:resource="@xml/androidbatterywidgetproviderinfo" />
</receiver>

<service android:name=".MyBatteryReceiver" android:label="MyBatteryReceiver">
<intent-filter>
<action android:name="android.intent.action.BATTERY_CHANGED" />
</intent-filter>
</service>

</application>
<uses-sdk android:minSdkVersion="4" />
</manifest>


Download the files.

Related Article:
- A simple Home Screen App Widget to get Date/Time.
- android.app.Service
- Detect Battery Info.


Friday, 22 October 2010

TinyUmbrella - 4.1.12 New Feature List

TinyUmbrella 4.1.12 is almost ready for release with quite a few bug fixes and improvements. Namely:

  • UI

    • Moved Buttons to the top of the screen

    • Added two new preferences

    • Single click expand/collapse headings

    • Editable Device Names

    • Log gives more details when saving SHSHs

    • Replaced UGLY folder icons in Windows UI

    • ECID now shown in Decimal and Hexadecimal format

  • Stability

    • Manual ECID (Custom Device) now accepts Hex or Decimal ECIDs

    • Clicking Save ALL SHSHs twice (or more) will only result in one set of requests

    • Added ppc7400 support for the launcher

    • Fixed requests sent to Apple

    • Fixed many bugs :)

  • Features

    • Added Save ALL SHSH feature

Once I feel better I plan on testing and releasing this weekend. (No more 50 releases in a day)

It also goes without saying that I'm also working on activation/itunes-less restores. It is just going to take a /very/ long time.

Thursday, 21 October 2010

New TinyUmbrella Site Design

I got a little bored with the dark motif and decided to brighten up the blog. I've also been working on some new tweaks to the app. I've heard your cries and am looking at many options for automated/in-place updates for TinyUmbrella. I feel your pain with 10+ updates in a single day (ouch). Here's what is coming soon for TinyUmbrella:


  • Editable device name tags

  • An option to keep the name you specify or override it with what is on the device

  • Moved the buttons to the top of the screen (for those of you with small vertical resolution)

  • Added 'Save All SHSHs' functionality to the Save SHSH button when you have 'Show All SHSHs' selected

  • Improved device detection in recovery mode.

As far as errata go, I've decided to move to a much slower release pace. I'll fix emergency bugs if they should arise but I won't be releasing many revisions in a single day like I have in the past.
In the near future I plan on releasing an update that fixes some nuisance bugs (sorry!). I'm also working on a FAQ page that will try to address many of the commonly asked questions many of you may have.


Thanks for using my app!

Wednesday, 20 October 2010

Check and prompt user to enable GPS

To check if the GPS have been enabled or not, the following code can be used:

String provider = Settings.Secure.getString(getContentResolver(), Settings.Secure.LOCATION_PROVIDERS_ALLOWED);

If it's empty, means the GPS have not been enabled. You can start activity with intent Settings.ACTION_SECURITY_SETTINGS, to switch to GPS setting page.


package com.exercise.AndroidEnableGPS;

import android.app.Activity;
import android.content.Intent;
import android.os.Bundle;
import android.provider.Settings;
import android.widget.Toast;

public class AndroidEnableGPS extends Activity {
/** Called when the activity is first created. */
@Override
public void onCreate(Bundle savedInstanceState) {
super.onCreate(savedInstanceState);
setContentView(R.layout.main);

CheckEnableGPS();
}

private void CheckEnableGPS(){
String provider = Settings.Secure.getString(getContentResolver(),
Settings.Secure.LOCATION_PROVIDERS_ALLOWED);
if(!provider.equals("")){
//GPS Enabled
Toast.makeText(AndroidEnableGPS.this, "GPS Enabled: " + provider,
Toast.LENGTH_LONG).show();
}else{
Intent intent = new Intent(Settings.ACTION_SECURITY_SETTINGS);
startActivity(intent);
}

}
}


Download the files.

Tuesday, 19 October 2010

Update Widget in onReceive() method

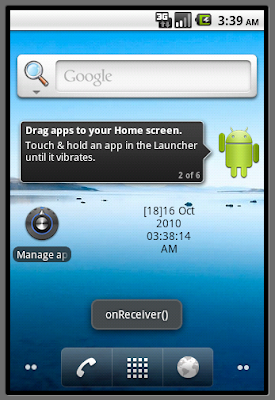
In my previous exercise of App Widget (Refer "App Widget using Alarm Manager" and "Cancel Alarm Service in onDisabled()"), Alarm Service was used t trigger onReceive() method of AppWidgetProvider object. It simple prompt user with a Toast only, without update widgets. This exercise, onReceive() method will update widgets.

In order to retrieve the list of appWidgetIds, the following code can be used:

ComponentName thisAppWidget = new ComponentName(context.getPackageName(), HelloWidgetProvider.class.getName());
int[] appWidgetIds = appWidgetManager.getAppWidgetIds(thisAppWidget);


then call onUpdate() method to update all widgets.

HelloWidgetProvider.java
package com.exercise.HelloWidget;

import java.text.SimpleDateFormat;
import java.util.Date;

import android.app.AlarmManager;
import android.app.PendingIntent;
import android.appwidget.AppWidgetManager;
import android.appwidget.AppWidgetProvider;
import android.content.ComponentName;
import android.content.Context;
import android.content.Intent;
import android.os.Bundle;
import android.widget.RemoteViews;
import android.widget.Toast;

public class HelloWidgetProvider extends AppWidgetProvider {

static AlarmManager myAlarmManager;
static PendingIntent myPendingIntent;

private static SimpleDateFormat formatter = new SimpleDateFormat("dd MMM yyyy hh:mm:ss a");
static String strWidgetText = "";

public static String MY_WIDGET_UPDATE = "MY_OWN_WIDGET_UPDATE";

@Override
public void onReceive(Context context, Intent intent) {
// TODO Auto-generated method stub
super.onReceive(context, intent);

if(MY_WIDGET_UPDATE.equals(intent.getAction())){

Bundle extras = intent.getExtras();
if(extras!=null) {
AppWidgetManager appWidgetManager = AppWidgetManager.getInstance(context);
ComponentName thisAppWidget = new ComponentName(context.getPackageName(), HelloWidgetProvider.class.getName());
int[] appWidgetIds = appWidgetManager.getAppWidgetIds(thisAppWidget);

onUpdate(context, appWidgetManager, appWidgetIds);
}

//Toast.makeText(context, "onReceiver()", Toast.LENGTH_LONG).show();
}
}

@Override
public void onDeleted(Context context, int[] appWidgetIds) {
// TODO Auto-generated method stub
//super.onDeleted(context, appWidgetIds);
Toast.makeText(context, "onDeleted()", Toast.LENGTH_LONG).show();
}

@Override
public void onDisabled(Context context) {
// TODO Auto-generated method stub
//super.onDisabled(context);

myAlarmManager.cancel(myPendingIntent);

Toast.makeText(context, "onDisabled()", Toast.LENGTH_LONG).show();
}

@Override
public void onEnabled(Context context) {
// TODO Auto-generated method stub
//super.onEnabled(context);
Toast.makeText(context, "onEnabled()", Toast.LENGTH_LONG).show();
}

@Override
public void onUpdate(Context context, AppWidgetManager appWidgetManager,
int[] appWidgetIds) {
// TODO Auto-generated method stub
super.onUpdate(context, appWidgetManager, appWidgetIds);

final int N = appWidgetIds.length;
for (int i=0; i<N; i++) {
int appWidgetId = appWidgetIds[i];
updateAppWidget(context, appWidgetManager, appWidgetId);

Toast.makeText(context, "onUpdate(): " + String.valueOf(i) + " : " + String.valueOf(appWidgetId), Toast.LENGTH_LONG).show();
}

}

public static void updateAppWidget(Context context, AppWidgetManager appWidgetManager,
int appWidgetId){
String currentTime = formatter.format(new Date());
strWidgetText = currentTime;

RemoteViews updateViews = new RemoteViews(context.getPackageName(), R.layout.hellowidget_layout);
updateViews.setTextViewText(R.id.widgettext, "[" + String.valueOf(appWidgetId) + "]" + strWidgetText);
appWidgetManager.updateAppWidget(appWidgetId, updateViews);

Toast.makeText(context, "updateAppWidget(): " + String.valueOf(appWidgetId) + "\n" + strWidgetText, Toast.LENGTH_LONG).show();

}

static void SaveAlarmManager(AlarmManager tAlarmManager, PendingIntent tPendingIntent)
{
myAlarmManager = tAlarmManager;
myPendingIntent = tPendingIntent;
}

}


Download the files.

Monday, 18 October 2010

Developing for Google Blogger

Google LogoI am looking into developing my own template for Google's blogger tool. So looking around I found a couple of resources of interest.

  • Widgets - If you want to make widgets you can find the scoop here. You can do a lot more than that if you have an interest. The documentation is all on the site.

  • Blog Templates - Base templates and documentation is on this Google group. The details are in the Pages section.

Cancel Alarm Service in onDisabled()

It's a follow-up work on last exercise "App Widget using Alarm Manager". As mentioned, the code haven't cancel the Alarm Service when all widgets removed from home screen. It's can be done in onDisabled() method of AppWidgetProvider.

First of all, we have to pass the value of alarmManager and pendingIntent to HelloWidgetProvider(which extends AppWidgetProvider) when created in HelloWidgetConfig(the configure activity).

In configOkButtonOnClickListener.onClick() of HelloWidgetConfig.java, add the code to pass the value of alarmManager and pendingIntent to HelloWidgetProvider()
private Button.OnClickListener configOkButtonOnClickListener
= new Button.OnClickListener(){

@Override
public void onClick(View arg0) {
// TODO Auto-generated method stub

final Context context = HelloWidgetConfig.this;

AppWidgetManager appWidgetManager = AppWidgetManager.getInstance(context);

//RemoteViews views = new RemoteViews(context.getPackageName(), R.layout.hellowidget_layout);
//appWidgetManager.updateAppWidget(mAppWidgetId, views);
HelloWidgetProvider.updateAppWidget(context, appWidgetManager, mAppWidgetId);

Toast.makeText(context, "HelloWidgetConfig.onClick(): " + String.valueOf(mAppWidgetId) , Toast.LENGTH_LONG).show();

//prepare Alarm Service to trigger Widget
Intent intent = new Intent(HelloWidgetProvider.MY_WIDGET_UPDATE);
pendingIntent = PendingIntent.getBroadcast(HelloWidgetConfig.this, 0, intent, 0);
AlarmManager alarmManager = (AlarmManager)getSystemService(ALARM_SERVICE);
Calendar calendar = Calendar.getInstance();
calendar.setTimeInMillis(System.currentTimeMillis());
calendar.add(Calendar.SECOND, 10);
alarmManager.setRepeating(AlarmManager.RTC_WAKEUP, calendar.getTimeInMillis(), 20*1000, pendingIntent);

HelloWidgetProvider.SaveAlarmManager(alarmManager, pendingIntent);

Intent resultValue = new Intent();
resultValue.putExtra(AppWidgetManager.EXTRA_APPWIDGET_ID, mAppWidgetId);
setResult(RESULT_OK, resultValue);
finish();
}


In HelloWidgetProvider.java, define static instance of AlarmManager and PendingIntent. Implement a method SaveAlarmManager() to sve the values, it will be called from HelloWidgetConfig.java.

Override onDisabled() method to cancel the alarm service.

static AlarmManager myAlarmManager;
static PendingIntent myPendingIntent;

@Override
public void onDisabled(Context context) {
// TODO Auto-generated method stub
//super.onDisabled(context);

myAlarmManager.cancel(myPendingIntent);

Toast.makeText(context, "onDisabled()", Toast.LENGTH_LONG).show();
}

static void SaveAlarmManager(AlarmManager tAlarmManager, PendingIntent tPendingIntent)
{
myAlarmManager = tAlarmManager;
myPendingIntent = tPendingIntent;
}


next: Update Widget in onReceive() method


TinyUmbrella 4.1.11

Mac version is now installed via package installer. No more entering admin credentials at startup. I've also made a slight UI adjustment: when you click save shsh, the connected device AND the known device will show the spinner indicating progress. I've added a new preference for overwriting shsh's when performing an shsh request. (defaults to true)


Enjoy!

Sunday, 17 October 2010

v4.1.10 Busy day...

I re-added a few features from the old version. (Clickable links, etc) and renamed the middle tab to "Log" since the TSS server button is on the main page. There were also a couple race conditions that I fixed causing the grabbing of /all/ shshs to occasionally fail and require another button press. I fixed/added so much it was time for a new revision. Happy SHSHing!

TinyUmbrella 4.1.9 Minor bugfixes

Sorry about the bugfixes! Please re-download the latest links and keep reporting any issues you come across. Please get this version and save your SHSHs again. Thanks.

Saturday, 16 October 2010

TinyUmbrella 4.1.9 - Update

I've released 4.1.9. Some notable features are the Custom Device (the means by which you add manual ecids) Click Manual ECID to give it a try. Custom Devices work the same as history or connected devices, you just don't have any info about the device. Once you connect the device with that ECID however, your custom device will disappear and the full known device history information will replace it! Trust me, it's alot simpler when you play around with it.

TinyUmbrella - 4.1.9 Coming Soon

The feedback on 4.1.8 has been fantastic! Thank you all for your criticism, ideas, rants, frustrations :) I've already started working on the suggestions you all have given. Here is a short list of things to expect in 4.1.9 (coming very soon - as in hours):

  • Moved "Kick Device out of Recovery" back to a button

    • Right-clicking on the device still pulls up the option!

  • Added a progress bar for feedback while saving all shshs.

  • Manual ECID entry.

  • Fixed a bug where changing the save directory would cause an exception in the device history manager.

I plan to have these fixes in today or tomorrow. Check back for updates.

Friday, 15 October 2010

TinyUmbrella - New UI Complete!

3GS / 3G Users - DO NOT USE TINYUMBRELLA in an attempt to save your baseband. It will not work. The baseband protection is for iPhone 4 *ONLY*.


After months of work I've finished the UI rewrite of TinyUmbrella. I've added quite a few things to this little app. It's definitely come a long way and I want to thank all of you for making it the success it's become. Here are some new features in 4.1.8:

  • Totally redesigned UI for all platforms (inspired by chpwn refined by me)

    • Original artwork by iOPK of Chronic Dev Team

    • Spinny Icon code (thanks to technomage)

    • Quaqua look and feel (sorry mac only due to license restrictions)

    • Much cleaner look and feel all around

  • Known Devices!

    • Now all devices detected by TinyUmbrella are saved for future use!

    • You can remove them as well :) (Right click -> delete from history)

    • You can save SHSH with known devices as well (No more requirement for the device to be connected)

  • Recovery Devices

    • If you connect a device in recovery mode you can still kick it out of recovery (Right click -> Kick out of recovery)

  • Save SHSH now saves ALL SHSHs available at Cydia with one button press!

  • Preferences

    • Change SHSH save directory

  • Proxies (Web and Socks) for those that need them!

  • Better port 80 detection.

I hope this release helps you obtain and keep your SHSH's locally. In the future I plan on adding activation and restores sans iTunes. (These are both HUGE in terms of development effort so bear with me).


I'm working on a troubleshooting guide that I will have posted in the Quick Links section.

App Widget using Alarm Manager

In the old exercise "A simple Home Screen App Widget with configure activity", it have a minimum rate of 30 minutes in android:updatePeriodMillis. In order to make the Home Screen App Widget do something faster than 30 minutes, Alarm Manager can be used.

In the preiouse exercise "Schedule a repeating alarm", we know how to triger a repeating service using Alarm Manager. It will be used here to trigger the onReceive() method of the AppWidgetProvider.

App Widget using Alarm Manager

Modify AndroidManifest.xml to add a new custom intent-filter, "MY_OWN_WIDGET_UPDATE".
<?xml version="1.0" encoding="utf-8"?>
<manifest xmlns:android="http://schemas.android.com/apk/res/android"
package="com.exercise.HelloWidget"
android:versionCode="1"
android:versionName="1.0">
<application android:icon="@drawable/icon" android:label="@string/app_name">
<receiver android:name="HelloWidgetProvider" >
<intent-filter>
<action android:name="android.appwidget.action.APPWIDGET_UPDATE" />
</intent-filter>
<intent-filter>
<action android:name="MY_OWN_WIDGET_UPDATE" />
</intent-filter>
<meta-data android:name="android.appwidget.provider"
android:resource="@xml/hellowidgetproviderinfo" />
</receiver>
<activity android:name=".HelloWidgetConfig"
android:label="Hello Widget Config">
<intent-filter>
<action android:name="android.appwidget.action.APPWIDGET_CONFIGURE" />
</intent-filter>
</activity>
</application>
<uses-sdk android:minSdkVersion="7" />

</manifest>


Modify HelloWidgetProvider.java to implement onReceive() method, to handle the "MY_OWN_WIDGET_UPDATE" action.
package com.exercise.HelloWidget;

import java.text.SimpleDateFormat;
import java.util.Date;

import android.appwidget.AppWidgetManager;
import android.appwidget.AppWidgetProvider;
import android.content.Context;
import android.content.Intent;
import android.widget.RemoteViews;
import android.widget.Toast;

public class HelloWidgetProvider extends AppWidgetProvider {

private static SimpleDateFormat formatter = new SimpleDateFormat("dd MMM yyyy hh:mm:ss a");
static String strWidgetText = "";

public static String MY_WIDGET_UPDATE = "MY_OWN_WIDGET_UPDATE";

@Override
public void onReceive(Context context, Intent intent) {
// TODO Auto-generated method stub
super.onReceive(context, intent);

if(MY_WIDGET_UPDATE.equals(intent.getAction())){
Toast.makeText(context, "onReceiver()", Toast.LENGTH_LONG).show();
}
}

@Override
public void onDeleted(Context context, int[] appWidgetIds) {
// TODO Auto-generated method stub
//super.onDeleted(context, appWidgetIds);
Toast.makeText(context, "onDeleted()", Toast.LENGTH_LONG).show();
}

@Override
public void onDisabled(Context context) {
// TODO Auto-generated method stub
//super.onDisabled(context);
Toast.makeText(context, "onDisabled()", Toast.LENGTH_LONG).show();
}

@Override
public void onEnabled(Context context) {
// TODO Auto-generated method stub
//super.onEnabled(context);
Toast.makeText(context, "onEnabled()", Toast.LENGTH_LONG).show();
}

@Override
public void onUpdate(Context context, AppWidgetManager appWidgetManager,
int[] appWidgetIds) {
// TODO Auto-generated method stub
super.onUpdate(context, appWidgetManager, appWidgetIds);

final int N = appWidgetIds.length;
for (int i=0; i<N; i++) {
int appWidgetId = appWidgetIds[i];
updateAppWidget(context, appWidgetManager, appWidgetId);

Toast.makeText(context, "onUpdate(): " + String.valueOf(i) + " : " + String.valueOf(appWidgetId), Toast.LENGTH_LONG).show();
}

}

public static void updateAppWidget(Context context, AppWidgetManager appWidgetManager,
int appWidgetId){
String currentTime = formatter.format(new Date());
strWidgetText = currentTime;

RemoteViews updateViews = new RemoteViews(context.getPackageName(), R.layout.hellowidget_layout);
updateViews.setTextViewText(R.id.widgettext, "[" + String.valueOf(appWidgetId) + "]" + strWidgetText);
appWidgetManager.updateAppWidget(appWidgetId, updateViews);

Toast.makeText(context, "updateAppWidget(): " + String.valueOf(appWidgetId) + "\n" + strWidgetText, Toast.LENGTH_LONG).show();

}

}


Modify HelloWidgetConfig.java to start Alarm Manager.
package com.exercise.HelloWidget;

import java.util.Calendar;

import android.app.Activity;
import android.app.AlarmManager;
import android.app.PendingIntent;
import android.appwidget.AppWidgetManager;
import android.content.Context;
import android.content.Intent;
import android.os.Bundle;
import android.view.View;
import android.widget.Button;
import android.widget.Toast;

public class HelloWidgetConfig extends Activity {

Button configOkButton;
int mAppWidgetId = AppWidgetManager.INVALID_APPWIDGET_ID;

@Override
protected void onCreate(Bundle savedInstanceState) {
// TODO Auto-generated method stub
super.onCreate(savedInstanceState);

setResult(RESULT_CANCELED);

setContentView(R.layout.config);

configOkButton = (Button)findViewById(R.id.okconfig);
configOkButton.setOnClickListener(configOkButtonOnClickListener);

Intent intent = getIntent();
Bundle extras = intent.getExtras();
if (extras != null) {
mAppWidgetId = extras.getInt(
AppWidgetManager.EXTRA_APPWIDGET_ID,
AppWidgetManager.INVALID_APPWIDGET_ID);
}

// If they gave us an intent without the widget id, just bail.
if (mAppWidgetId == AppWidgetManager.INVALID_APPWIDGET_ID) {
finish();
}
}

private Button.OnClickListener configOkButtonOnClickListener
= new Button.OnClickListener(){

@Override
public void onClick(View arg0) {
// TODO Auto-generated method stub

final Context context = HelloWidgetConfig.this;

AppWidgetManager appWidgetManager = AppWidgetManager.getInstance(context);

//RemoteViews views = new RemoteViews(context.getPackageName(), R.layout.hellowidget_layout);
//appWidgetManager.updateAppWidget(mAppWidgetId, views);
HelloWidgetProvider.updateAppWidget(context, appWidgetManager, mAppWidgetId);

Toast.makeText(context, "HelloWidgetConfig.onClick(): " + String.valueOf(mAppWidgetId) , Toast.LENGTH_LONG).show();

//prepare Alarm Service to trigger Widget
Intent intent = new Intent(HelloWidgetProvider.MY_WIDGET_UPDATE);
PendingIntent pendingIntent = PendingIntent.getBroadcast(HelloWidgetConfig.this, 0, intent, 0);
AlarmManager alarmManager = (AlarmManager)getSystemService(ALARM_SERVICE);
Calendar calendar = Calendar.getInstance();
calendar.setTimeInMillis(System.currentTimeMillis());
calendar.add(Calendar.SECOND, 10);
alarmManager.setRepeating(AlarmManager.RTC_WAKEUP, calendar.getTimeInMillis(), 20*1000, pendingIntent);

Intent resultValue = new Intent();
resultValue.putExtra(AppWidgetManager.EXTRA_APPWIDGET_ID, mAppWidgetId);
setResult(RESULT_OK, resultValue);
finish();
}};

}


Download the files.

Known Issues:
Please note that it's a simple exercise to implement App Widget using Alarm Manager, not a completed code. There are some issues:

- It's strongly recommanded that NOT to set Widget in such high repeating rate if not necessage, otherwise your battery will go low soon.

- The exercise haven't cancel the Alarm Service, it will not stop even all the Widget removed from Home Screen. (Refer to the article: Cancel Alarm Service in onDisabled()).

- There are no appWidgetManager and appWidgetId passed to onReceive() method, how to handle the individual Widget is another issue. (Refer to the article: Update Widget in onReceive() method).

Thursday, 14 October 2010

Schedule a repeating alarm

In the last exercise "A simple example of Alarm Service, using AlarmManager" implement a Alarm Service with a one shoot alarm. It will be modified here to have a repeating alarm in duration of 5 seconds.

Just modify the code alarmManager.set(AlarmManager.RTC_WAKEUP, calendar.getTimeInMillis(), pendingIntent) in AndroidAlarmService class to alarmManager.setRepeating(AlarmManager.RTC_WAKEUP, calendar.getTimeInMillis(), 5*1000, pendingIntent).

public void onClick(View arg0) {
// TODO Auto-generated method stub

Intent myIntent = new Intent(AndroidAlarmService.this, MyAlarmService.class);
pendingIntent = PendingIntent.getService(AndroidAlarmService.this, 0, myIntent, 0);

AlarmManager alarmManager = (AlarmManager)getSystemService(ALARM_SERVICE);

Calendar calendar = Calendar.getInstance();
calendar.setTimeInMillis(System.currentTimeMillis());
calendar.add(Calendar.SECOND, 10);
//alarmManager.set(AlarmManager.RTC_WAKEUP, calendar.getTimeInMillis(), pendingIntent);
alarmManager.setRepeating(AlarmManager.RTC_WAKEUP, calendar.getTimeInMillis(), 5*1000, pendingIntent);

Toast.makeText(AndroidAlarmService.this, "Start Alarm", Toast.LENGTH_LONG).show();
}});


public void setRepeating (int type, long triggerAtTime, long interval, PendingIntent operation), like set(int, long, PendingIntent), except you can also supply a rate at which the alarm will repeat.

Related article:
- App Widget using Alarm Manager

Wednesday, 13 October 2010

A simple example of Alarm Service, using AlarmManager

AlarmManager class provides access to the system alarm services. These allow you to schedule your application to be run at some point in the future. When an alarm goes off, the Intent that had been registered for it is broadcast by the system, automatically starting the target application if it is not already running.


In this exercise, a scheduled alarm of 10 seconds will start a service, MyAlarmService.


Modify main.xml to have two button to start and cancel the alarm.

<?xml version="1.0" encoding="utf-8"?>

<LinearLayout xmlns:android="http://schemas.android.com/apk/res/android"

android:orientation="vertical"

android:layout_width="fill_parent"

android:layout_height="fill_parent"

>

<TextView

android:layout_width="fill_parent"

android:layout_height="wrap_content"

android:text="@string/hello"

/>

<Button

android:id="@+id/startalarm"

android:layout_width="fill_parent"

android:layout_height="wrap_content"

android:text="Start"

/>

<Button

android:id="@+id/cancelalarm"

android:layout_width="fill_parent"

android:layout_height="wrap_content"

android:text="Cancel"

/>

</LinearLayout>


AndroidAlarmService.java, the main activity.

package com.exercise.AndroidAlarmService;


import java.util.Calendar;


import android.app.Activity;

import android.app.AlarmManager;

import android.app.PendingIntent;

import android.content.Intent;

import android.os.Bundle;

import android.os.SystemClock;

import android.view.View;

import android.widget.Button;

import android.widget.Toast;


public class AndroidAlarmService extends Activity {


private PendingIntent pendingIntent;


/** Called when the activity is first created. */

@Override

public void onCreate(Bundle savedInstanceState) {

super.onCreate(savedInstanceState);

setContentView(R.layout.main);

Button buttonStart = (Button)findViewById(R.id.startalarm);

Button buttonCancel = (Button)findViewById(R.id.cancelalarm);


buttonStart.setOnClickListener(new Button.OnClickListener(){


@Override

public void onClick(View arg0) {

// TODO Auto-generated method stub


Intent myIntent = new Intent(AndroidAlarmService.this, MyAlarmService.class);

pendingIntent = PendingIntent.getService(AndroidAlarmService.this, 0, myIntent, 0);


AlarmManager alarmManager = (AlarmManager)getSystemService(ALARM_SERVICE);


Calendar calendar = Calendar.getInstance();

calendar.setTimeInMillis(System.currentTimeMillis());

calendar.add(Calendar.SECOND, 10);

alarmManager.set(AlarmManager.RTC_WAKEUP, calendar.getTimeInMillis(), pendingIntent);


Toast.makeText(AndroidAlarmService.this, "Start Alarm", Toast.LENGTH_LONG).show();

}});


buttonCancel.setOnClickListener(new Button.OnClickListener(){


@Override

public void onClick(View arg0) {

// TODO Auto-generated method stub

AlarmManager alarmManager = (AlarmManager)getSystemService(ALARM_SERVICE);

alarmManager.cancel(pendingIntent);


// Tell the user about what we did.

Toast.makeText(AndroidAlarmService.this, "Cancel!", Toast.LENGTH_LONG).show();


}});


}

}


MyAlarmService.java, it will be started in 10 seconds triggered by AlarmManager

package com.exercise.AndroidAlarmService;


import android.app.Service;

import android.content.Intent;

import android.os.IBinder;

import android.widget.Toast;


public class MyAlarmService extends Service {


@Override

public void onCreate() {

// TODO Auto-generated method stub

Toast.makeText(this, "MyAlarmService.onCreate()", Toast.LENGTH_LONG).show();

}


@Override

public IBinder onBind(Intent intent) {

// TODO Auto-generated method stub

Toast.makeText(this, "MyAlarmService.onBind()", Toast.LENGTH_LONG).show();

return null;

}


@Override

public void onDestroy() {

// TODO Auto-generated method stub

super.onDestroy();

Toast.makeText(this, "MyAlarmService.onDestroy()", Toast.LENGTH_LONG).show();

}


@Override

public void onStart(Intent intent, int startId) {

// TODO Auto-generated method stub

super.onStart(intent, startId);

Toast.makeText(this, "MyAlarmService.onStart()", Toast.LENGTH_LONG).show();

}


@Override

public boolean onUnbind(Intent intent) {

// TODO Auto-generated method stub

Toast.makeText(this, "MyAlarmService.onUnbind()", Toast.LENGTH_LONG).show();

return super.onUnbind(intent);

}


}


Finally, modify AndroidManifest.xml to have our MyAlarmService listed as service.

<?xml version="1.0" encoding="utf-8"?>

<manifest xmlns:android="http://schemas.android.com/apk/res/android"

package="com.exercise.AndroidAlarmService"

android:versionCode="1"

android:versionName="1.0">

<application android:icon="@drawable/icon" android:label="@string/app_name">

<activity android:name=".AndroidAlarmService"

android:label="@string/app_name">

<intent-filter>

<action android:name="android.intent.action.MAIN" />

<category android:name="android.intent.category.LAUNCHER" />

</intent-filter>

</activity>

<service android:name=".MyAlarmService" />

</application>

<uses-sdk android:minSdkVersion="4" />


</manifest>


Download the project.


Related articles:


- Schedule a repeating alarm


- App Widget using Alarm Manager


- Send SMS in Alarm Service at a pre-defined time


- Using AlarmManager to start a Scheduled Activity


Sunday, 10 October 2010

Setting up a Mac 05: Programming Editors for the Mac

OS X pictureProgramming editors are next. There really are not a lot of options for the Mac if you are looking for lightweight, inexpensive and free tools.


Native Apps

TextMate - The best native programming editor for the Mac. It is shareware and costs �39 for a copy. But with an excellent set of features and good support, it is worth it.


Smultron - A good native open source editor. Nothing fancy, but a very solid editor. Currently, (as of 10/2010) the developer is not going to release any new versions.


Cross Platform

Komodo Edit - This is the free open source version of the Komodo IDE. But it still has a lot of features. Currently my favorite editor.


JEdit - An open source Java editor with a very active community working on it. Lots of plugins and useful features.


IDEs

NetBeans - The only tool I use for coding Java. It really can make things a lot easier.

Saturday, 9 October 2010

iPod Touch 8B118 Support

For those of you on iPod Touch 4 seeing UNKNOWN device in TinyUmbrella I've released an incremental update supporting the 8B118 firmware for iPod Touch 4. I've also fixed the PPC bouncing issue! (If reports are accurate :) ) Enjoy - and don't forget 10/10/10 10:10 ;)

Friday, 8 October 2010

greenpois0n - get a dose on 10/10/10

Chronic Dev will be releasing greenpois0n on 10/10. This JB will include iPhone 4, iPod Touch 4, and iPad. As of now, it will not include any other device due to the changes from previous devices' bootroms. I've been busy helping Chronic Dev Team and will continue working on TinyUmbrella once we've released greenpois0n.

(Thanks OPK for the killer artwork)

Setting up a Mac 04: Fixing the Terminal and Bash

OS X pictureBeing a command line junkie, I find the default bash shell settings on the Mac need a few tweaks. Only two files need to be changed, the bash login configuration file (.bash_profile) and the bash run control file (.bashrc). A good explanation of both can be found here.


.bash_profile

The only change here is to call the .bashrc file on the login.

. .bashrc


This will load the settings in the .bashrc file every time the login shell is executed.


.bashrc

Two things to do in this file. Colorize the ls command and change the command prompt.


alias ls='ls -G'

alias ll='ls -lG'


export PS1='\w \$ '


The -G option colorizes the results. The PS1 changes the command prompt to show only the current directory and the dollar sign. This gets rid of rather long default host name.


If you want to change the host name, go to the sharing preferences and change the Computer Name. Then you can leave the prompt like this:

export PS1='\h:\w \$ '

How to create sub-folder in SD Card, using Java code

How to create sub-folder in SD Card, using Java code

If you want to create sub-folder in SD Card using Java code, you can use the mkdir() method of java.io.File class.


ex.

String newFolder = "/myFolder2";
String extStorageDirectory = Environment.getExternalStorageDirectory().toString();
File myNewFolder = new File(extStorageDirectory + newFolder);
myNewFolder.mkdir();


And also, AndroidManifest.xml have to be modify to add permission of "android.permission.WRITE_EXTERNAL_STORAGE"
<?xml version="1.0" encoding="utf-8"?>
<manifest xmlns:android="http://schemas.android.com/apk/res/android"
package="com.exercise.AndroidNewFolder"
android:versionCode="1"
android:versionName="1.0">
<application android:icon="@drawable/icon" android:label="@string/app_name">
<activity android:name=".AndroidNewFolder"
android:label="@string/app_name">
<intent-filter>
<action android:name="android.intent.action.MAIN" />
<category android:name="android.intent.category.LAUNCHER" />
</intent-filter>
</activity>

</application>
<uses-sdk android:minSdkVersion="4" />
<uses-permission android:name="android.permission.WRITE_EXTERNAL_STORAGE" />
</manifest>


Related Article:
- Save file to SD Card
- How to create sub-folder in SD Card of Android Emulator, using adb

How to create sub-folder in SD Card of Android Emulator, using adb

If you want to create sub-folder in SD Card of Android Emulator, Android Debug Bridge(adb) can be used. Android Debug Bridge(adb) is a versatile tool lets you manage the state of an emulator instance or Android-powered device.


With Android Emulator running, start a Terminal (in Linux), switch to the <android sdk>/tools folder. type the command:

$./adb shell "mkdir /sdcard/myFolder"

where:
<android sdk> is the location of your installed android sdk.
myFolder is the folder you want to create.


Related article: Create SD Card in Android Emulator and copy files into, in Eclipse, Emulator and DDMS.

Thursday, 7 October 2010

Setting up a Mac 03: Web Browsers

OS X pictureThe first software I install is Web browsers. With the Mac, Safari is installed by default, so that is taken care of.


Firefox gets installed first, great for general web browsing and web development. The following addons are a must.


Flashblock - Prevents flash from running on a web page without your approval. Instead of flash, a flash icon is presented in a box where the flash would be. Click on the icon to load that flash element if your wish. The plugin prevents all those nasty CPU hogging flash ads from running. But just clicking allows you to run things like videos just fine.


Firebug - A web page debugger. A must for anyone developing a web site.


Chrome is next. Each tab has its own thread and runs really fast. Great for using Google sites too. There is also a FlashBlock for Chrome.


Lastly, SeaMonkey gets added. This is the real descendent of the old Netscape browser and uses the same rendering engine as Firefox. An integrated browser with built in mail and web page creation tool. In addition, this browser supports profiles. So if you have multiple Google accounts, for example, you can run a separate instance of the browser for each account.


For example, a shell script like this will run a new instance of the browser:


#!/bin/bash

/Applications/SeaMonkey.app/Contents/MacOS/seamonkey-bin -P profileName &

android.app.Service

android.app.Service is an application component representing either an application's desire to perform a longer-running operation while not interacting with the user or to supply functionality for other applications to use. Each service class must have a corresponding declaration in its package's AndroidManifest.xml. Services can be started with Context.startService() and Context.bindService(). (Ref: Service | Android Developers)

This exercise is a simple app with a dummy Local Service. Through the exercise, what can be noted are the life-cycle of a Service, how to link with Service with Start Service, Stop Service, Bind Service and Unbind Service, also the steps to implement the app with Service.

android.app.Service

Create a New Android Application as normal, with the main activity AndroidService.

Create a new class MyService extends Service. It's our service.
package com.exercise.AndroidService;

import android.app.Service;
import android.content.Intent;
import android.os.Binder;
import android.os.IBinder;
import android.widget.Toast;

public class MyService extends Service {

@Override
public IBinder onBind(Intent arg0) {
// TODO Auto-generated method stub
Toast.makeText(this,
"-MyService.onBind()-", Toast.LENGTH_LONG).show();
return null;
}

@Override
public void onCreate() {
// TODO Auto-generated method stub
Toast.makeText(this,
"-MyService.onCreate()-", Toast.LENGTH_LONG).show();
}

@Override
public void onDestroy() {
// TODO Auto-generated method stub
Toast.makeText(this,
"-MyService.onDestroy()-", Toast.LENGTH_LONG).show();
}

@Override
public void onRebind(Intent intent) {
// TODO Auto-generated method stub
Toast.makeText(this,
"-MyService.onRebind()-", Toast.LENGTH_LONG).show();
}

@Override
public void onStart(Intent intent, int startId) {
// TODO Auto-generated method stub
Toast.makeText(this,
"-MyService.onStart()-", Toast.LENGTH_LONG).show();
}

@Override
public boolean onUnbind(Intent intent) {
// TODO Auto-generated method stub
Toast.makeText(this,
"-MyService.onUnbind()-", Toast.LENGTH_LONG).show();
return false;
}

public class LocalBinder extends Binder{
MyService getService(){
return MyService.this;
}
}

}


Modify main.xml to have four button to involve our expected task, Start Service, Stop Service, Bind Service and Unbind Service.
<?xml version="1.0" encoding="utf-8"?>
<LinearLayout xmlns:android="http://schemas.android.com/apk/res/android"
android:orientation="vertical"
android:layout_width="fill_parent"
android:layout_height="fill_parent"
>
<TextView
android:layout_width="fill_parent"
android:layout_height="wrap_content"
android:text="@string/hello"
/>
<Button
android:id="@+id/startservice"
android:layout_width="fill_parent"
android:layout_height="wrap_content"
android:text="Start Service"
/>
<Button
android:id="@+id/stopservice"
android:layout_width="fill_parent"
android:layout_height="wrap_content"
android:text="Stop Service"
/>
<Button
android:id="@+id/bindservice"
android:layout_width="fill_parent"
android:layout_height="wrap_content"
android:text="Bind Service"
/>
<Button
android:id="@+id/unbindservice"
android:layout_width="fill_parent"
android:layout_height="wrap_content"
android:text="Unbind Service"
/>
</LinearLayout>


Modify the main activity, AndroidService.java.
package com.exercise.AndroidService;

import android.app.Activity;
import android.content.ComponentName;
import android.content.Context;
import android.content.Intent;
import android.content.ServiceConnection;
import android.os.Bundle;
import android.os.IBinder;
import android.view.View;
import android.widget.Button;
import android.widget.Toast;

public class AndroidService extends Activity {

private MyService myService;
private boolean serviceIsBinding;

/** Called when the activity is first created. */
@Override
public void onCreate(Bundle savedInstanceState) {
super.onCreate(savedInstanceState);
setContentView(R.layout.main);

Button buttonStartService = (Button)findViewById(R.id.startservice);
Button buttonStopService = (Button)findViewById(R.id.stopservice);
Button buttonBindService = (Button)findViewById(R.id.bindservice);
Button buttonUnbindService = (Button)findViewById(R.id.unbindservice);

buttonStartService.setOnClickListener(new Button.OnClickListener(){

@Override
public void onClick(View v) {
// TODO Auto-generated method stub
startService();
Toast.makeText(AndroidService.this,
"Start Service", Toast.LENGTH_LONG).show();
}});

buttonStopService.setOnClickListener(new Button.OnClickListener(){

@Override
public void onClick(View v) {
// TODO Auto-generated method stub
stopService();
Toast.makeText(AndroidService.this,
"Stop Service", Toast.LENGTH_LONG).show();
}});

buttonBindService.setOnClickListener(new Button.OnClickListener(){

@Override
public void onClick(View v) {
// TODO Auto-generated method stub
bindService();
Toast.makeText(AndroidService.this,
"Bind Service", Toast.LENGTH_LONG).show();
}});

buttonUnbindService.setOnClickListener(new Button.OnClickListener(){

@Override
public void onClick(View v) {
// TODO Auto-generated method stub
unbindService();
Toast.makeText(AndroidService.this,
"Unbind Service", Toast.LENGTH_LONG).show();
}});
}

private ServiceConnection serviceConnection = new ServiceConnection(){

@Override
public void onServiceConnected(ComponentName arg0, IBinder arg1) {
// TODO Auto-generated method stub
myService = ((MyService.LocalBinder)arg1).getService();
Toast.makeText(AndroidService.this,
"onServiceConnected()", Toast.LENGTH_LONG).show();
}

@Override
public void onServiceDisconnected(ComponentName arg0) {
// TODO Auto-generated method stub
myService = null;
Toast.makeText(AndroidService.this,
"onServiceDisconnected()", Toast.LENGTH_LONG).show();
}};

private void startService(){
Intent intentService = new Intent(this, MyService.class);
this.startService(intentService);
}

private void stopService(){
Intent intentService = new Intent(this, MyService.class);
this.stopService(intentService);
}

private void bindService(){
Intent intentService = new Intent(this, MyService.class);
bindService(intentService, serviceConnection, Context.BIND_AUTO_CREATE);
serviceIsBinding = true;
}

private void unbindService(){
if(serviceIsBinding){
unbindService(serviceConnection);
serviceIsBinding = false;
}
}
}

In with, ServiceConnection is the interface for monitoring the state of an application service.

Finally, modify AndroidManifest.xml to add the <service> element.
<?xml version="1.0" encoding="utf-8"?>
<manifest xmlns:android="http://schemas.android.com/apk/res/android"
package="com.exercise.AndroidService"
android:versionCode="1"
android:versionName="1.0">
<application android:icon="@drawable/icon" android:label="@string/app_name">
<activity android:name=".AndroidService"
android:label="@string/app_name">
<intent-filter>
<action android:name="android.intent.action.MAIN" />
<category android:name="android.intent.category.LAUNCHER" />
</intent-filter>
</activity>
<service android:enabled="true" android:name="MyService"></service>
</application>
<uses-sdk android:minSdkVersion="7" />

</manifest>


Download the files.

Wednesday, 6 October 2010

Setting up a Mac 02: Bootcamp

OS X pictureIf you want to dual boot your shiny new Mac, you will need to install Bootcamp. Not one program, but a number of programs on both OS X and Mac, Bootcamp makes switching between the two operating systems a snap. This note is not a comprehensive guide to bootcamp, there are lots of docs on that, but a few tips from my experience.


What You Need to Start

Before you start the install, you will need a few things.

  1. First, you need a copy of Windows 7. I recommend the 64 bit version as this is gonna work best in the long run. If you know what your are doing, consider getting the System Builders version, it will save you a little money. If you want tech support, get the standard version linked here.


  2. Next, you need a wired connection to your Internet. Once my installation was done, the Wifi for the MacBook Pro did not work under Windows initially. This is not required but definitely makes things go smoother.

  3. A mouse. After the initial install, the track pad did not work completely. No right click for example. A simple 3 button mouse makes things a lot easier.

Bootcamp Installation
To start the installation, open Spotlight (Command Spacebar) and type boot. This should provide a link to the Bootcamp Assistant. Click on that and the assistant will walk your through the setup on the Mac side.


When you partition the drive, I would recommend a minimum of 80gig of space. Bootcamp assistant will name the new partition BOOTCAMP making it easy to know which partition to format when you install Windows.


Bootcamp will have you insert the install disc and will reboot and start the installation.


Once Windows Starts

Once Windows starts up, you need to install the Windows Bootcamp utilities. You will find these on your OS X operating system disc. This contains all the drivers and utilities to make your Mac work on Windows. Just insert the disc and run the installer.


Once the installation is complete, you should have all the drivers for your Mac installed. In addition, there will be a Bootcamp app in the system tray of your Windows system. At this point, you can proceed with your Windows patching and software installation.

iPhone/iPad Top Apps on Web

iPhone iPad pictureOne thing I think the whole iPhone/iPad ecosystem lacks, is a really good web site for browsing apps. I don't know what anyone else thinks, but the iTunes store UI pretty much sucks.


Well to acknowledge a step in the right direction, it looks like Apple has added the top 100 paid and free apps to its web site. Nice! More of the same please Apple.


Top 100 Free Apps

Top 100 Paid Apps

Tuesday, 5 October 2010

Setting up a Mac 01: Initial Steps

OS X pictureThese steps are performed before doing any software installation or any real setup steps.


First, just turn on the machine. Choose your language, time zone and all that fun stuff. When prompted for select a user id, I recommend using something other than your first and last name for your account. It takes too long to type and its not all that secure.


Once everything boots up, select Software Update from the Apple menu. This should get the patching process started. Running this command one or two times should get you up to date. After this, you should be ready to start installing software.


One thing I ran into with the 17 MacBook Pro was the 1600 x 1200 screen resolution. Although this is great for screen real estate, the default font sizes were not so great for my 40 year old eyes. Very tiny. Amazingly, there is no way to change the default system font size in OS X 10.6 Snow Leopard. However, there is a work around. Check out TinkerTool. This is a simple app that allows you to change most of the system fonts for your account. However, it does not work on all of them.


One other tip. Because of the resolution issue, I'm zooming in and out of web pages a lot. This can be done on a Mac by pressing Command + and Command - to zoom in and out respectively.

Notes on updatePeriodMillis in Home App Widget

updatePeriodMillis in Widget Provider Information XML file define How often, in milliseconds, that this AppWidget wants to be updated. The AppWidget manager may place a limit on how often a AppWidget is updated.

If you tried and run the exercise in "A simple Home Screen App Widget with configure activity", it can be noted that:


- The updatePeriodMillis attribute defines how often the App Widget framework should request an update from the AppWidgetProvider by calling the onUpdate() method. The actual update is not guaranteed to occur exactly on time with this value. Refer "App Widget using Alarm Manager" to implement App Widget with higher rate.

- Updates requested with updatePeriodMillis will not be delivered more than once every 30 minutes.

- Only one updatePeriodMillis schedule will be managed for all instances of the App Widget. For example, if the update schedule is defined to be every two hours, and a second instance of the App Widget is added one hour after the first one, then they will both be updated on the period defined by the first one and the second update period will be ignored (they'll both be updated every two hours, not every hour).

Setting Up a New Machine Series

Internet IconI recently purchased a new MacBook Pro 17inch with a matte finish to use as my primary work machine. So over the next few days or weeks, I'm going to be posting on topics related to the setup of the machine.


Since OS X 10.6 comes with Bootcamp, not only can the setup of OS X be covered, but also the setup of Windows 7. So its like two for one. :)


Well I hope you enjoy it. More posts to come.

Monday, 4 October 2010

Ever want to Customize VIM?

Linux LogoHave you ever wanted to customize VIM but you have no idea where to begin? Check out: How I boosted my VIM


It will at least give you an idea of what you can do.

Sunday, 3 October 2010

TinyUmbrella New UI - Status Update

Sorry for the delays folks :) I've been trying to balance work, life, this, and our (Chronic-Dev Team) jailbreak. I've been trying to help out a bit with the team when possible so I've somewhat neglected my TinyUmbrella UI implementation. That said, @iOPK put together some awesome icons for me to use in TinyUmbrella for device detection/recent devices. Have a peek. I'm also going to be adding Socks / HTTP Proxy support for those few of you that have asked for it :)

A simple Home Screen App Widget with configure activity

In the former article "A simple Home Screen App Widget to get Date/Time", we have a very minimal widget: simple self-described as a widget with update duration, then update the widget with current time. In the exercise, no configure activity have been defined; such that the update() method of the provider activity will be call when add the widget in home screen, and when update period is reached.

In this exercise, a configure activity wil be implemented; the onCreate() method of the configure activity will be called when the widget is added on home screen. And also, the onUpdate() method of the HelloWidgetProvider cass (extends AppWidgetProvider) will be modified to handle each appWidgetIds separately.

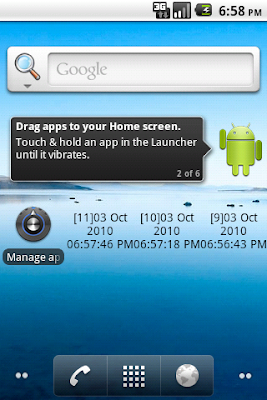
configure activity
The simple Home Screen App Widget

Modify onUpdate() of HelloWidgetProvider.java, and implemented updateAppWidget() method which will be called by onUpdate() and the new added configure activity.

onUpdate() includes a loop that iterates through each entry in appWidgetIds, which is an array of IDs that identify each App Widget created by this provider. In this way, if the user creates more than one instance of the App Widget, then they are all updated simultaneously.
package com.exercise.HelloWidget;

import java.text.SimpleDateFormat;
import java.util.Date;

import android.appwidget.AppWidgetManager;
import android.appwidget.AppWidgetProvider;
import android.content.Context;
import android.widget.RemoteViews;
import android.widget.Toast;

public class HelloWidgetProvider extends AppWidgetProvider {

private static SimpleDateFormat formatter = new SimpleDateFormat("dd MMM yyyy hh:mm:ss a");
static String strWidgetText = "";

@Override
public void onDeleted(Context context, int[] appWidgetIds) {
// TODO Auto-generated method stub
//super.onDeleted(context, appWidgetIds);
Toast.makeText(context, "onDeleted()", Toast.LENGTH_LONG).show();
}

@Override
public void onDisabled(Context context) {
// TODO Auto-generated method stub
//super.onDisabled(context);
Toast.makeText(context, "onDisabled()", Toast.LENGTH_LONG).show();
}

@Override
public void onEnabled(Context context) {
// TODO Auto-generated method stub
//super.onEnabled(context);
Toast.makeText(context, "onEnabled()", Toast.LENGTH_LONG).show();
}

@Override
public void onUpdate(Context context, AppWidgetManager appWidgetManager,
int[] appWidgetIds) {
// TODO Auto-generated method stub
super.onUpdate(context, appWidgetManager, appWidgetIds);

final int N = appWidgetIds.length;
for (int i=0; i<N; i++) {
int appWidgetId = appWidgetIds[i];
updateAppWidget(context, appWidgetManager, appWidgetId);

Toast.makeText(context, "onUpdate(): " + String.valueOf(i) + " : " + String.valueOf(appWidgetId), Toast.LENGTH_LONG).show();
}

}

public static void updateAppWidget(Context context, AppWidgetManager appWidgetManager,
int appWidgetId){
String currentTime = formatter.format(new Date());
strWidgetText = currentTime;

RemoteViews updateViews = new RemoteViews(context.getPackageName(), R.layout.hellowidget_layout);
updateViews.setTextViewText(R.id.widgettext, "[" + String.valueOf(appWidgetId) + "]" + strWidgetText);
appWidgetManager.updateAppWidget(appWidgetId, updateViews);

Toast.makeText(context, "updateAppWidget(): " + String.valueOf(appWidgetId) + "\n" + strWidgetText, Toast.LENGTH_LONG).show();

}

}


Implement /res/layout/config.xml which is the layout of the configure activity
<?xml version="1.0" encoding="utf-8"?>
<LinearLayout xmlns:android="http://schemas.android.com/apk/res/android"
android:orientation="vertical"
android:layout_width="fill_parent"
android:layout_height="fill_parent"
>
<TextView
android:layout_width="fill_parent"
android:layout_height="wrap_content"
android:text="@string/hello"
/>
<Button
android:id="@+id/okconfig"
android:layout_width="fill_parent"
android:layout_height="wrap_content"
android:text="OK"
/>
</LinearLayout>


Implement the configure activity, HelloWidgetConfig extends Activity. Actually, it do nothing except prompt the user to click on the OK button.
package com.exercise.HelloWidget;

import android.app.Activity;
import android.appwidget.AppWidgetManager;
import android.content.Context;
import android.content.Intent;
import android.os.Bundle;
import android.view.View;
import android.widget.Button;
import android.widget.Toast;

public class HelloWidgetConfig extends Activity {

Button configOkButton;
int mAppWidgetId = AppWidgetManager.INVALID_APPWIDGET_ID;

@Override
protected void onCreate(Bundle savedInstanceState) {
// TODO Auto-generated method stub
super.onCreate(savedInstanceState);

setResult(RESULT_CANCELED);

setContentView(R.layout.config);

configOkButton = (Button)findViewById(R.id.okconfig);
configOkButton.setOnClickListener(configOkButtonOnClickListener);

Intent intent = getIntent();
Bundle extras = intent.getExtras();
if (extras != null) {
mAppWidgetId = extras.getInt(
AppWidgetManager.EXTRA_APPWIDGET_ID,
AppWidgetManager.INVALID_APPWIDGET_ID);
}

// If they gave us an intent without the widget id, just bail.
if (mAppWidgetId == AppWidgetManager.INVALID_APPWIDGET_ID) {
finish();
}
}

private Button.OnClickListener configOkButtonOnClickListener
= new Button.OnClickListener(){

@Override
public void onClick(View arg0) {
// TODO Auto-generated method stub

final Context context = HelloWidgetConfig.this;

AppWidgetManager appWidgetManager = AppWidgetManager.getInstance(context);

//RemoteViews views = new RemoteViews(context.getPackageName(), R.layout.hellowidget_layout);
//appWidgetManager.updateAppWidget(mAppWidgetId, views);
HelloWidgetProvider.updateAppWidget(context, appWidgetManager, mAppWidgetId);

Toast.makeText(context, "HelloWidgetConfig.onClick(): " + String.valueOf(mAppWidgetId) , Toast.LENGTH_LONG).show();

Intent resultValue = new Intent();
resultValue.putExtra(AppWidgetManager.EXTRA_APPWIDGET_ID, mAppWidgetId);
setResult(RESULT_OK, resultValue);
finish();
}};

}


Modify hellowidgetproviderinfo.xml to include android:configure="com.exercise.HelloWidget.HelloWidgetConfig"
<appwidget-provider xmlns:android="http://schemas.android.com/apk/res/android"
android:minWidth="72dp"
android:minHeight="72dp"
android:updatePeriodMillis="1800000"
android:initialLayout="@layout/hellowidget_layout"
android:configure="com.exercise.HelloWidget.HelloWidgetConfig"
>
</appwidget-provider>


Modify AndroidManifest.xml to add HelloWidgetConfig as a activity with intent-filter of "android.appwidget.action.APPWIDGET_CONFIGURE".
<?xml version="1.0" encoding="utf-8"?>
<manifest xmlns:android="http://schemas.android.com/apk/res/android"
package="com.exercise.HelloWidget"
android:versionCode="1"
android:versionName="1.0">
<application android:icon="@drawable/icon" android:label="@string/app_name">
<receiver android:name="HelloWidgetProvider" >
<intent-filter>
<action android:name="android.appwidget.action.APPWIDGET_UPDATE" />
</intent-filter>
<meta-data android:name="android.appwidget.provider"
android:resource="@xml/hellowidgetproviderinfo" />
</receiver>
<activity android:name=".HelloWidgetConfig"
android:label="Hello Widget Config">
<intent-filter>
<action android:name="android.appwidget.action.APPWIDGET_CONFIGURE" />
</intent-filter>
</activity>
</application>
<uses-sdk android:minSdkVersion="7" />

</manifest>


Download the files.

Related Article:
- Notes on updatePeriodMillis in Home App Widget
- App Widget using Alarm Manager

Reference: Android Developers - App Widgets