Once you have created the disk image, you can copy files to it prior to loading it in the emulator. To copy files, you can mount the image as a loop device and then copy the files to it, or you can use a utility such as mtools to copy the files directly to the image. The mtools package is available for Linux, Mac, and Windows.
Here, I will mount and copy files to emulator SD Card as a loop device.
In Unix-like operating systems, a loop device, vnd (vnode disk), or lofi (loopback file interface) is a pseudo-device that makes a file accessible as a block device.
Create a directory, named SD in my home.
Type the command in Terminal:
$sudo mount -o loop /home/eric/.android/avd/my_avd_GoogleAPIs_1.5.avd/sdcard.img /home/eric/sd
Where /home/eric/sd is the directory mounted to be accessed.
/home/eric/.android/avd/my_avd_GoogleAPIs_1.5.avd/sdcard.img is the SDCard image created for Android Emulator.
Now, you can create directory, copy files to the emulator's SDCard by SD.
$cd sd
$sudo mkdir pictures
$cd pictures
$sudo cp /home/eric/SDCard_16M.png .
$...
To know more details of the command mount, type
$man mount
--------------------------------------------------------
it's another approach, Create SD Card in Android Emulator and copy files into, in Eclipse, Emulator and DDMS.
Saturday 29 August 2009
Create an SD Card to existing AVD
Here, I want to create an SD Card image to an AVD.
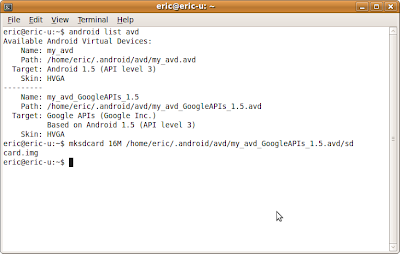
- Firstly, locate the path of your AVD, type the command in Terminal:
$android list avd
- Create a SDCard image, named "sdcard.img" (it's the default name for the emulator to load).
In my case, I want to add 16M SD Card to the /home/eric/.android/avd/my_avd_GoogleAPIs_1.5.avd.
$mksdcard 16M /home/eric/.android/avd/my_avd_GoogleAPIs_1.5.avd/sdcard.img
where /home/eric/.android/avd/my_avd_GoogleAPIs_1.5.avd/ is the path of my avd.
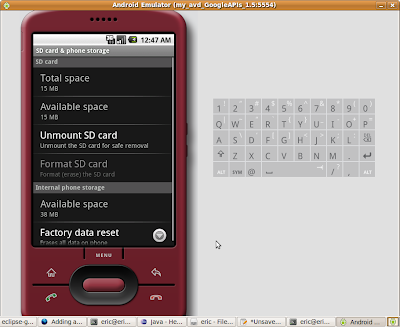
Restart the emulator, click Menu in Android Home screen, then click Settings > SD Card & phone storage. Now, you can see the SD Card here.
With 16M SD Card:
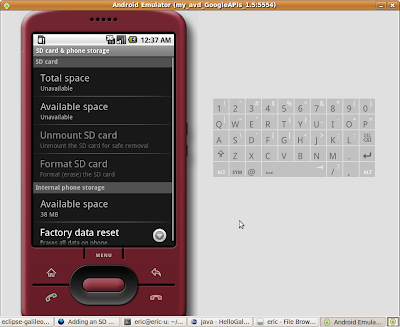
Without SD Card, before adding the SDCard image:
next >> Copying Files to a Disk Image
--------------------------------------------------------
it's another approach, Create SD Card in Android Emulator and copy files into, in Eclipse, Emulator and DDMS.
- Firstly, locate the path of your AVD, type the command in Terminal:
$android list avd
- Create a SDCard image, named "sdcard.img" (it's the default name for the emulator to load).
In my case, I want to add 16M SD Card to the /home/eric/.android/avd/my_avd_GoogleAPIs_1.5.avd.
$mksdcard 16M /home/eric/.android/avd/my_avd_GoogleAPIs_1.5.avd/sdcard.img
where /home/eric/.android/avd/my_avd_GoogleAPIs_1.5.avd/ is the path of my avd.

Restart the emulator, click Menu in Android Home screen, then click Settings > SD Card & phone storage. Now, you can see the SD Card here.
With 16M SD Card:

Without SD Card, before adding the SDCard image:

next >> Copying Files to a Disk Image
--------------------------------------------------------
it's another approach, Create SD Card in Android Emulator and copy files into, in Eclipse, Emulator and DDMS.
Wednesday 26 August 2009
A Way Back Moment
This is completely off topic. But I was listening to Pandora radio today and they played a Suzanne Vega tune. Now that really brings back the memories. I was a big fan (really like Marlene on the Wall) before she hit it big and saw her at the Paramount Theater in Denver in 1987. It was the first show where i sat in the first 10 rows. Well anyway, I ran across the story of Suzanne and her second husband. It was so cool, I had to share. They could make a movie out of that.
Getting Friendly with JQuery
Check out this cool JQuery intro: Getting Friendly with JQuery. Looks to be pretty detailed and useful. Lots of examples. Found via regator.com.
Tuesday 25 August 2009
Craigslist Profits
Found this tech dirt post on the craigslist in this months Wired. The interesting thing is that Craigslist is bringing in $100M a year with only 30 employees. Wowsers! That is pretty cool, just think of the year end bonuses! lol.
It the near term it seems like there will be a lot more small Net companies than big ones. It will take Google and Microsoft at least 20 years to buy them all. :)
Sunday 23 August 2009
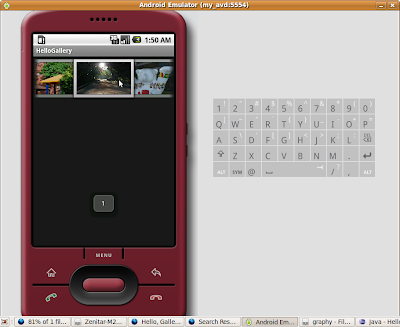
HelloGallery, using Gallery Widget.
Here is a exercise to implement a picture view using Gallery, a view that shows items in a center-locked, horizontally scrolling list.
Basically, this exercise follow the Android Tutorial, Hello Gallery. But in my practice, error is complained in building. I have to create a attrs.xml and modify some code to fix it.
Here is how I fix it to make it work.
Create a Android Application, HelloGallery. Copy some images, in .png format, into res/drawable/ directory. Named image_01..05.png in my case.
Android supports bitmap resource files in a few different formats: png (preferred), jpg (acceptable), gif (discouraged). The bitmap file itself is compiled and referenced by the file name without the extension (so res/drawable/my_picture.png would be referenced as R.drawable.my_picture).
Create res/values/attrs.xml to define Theme_android_galleryItemBackground.
Modify main.xml to have a Gallery in the screen.
Finally, modify the HelloGallery.java
 The project files, include some images for demo, can be downloaded here.
Next>>HelloGallery, read picture files from SD, using File ArrayList

Basically, this exercise follow the Android Tutorial, Hello Gallery. But in my practice, error is complained in building. I have to create a attrs.xml and modify some code to fix it.
Here is how I fix it to make it work.
Create a Android Application, HelloGallery. Copy some images, in .png format, into res/drawable/ directory. Named image_01..05.png in my case.
Android supports bitmap resource files in a few different formats: png (preferred), jpg (acceptable), gif (discouraged). The bitmap file itself is compiled and referenced by the file name without the extension (so res/drawable/my_picture.png would be referenced as R.drawable.my_picture).
Create res/values/attrs.xml to define Theme_android_galleryItemBackground.
<?xml version="1.0" encoding="utf-8"?>
<resources>
<declare-styleable name="Theme">
<attr name="android:galleryItemBackground" />
</declare-styleable>
</resources>
Modify main.xml to have a Gallery in the screen.
<?xml version="1.0" encoding="utf-8"?>
<Gallery xmlns:android="http://schemas.android.com/apk/res/android"
android:id="@+id/gallery"
android:layout_width="fill_parent"
android:layout_height="wrap_content"
/>
Finally, modify the HelloGallery.java
package com.exercise.HelloGallery;

import android.app.Activity;
import android.content.Context;
import android.content.res.TypedArray;
import android.os.Bundle;
import android.view.View;
import android.view.ViewGroup;
import android.widget.AdapterView;
import android.widget.BaseAdapter;
import android.widget.Gallery;
import android.widget.ImageView;
import android.widget.Toast;
import android.widget.AdapterView.OnItemClickListener;

public class HelloGallery extends Activity {
/** Called when the activity is first created. */
@Override
public void onCreate(Bundle savedInstanceState) {
   super.onCreate(savedInstanceState);
   setContentView(R.layout.main);

   Gallery g = (Gallery) findViewById(R.id.gallery);
   g.setAdapter(new ImageAdapter(this));

   g.setOnItemClickListener(new OnItemClickListener() {
       public void onItemClick(AdapterView<?> parent,
           View v, int position, long id) {
           Toast.makeText(HelloGallery.this, "" + position,
               Toast.LENGTH_SHORT).show();
       }
   });
}

public class ImageAdapter extends BaseAdapter {
   int mGalleryItemBackground;
   private Context mContext;

   private Integer[] mImageIds = {
           R.drawable.image_01,
           R.drawable.image_02,
           R.drawable.image_03,
           R.drawable.image_04,
           R.drawable.image_05
   };

   public ImageAdapter(Context c) {
       mContext = c;
       TypedArray a = obtainStyledAttributes(R.styleable.Theme);
       mGalleryItemBackground = a.getResourceId(
         R.styleable.Theme_android_galleryItemBackground,
                   0);
       a.recycle();
   }

   public int getCount() {
       return mImageIds.length;
   }

   public Object getItem(int position) {
       return position;
   }

   public long getItemId(int position) {
       return position;
   }

   public View getView(int position,
       View convertView, ViewGroup parent) {
       ImageView i = new ImageView(mContext);

       i.setImageResource(mImageIds[position]);
       i.setLayoutParams(new Gallery.LayoutParams(150, 100));
       i.setScaleType(ImageView.ScaleType.FIT_XY);
       i.setBackgroundResource(mGalleryItemBackground);

       return i;
   }
}
}
Next>>HelloGallery, read picture files from SD, using File ArrayList
live-android 0.3 released
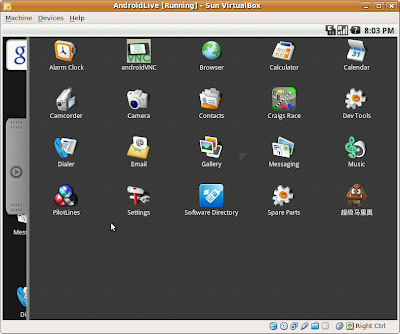
Want to give Google Android a try, but don't feel like buying a T-Mobile G1/G2/G3? LiveAndroid lets you download a LiveCD disc image of the Google Android operating system. Just burn the image to a disc, stick it in a CD-ROM drive, and reboot your computer and you can check out Android without installing it or affecting any files on your PC.
You can also use the disc image in a virtualization application like VirtualBox, VMWare or Microsoft Virtual PC if you want to try the operating system without even rebooting your computer.
v0.3 liveCD released on Aug 21, 2009
live-android 0.3 run on Sun VirtualBox 3.0.4.
Download
You can also use the disc image in a virtualization application like VirtualBox, VMWare or Microsoft Virtual PC if you want to try the operating system without even rebooting your computer.
v0.3 liveCD released on Aug 21, 2009
live-android 0.3 run on Sun VirtualBox 3.0.4.

Download
- LiveCD
- download
- liveandroidv0.3.iso.001 / liveandroidv0.3.iso.002 at http://code.google.com/p/live-android/downloads/list
- torrent at http://www.mininova.org/get/2870386
- join
- windows, use HJSplit(http://www.freebyte.com/hjsplit/ or http://www.freebytesoftware.com/download/hjsplit.zip) to join it. also use command COPY /B liveandroidv0.3.iso.001 + liveandroidv0.3.iso.002 liveandroidv0.3.iso
- linux, cat liveandroidv0.3.iso.001 liveandroidv0.3.iso.002 > liveandroidv0.3.iso
- size 173M
- check liveandroidv0.3.iso md5sum e0c5c305f78cd958dbaea3716c82296f
Saturday 22 August 2009
Obtaining a Maps API Key, for debug.
If you are looking for Obtain a Maps API Key for Your Signing Certificate, refer to the article here.
In order to make your Android Maps appliation run, your need a Maps API Key. Here describe a simple steps to obtain a Maps API Key, Details refer to Google document, Obtaining a Maps API Key.
Get your MD5 Fingerprint of the SDK Debug Certificate:
in Eclipse, select Windows > Prefs > Android > Build to check the full path of your MD5 Fingerprint.
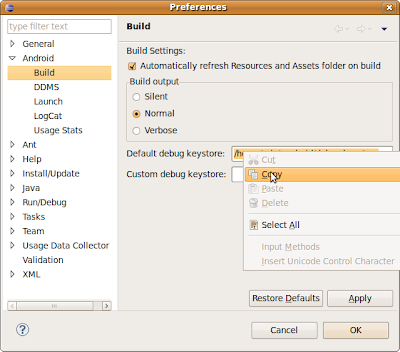
Open a Terminal, type the command:
$ keytool -list -alias androiddebugkey -keystore /home/eric/.android/debug.keystore -storepass android -keypass android
Where /home/eric/.android/debug.keystore is the Default Debug Keystore copied from Eclipse. Your MD5 fingerprint will be shown.
In order to obtain a Maps API Key, you need a Google account, log-in or register one.
Then, you Sign Up for the Android Maps API.
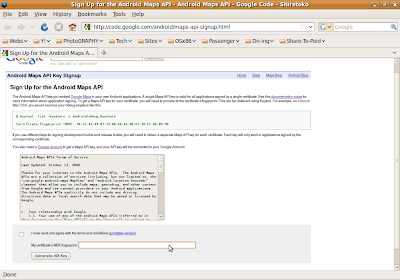
Accept the terms, paste the your MD5 fingerprint in the box, and generate your own API Key.
A minimal Map application using MapActivity, with Android 1.5 SDK r3.
OS: Ubuntu 9.04
Java: Sun JDK 6
Eclipse version: 3.5 Galileo
Android SDK: Android 1.5 SDK r3
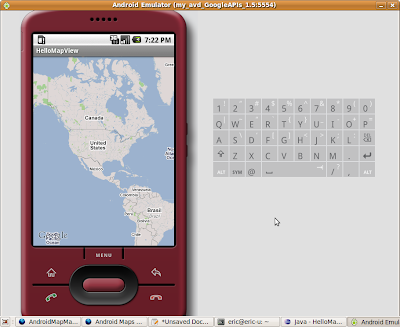
It's a very minimal Android Application to display MapView.
Actually, this exercise follow the tutorial, Hello, MapView, with more pictures to describe.
Create a Android Application HelloMapView.
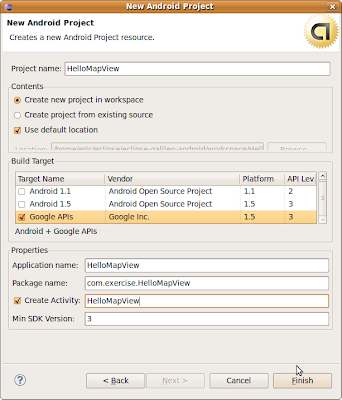
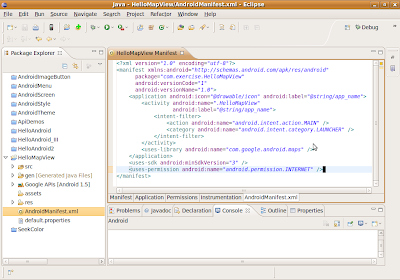
Modify AndroidManifest.xml:
Add <uses-library android:name="com.google.android.maps" /> as a child of the <application> element.
Add <uses-permission android:name="android.permission.INTERNET" /> a child of the <manifest> element.
Modify main.xml to add a MapView.
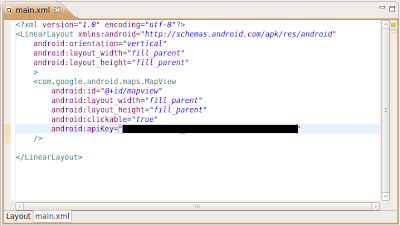
You have to Obtaining a Maps API Key, and insert into the field "apikey"
Modify HelloMapView to extends HelloMapView from MapActivity, and also override isRouteDisplayed().
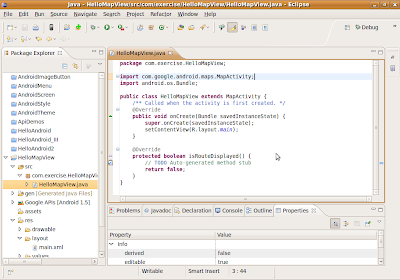
You can actually run this now, but all it does is allow you to pan around the map.
The project files can be downloaded here. Please note that you cannot run the application directly, you have to insert your own apikey, in order to make it work.
Java: Sun JDK 6
Eclipse version: 3.5 Galileo
Android SDK: Android 1.5 SDK r3
It's a very minimal Android Application to display MapView.
Actually, this exercise follow the tutorial, Hello, MapView, with more pictures to describe.
Create a Android Application HelloMapView.

Modify AndroidManifest.xml:
Add <uses-library android:name="com.google.android.maps" /> as a child of the <application> element.
Add <uses-permission android:name="android.permission.INTERNET" /> a child of the <manifest> element.

Modify main.xml to add a MapView.

You have to Obtaining a Maps API Key, and insert into the field "apikey"
Modify HelloMapView to extends HelloMapView from MapActivity, and also override isRouteDisplayed().

You can actually run this now, but all it does is allow you to pan around the map.

Friday 21 August 2009
Using Spaces a Lot More

Hey OS X fans out there. Did you know that Spaces automatically remembers which Space an application was opened in? And then when you click on that app, it automatically switches you to that Space? Sadly I did not and hadn't really used Spaces that much.
But as I work on my current course update. I have to switch between, Open Office, NetBeans, Finder, Preview, Web Browsers, Thunderbird. Spaces is amazingly good at reducing screen clutter. That auto jump feature really rocks. So if you were like me and mostly ignored Spaces, give it another look.
Blizzcon Coverage
Like me. Most folks are not able to make it to Blizzcon. However, there appears to be a number of options for following the event.
First off, we have a bunch of coverage from wow.com. First they have a wow.com blizzcon page for all blog posts Blizzcon. In addition, they will have multiple people tweeting at the conference. All their coverage is detailed in this post.
If you want to participate in the conversation, check out #blizzcon on twitter. The other day I stumbled across twubs.com which is a site that compiles all those hashtags into a nice easy to follow stream. Want to see what people are saying about #blizzcon? Check out the #blizzcon twitter feed here.
I spurlged on the Direct TV HD feed so my DVR will be happily recording everything. Yay!
Exercise: Change background color, by SeekBar

In this exercise, the background color is changed, controlled by SeekBar.
A SeekBar is an extension of ProgressBar that adds a draggable thumb. The user can touch the thumb and drag left or right to set the current progress level or use the arrow keys.
When SeekBarChange, the onProgressChanged() of OnSeekBarChangeListener will be called, and the background of the screen(LinearLayout) will be updated according to the value (SeekBar.getProgress()).
Create a Android Application, SeekColor, with three SeekBar for Red, Green and Blue setting.
main.xml
<?xml version="1.0" encoding="utf-8"?>
<LinearLayout xmlns:android="http://schemas.android.com/apk/res/android"
android:orientation="vertical"
android:layout_width="fill_parent"
android:layout_height="fill_parent"
android:id="@+id/myScreen"
>
<TextView
android:layout_width="fill_parent"
android:layout_height="wrap_content"
android:text="@string/hello"
/>
<SeekBar
android:id="@+id/mySeekingBar_R"
    android:layout_width="fill_parent"
    android:layout_height="wrap_content"
    android:max="255"
    android:progress="0"/>
<SeekBar
android:id="@+id/mySeekingBar_G"
    android:layout_width="fill_parent"
    android:layout_height="wrap_content"
    android:max="255"
    android:progress="0"/>
<SeekBar
android:id="@+id/mySeekingBar_B"
    android:layout_width="fill_parent"
    android:layout_height="wrap_content"
    android:max="255"
    android:progress="0"/>
</LinearLayout>
SeekColorActivity.java
package com.exercise.seekcolor;

import android.app.Activity;
import android.os.Bundle;
import android.widget.LinearLayout;
import android.widget.SeekBar;

public class SeekColorActivity extends Activity {

private int seekR, seekG, seekB;
SeekBar redSeekBar, greenSeekBar, blueSeekBar;
LinearLayout mScreen;

/** Called when the activity is first created. */
@Override
public void onCreate(Bundle savedInstanceState) {
    super.onCreate(savedInstanceState);
    setContentView(R.layout.main);

    mScreen = (LinearLayout) findViewById(R.id.myScreen);
    redSeekBar = (SeekBar) findViewById(R.id.mySeekingBar_R);
    greenSeekBar = (SeekBar) findViewById(R.id.mySeekingBar_G);
    blueSeekBar = (SeekBar) findViewById(R.id.mySeekingBar_B);
    updateBackground();

    redSeekBar.setOnSeekBarChangeListener(seekBarChangeListener);
    greenSeekBar.setOnSeekBarChangeListener(seekBarChangeListener);
    blueSeekBar.setOnSeekBarChangeListener(seekBarChangeListener);

}

private SeekBar.OnSeekBarChangeListener seekBarChangeListener
= new SeekBar.OnSeekBarChangeListener()
{

@Override
public void onProgressChanged(SeekBar seekBar, int progress,
  boolean fromUser) {
// TODO Auto-generated method stub
 updateBackground();
}
@Override
public void onStartTrackingTouch(SeekBar seekBar) {
// TODO Auto-generated method stub
}

@Override
public void onStopTrackingTouch(SeekBar seekBar) {
// TODO Auto-generated method stub
}
};

private void updateBackground()
{
 seekR = redSeekBar.getProgress();
 seekG = greenSeekBar.getProgress();
 seekB = blueSeekBar.getProgress();
 mScreen.setBackgroundColor(
  0xff000000
  + seekR * 0x10000
  + seekG * 0x100
  + seekB
  );
}
}
Wednesday 19 August 2009
Thanks a LOT Craig Davey!
[sarcasm on]All I can say is thanks a lot Craig Davey! Way to set the bar too high for the rest of us! I ran across this post on the 37signals blog announcing their latest new hire. Not only does he make this wonderfully sharp job application. He then has the gall to link to this portfolio of wonderfully designed web sites he has worked on. All the symmetry and tasteful color schemes make me sick. How is my paper resume gonna compete with this! What will become of inflated resumes when folks start proving they have talent! I guess I'm gonna have to take off the 25 years of J2EE experience bullet off mine. /sigh. Thanks a lot Craig. Way to ruin paper resumes forever.[sarcasm off]
Had to put the sarcasm filters on. I have found posting on forums recently that if I don't, only about 50% of the folks get the joke. So it is best to avoid a bunch of "why are you hating on Craig" comments if possible. :)
It does make one rethink whether a paper resume is enough anymore. Also, note how the 37signals guys "interview" someone. They actually work with the person for a few weeks. I can't think of a better way to find out if the person can do the job and if the person fits into the team. Cool stuff.
Tuesday 18 August 2009
Next Linux to Try

Is this the next Linux I should try? Check out this review of Linux Mint. (Found via digg)
Since this distro is based on Ubuntu, I keep a lot of the neat features I like about that distro. It appears that Mint is mainly a project to improve the UI and media features. Definitely worth checking out.
Sunday 16 August 2009
Basic Gaming Machine From Scratch
AMD Computer Build
I am planning to build a basic gaming machine from scratch. Some friends wanted me to post the part list I came up with. So here goes:
- Case - Coolmaster Centurion $50
- Motherboard - AMD AM3 ATX Asus M4A78 Plus $80
- CPU - AMD Athlon Dual Core AM3 65W $66
- Memory - 4 GB Cosair DDR 2 800 $63
- HDD - WD Caviar Blue SATA 500GB $55
- CD/DVD - Sony Optiarc SATA CD/DVD $26
- Power Supply - Apevia 500W $40
- Video Card - Sapphire Radeon 4600 $55
Total Price $435
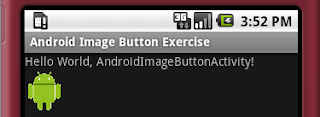
Exercise: Load background to ImageButton, in programmatical approach
In addition to "Load background to ImageButton, using XML", Android support programmatic approach also, using setImageResource().
In this exercise, I implement ImageButton.setOnFocusChangeListener() and ImageButton.setOnClickListener() to handle the background image of the ImageButton. The outcome is same as the "Load background to ImageButton, using XML".


Download and save the three image above to res > drawable folder.
Add a ImageButton in main.xml
Modify the source code to implement setOnFocusChangeListener() and setOnClickListener()
In this exercise, I implement ImageButton.setOnFocusChangeListener() and ImageButton.setOnClickListener() to handle the background image of the ImageButton. The outcome is same as the "Load background to ImageButton, using XML".


Download and save the three image above to res > drawable folder.
Add a ImageButton in main.xml
<?xml version="1.0" encoding="utf-8"?>
<LinearLayout xmlns:android="http://schemas.android.com/apk/res/android"
   android:orientation="vertical"
   android:layout_width="fill_parent"
   android:layout_height="fill_parent"
   >
<TextView
   android:layout_width="fill_parent"
   android:layout_height="wrap_content"
   android:text="@string/hello"
   />
<ImageButton
    android:id="@+id/myImageButton"
    android:layout_width="wrap_content"
    android:layout_height="wrap_content"
    android:background="@drawable/android"
    />
</LinearLayout>
Modify the source code to implement setOnFocusChangeListener() and setOnClickListener()
package com.exercise.AndroidImageButton;

import android.app.Activity;
import android.os.Bundle;
import android.view.View;
import android.view.View.OnClickListener;
import android.view.View.OnFocusChangeListener;
import android.widget.ImageButton;

public class AndroidImageButtonActivity extends Activity {

  private ImageButton mImageButton;

  /** Called when the activity is first created. */
  @Override
  public void onCreate(Bundle savedInstanceState) {
    super.onCreate(savedInstanceState);
    setContentView(R.layout.main);

    mImageButton = (ImageButton) findViewById(R.id.myImageButton);

    mImageButton.setOnFocusChangeListener(
      new OnFocusChangeListener()
       {
   @Override
   public void onFocusChange(View v, boolean hasFocus) {
   // TODO Auto-generated method stub
   if (hasFocus==true)
   {
      mImageButton.setImageResource(R.drawable.androidonfocus);
   }
   else
   {
      mImageButton.setImageResource(R.drawable.android);
   }
 }
     });

     mImageButton.setOnClickListener(
       new OnClickListener() {
   @Override
   public void onClick(View v) {
   // TODO Auto-generated method stub
   mImageButton.setImageResource(R.drawable.androidonclick);
 }
     });
   }
}
Exercise: Load background to ImageButton, using XML
Default of ImageButton:
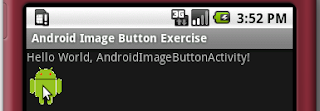
Button On Focus:
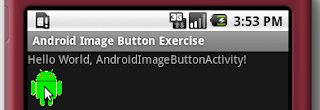
Button On Click:
The backgound of ImageButton can be defined in main.xml, without any works on programming.
Download and save the three image above to res > drawable folder.
Create a loadimagebutton.xml in res > drawable folder.
Modify main.xml to involve loadimagebutton
(To achieve the same out-come using programmatical approach, refer to the next article, Exercise: Load background to ImageButton, in programmatical approach.)

Button On Focus:

Button On Click:

The backgound of ImageButton can be defined in main.xml, without any works on programming.
Download and save the three image above to res > drawable folder.
Create a loadimagebutton.xml in res > drawable folder.
<?xml version="1.0" encoding="utf-8"?>
<selector
xmlns:android="http://schemas.android.com/apk/res/android">
<item
 android:state_focused="true"
 android:state_pressed="false"
 android:drawable="@drawable/androidonfocus" />
<item
 android:state_focused="true"
 android:state_pressed="true"
 android:drawable="@drawable/androidonclick" />
<item
 android:state_focused="false"
 android:state_pressed="true"
 android:drawable="@drawable/androidonclick" />
<item
 android:drawable="@drawable/android" />
</selector>
Modify main.xml to involve loadimagebutton
<?xml version="1.0" encoding="utf-8"?>
<LinearLayout xmlns:android="http://schemas.android.com/apk/res/android"
android:orientation="vertical"
android:layout_width="fill_parent"
android:layout_height="fill_parent"
>
<TextView
android:layout_width="fill_parent"
android:layout_height="wrap_content"
android:text="@string/hello"
/>
<ImageButton
    android:background="@drawable/loadimagebutton"
    android:layout_width="wrap_content"
    android:layout_height="wrap_content"
    />
</LinearLayout>
(To achieve the same out-come using programmatical approach, refer to the next article, Exercise: Load background to ImageButton, in programmatical approach.)
Friday 14 August 2009
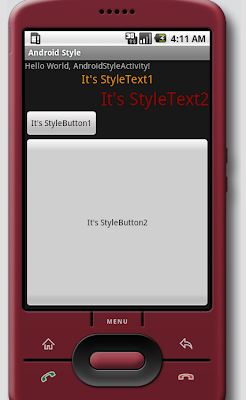
Exercise: style
A style is a set of one or more formatting attributes that you can apply as a unit to single elements in your layout XML file(s). For example, you could define a style that specifies a certain text size and color, then apply it to instances of a certain type of View element.
details>>
Create a dummy Android Application, AndroidStyle. Create style.xml in the folder res > values
Modify main.xml to apply the styles.
details>>
Create a dummy Android Application, AndroidStyle. Create style.xml in the folder res > values
<?xml version="1.0" encoding="utf-8"?>
<resources>
 <style name="StyleText1">
     <item name="android:textSize">20sp</item>
     <item name="android:textColor">#EC9200</item>
     <item name="android:gravity">center_horizontal</item>

 </style>
 <style name="StyleText2">
     <item name="android:textSize">30sp</item>
     <item name="android:textColor">#990000</item>
     <item name="android:gravity">right</item>
 </style>
 <style name="StyleButton1">
     <item name="android:layout_width">wrap_content</item>
     <item name="android:layout_height">wrap_content</item>
 </style>
 <style name="StyleButton2">
     <item name="android:layout_width">fill_parent</item>
     <item name="android:layout_height">fill_parent</item>
 </style>
</resources>
Modify main.xml to apply the styles.
<?xml version="1.0" encoding="utf-8"?>
<LinearLayout xmlns:android="http://schemas.android.com/apk/res/android"
 android:orientation="vertical"
 android:layout_width="fill_parent"
 android:layout_height="fill_parent"
 >
<TextView
 android:layout_width="fill_parent"
 android:layout_height="wrap_content"
 android:text="@string/hello"
 />
<TextView
 style="@style/StyleText1"
 android:layout_width="fill_parent"
 android:layout_height="wrap_content"
 android:text="It's StyleText1"
 />
<TextView
 style="@style/StyleText2"
 android:layout_width="fill_parent"
 android:layout_height="wrap_content"
 android:text="It's StyleText2"
 />
<Button
 style="@style/StyleButton1"
 android:text="It's StyleButton1"
 />
<Button
 style="@style/StyleButton2"
 android:text="It's StyleButton2"
 />
</LinearLayout>

Thursday 13 August 2009
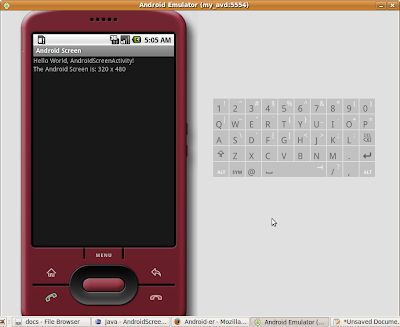
Exercise: Get screen resolution using android.util.DisplayMetrics
android.util.DisplayMetrics is a structure describing general information about a display, such as its size, density, and font scaling.
To use android.util.DisplayMetrics to get resolution:
Create a dummy Android Application, add a TextView in main.xml to display the result.
<TextView
android:id="@+id/strScreenSize"
android:layout_width="fill_parent"
android:layout_height="wrap_content"
android:text=""
/>
Modify the .java file to read DisplayMetrics
Related Post:
- Get screen size in DPI
To use android.util.DisplayMetrics to get resolution:
Create a dummy Android Application, add a TextView in main.xml to display the result.
<TextView
android:id="@+id/strScreenSize"
android:layout_width="fill_parent"
android:layout_height="wrap_content"
android:text=""
/>
Modify the .java file to read DisplayMetrics
package com.exercise.AndroidScreen;

import android.app.Activity;
import android.os.Bundle;
import android.util.DisplayMetrics;
import android.widget.TextView;

public class AndroidScreenActivity extends Activity {
 /** Called when the activity is first created. */
 @Override
 public void onCreate(Bundle savedInstanceState) {
     super.onCreate(savedInstanceState);
     setContentView(R.layout.main);

        DisplayMetrics dm = new DisplayMetrics();
        getWindowManager().getDefaultDisplay().getMetrics(dm);
        String str_ScreenSize = "The Android Screen is: "
                    + dm.widthPixels
                    + " x "
                    + dm.heightPixels;

        TextView mScreenSize = (TextView) findViewById(R.id.strScreenSize);
        mScreenSize.setText(str_ScreenSize);
 }
}

Related Post:
- Get screen size in DPI
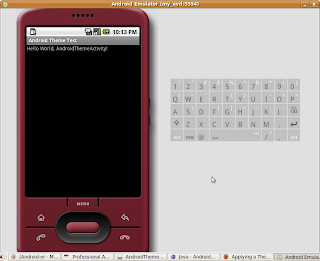
Exercise: Apply Theme in AndroidManifest.xml
Android provide some predefine themes in the base package, you can change the theme by adding a code in the file AndroidManifest.xml.
Inside Application tag to take effect on whole Application.
Or,
Inside Activity tag to take effect on individual Activity.
@android:style/Theme.Black
@android:style/Theme.Light
@android:style/Theme.Translucent
Inside Application tag to take effect on whole Application.
<?xml version="1.0" encoding="utf-8"?>
<manifest xmlns:android="http://schemas.android.com/apk/res/android"
 package="com.exercise.AndroidTheme"
 android:versionCode="1"
 android:versionName="1.0">
<application android:icon="@drawable/icon" android:label="@string/app_name"
 android:theme="@android:style/Theme.Black"
 >
   <activity android:name=".AndroidThemeActivity"
             android:label="@string/app_name">
       <intent-filter>
           <action android:name="android.intent.action.MAIN" />
           <category android:name="android.intent.category.LAUNCHER" />
       </intent-filter>
   </activity>
</application>
<uses-sdk android:minSdkVersion="2" />
</manifest>
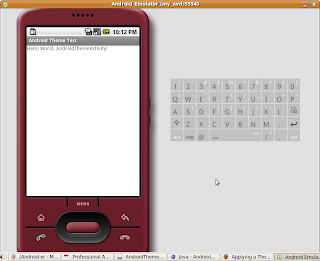
Or,
Inside Activity tag to take effect on individual Activity.
<?xml version="1.0" encoding="utf-8"?>
<manifest xmlns:android="http://schemas.android.com/apk/res/android"
  package="com.exercise.AndroidTheme"
  android:versionCode="1"
  android:versionName="1.0">
<application android:icon="@drawable/icon" android:label="@string/app_name"
 >
    <activity android:name=".AndroidThemeActivity"
              android:label="@string/app_name"
              android:theme="@android:style/Theme.Light"
              >
        <intent-filter>
            <action android:name="android.intent.action.MAIN" />
            <category android:name="android.intent.category.LAUNCHER" />
        </intent-filter>
    </activity>
</application>
<uses-sdk android:minSdkVersion="2" />
</manifest>
@android:style/Theme.Black

@android:style/Theme.Light

@android:style/Theme.Translucent
Wednesday 12 August 2009
Hitler Not Pleased with FriendFeed Acquisition
Check out this post on TechCrunch. Someone took an old Hitler movie and redid the subtitles to comment on the Facebook acquisition of FriendFeed. Too funny!
Tuesday 11 August 2009
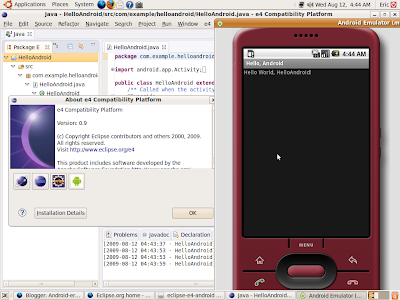
An early alpha release of e4, the next generation of the Eclipse platform, is now available.
An early alpha release of e4, the next generation of the Eclipse platform, is now available.
The mission of the e4 project is to build a next generation platform for pervasive, component-based applications and tools. See the about page as well as the original project proposal for more details.
I tried to install, with ADT and Android SDK. And also tried Hello Android. It seem to be compatible. The install procedure is same as Install Android SDK on Eclipse 3.5 Galileo.

Simple steps to change the drawable icon with Transparency background using GIMP
 In the Exercise: Add a icon on Dialog, the background of android icon is in white. It can be removed to be transparency using GIMP.
Open the android.png in GIMP.
Select Fuzzy Select Tool.

Click on the background of the icon.

Click Select > Invert to select the foreground image.
Click Edit > Copy to copy the select image to clipboard.
Close the original file.
Click File > New to create a new image
Expend the Advanced Options in the Create a New Image dialog.
Select Transparency in the Fill with option, and click OK.

Click Edit > Paste to paste the copied image as the foreground.

Run the Android Application again, the background have been changed to transparency now.
Monday 10 August 2009
Exercise: Add a icon on Dialog
Extends from the previous exercise, Exercise: Menu and Dialog. A icon will be added on the About me Dialog, as shown:
Save the icon, , in the folder res/drawable.
Add one line in the openOptionsDialog() class:
Next: Simple steps to change the drawable icon with Transparency background using GIMP

Save the icon,
 , in the folder res/drawable.
Add one line in the openOptionsDialog() class:
private void openOptionsDialog()
{
new AlertDialog.Builder(this)
.setTitle(R.string.app_about)
.setIcon(R.drawable.android)
.setMessage(R.string.app_about_message)
.setPositiveButton(R.string.str_ok,
new DialogInterface.OnClickListener()
{
public void onClick(DialogInterface dialoginterface, int i)
{
}
})
.show();
}
Next: Simple steps to change the drawable icon with Transparency background using GIMP
Saturday 8 August 2009
Exercise: Menu and Dialog
In this article, option menu and dialog will be added to Android Application.
The project files can be downloaded here.
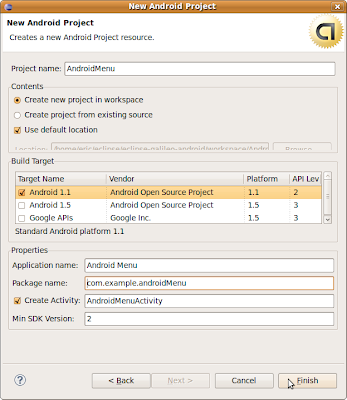
Create a new Android Application with the following setting:
Project name: AndroidMenu
Application name: Android Menu
Package name: com.example.androidMenu
Create Activity: AndroidMenuActivity
Min SDK Version: 2
Use the technique described in the article, Tips and Tricks in using Eclipse: Override a method from a base class, to insert methods onCreateOptionsMenu and onOptionsItemSelected.
Right click on the Source Code Editor and invoke Source > Override/Implement Methods.
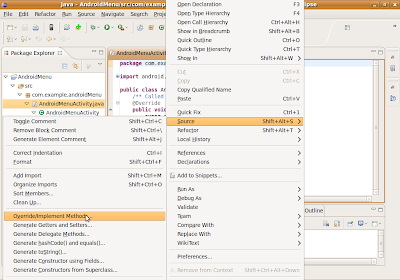
Find and select onCreateOptionsMenu and onOptionsItemSelected, select the insertion position, and click OK.
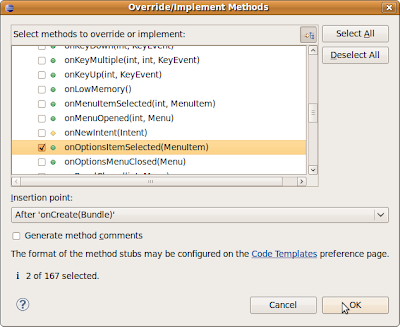
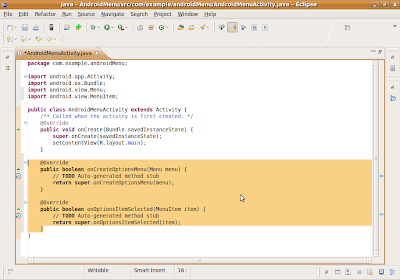
The selected methods will be inserted with dummy code, the need files, android.view.Menu and android.view.MenuItem, will be imported also.
We have to add string constane in the string.xml file.
Modify R.string in res>values>string.xml, add the items:
<string name="app_about">About Me</string>
<string name="str_exit">Exit</string>
<string name="app_about_message">Android Menu</string>
<string name="str_ok">OK</string>
<string name="app_exit">Exit</string>
<string name="app_exit_message">Exit?</string>
<string name="str_no">No</string>
Modify onCreateOptionsMenu(Menu menu), onOptionsItemSelected(MenuItem item) and implement openOptionsDialog() and exitOptionsDialog().
In order to use AlertDialog, DialogInterface, two more classes have to be imported:
import android.app.AlertDialog;
import android.content.DialogInterface;
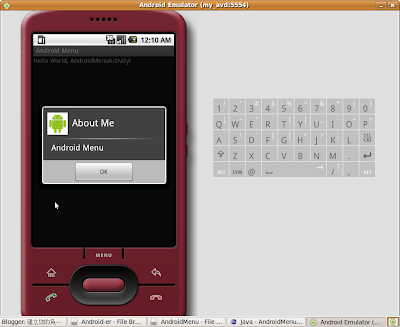
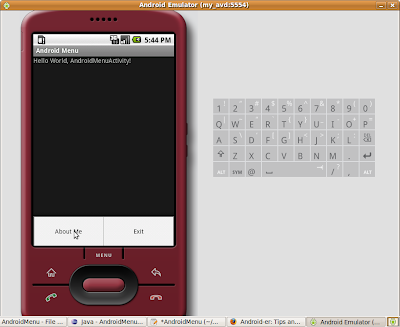
Run the application, click the MENU button, two Menu Option, About Me and Exit, will be displayed.
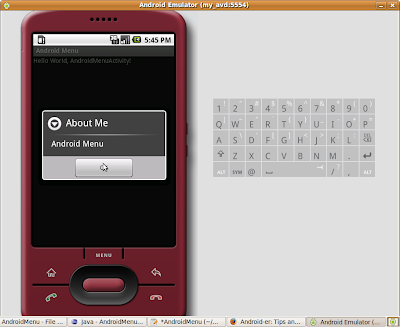
 Click About Me will show the About Me dialog
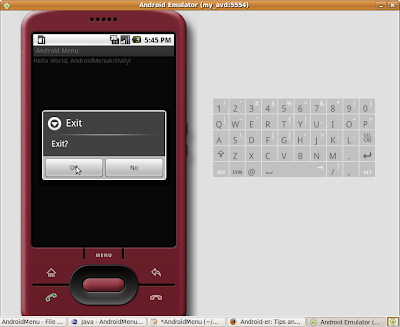
 Click Exit will show a Exit dialog asking to confirm exit.
The project files can be downloaded here.
Create a new Android Application with the following setting:
Project name: AndroidMenu
Application name: Android Menu
Package name: com.example.androidMenu
Create Activity: AndroidMenuActivity
Min SDK Version: 2

Use the technique described in the article, Tips and Tricks in using Eclipse: Override a method from a base class, to insert methods onCreateOptionsMenu and onOptionsItemSelected.
Right click on the Source Code Editor and invoke Source > Override/Implement Methods.

Find and select onCreateOptionsMenu and onOptionsItemSelected, select the insertion position, and click OK.

The selected methods will be inserted with dummy code, the need files, android.view.Menu and android.view.MenuItem, will be imported also.

We have to add string constane in the string.xml file.
Modify R.string in res>values>string.xml, add the items:
<string name="app_about">About Me</string>
<string name="str_exit">Exit</string>
<string name="app_about_message">Android Menu</string>
<string name="str_ok">OK</string>
<string name="app_exit">Exit</string>
<string name="app_exit_message">Exit?</string>
<string name="str_no">No</string>
Modify onCreateOptionsMenu(Menu menu), onOptionsItemSelected(MenuItem item) and implement openOptionsDialog() and exitOptionsDialog().
@Override
public boolean onCreateOptionsMenu(Menu menu) {
// TODO Auto-generated method stub
menu.add(0, 0, 0, R.string.app_about);
menu.add(0, 1, 1, R.string.str_exit);
return super.onCreateOptionsMenu(menu);
}
@Override
public boolean onOptionsItemSelected(MenuItem item) {
// TODO Auto-generated method stub
super.onOptionsItemSelected(item);

switch(item.getItemId())
{
case 0:
openOptionsDialog();
break;
case 1:
exitOptionsDialog();
break;
}
return true;
}
private void openOptionsDialog()
{
new AlertDialog.Builder(this)
.setTitle(R.string.app_about)
.setMessage(R.string.app_about_message)
.setPositiveButton(R.string.str_ok,
new DialogInterface.OnClickListener()
{
public void onClick(DialogInterface dialoginterface, int i)
{
}
})
.show();
}
private void exitOptionsDialog()
{
new AlertDialog.Builder(this)
.setTitle(R.string.app_exit)
.setMessage(R.string.app_exit_message)
.setNegativeButton(R.string.str_no,
new DialogInterface.OnClickListener()
{
public void onClick(DialogInterface dialoginterface, int i)
{}
})
.setPositiveButton(R.string.str_ok,
new DialogInterface.OnClickListener()
{
public void onClick(DialogInterface dialoginterface, int i)
{
 finish();
}
})
.show();
}
In order to use AlertDialog, DialogInterface, two more classes have to be imported:
import android.app.AlertDialog;
import android.content.DialogInterface;
Run the application, click the MENU button, two Menu Option, About Me and Exit, will be displayed.
 Click About Me will show the About Me dialog
 Click Exit will show a Exit dialog asking to confirm exit.
Subscribe to:
Posts (Atom)