Monday 31 January 2011

Using CSS to Style for Web and Mobile

CSS ButtonFound this post on bloop.co on how to style a site for desktop and mobile form factors. One set of CSS handles several different form factors. I can't say I understand all it, but I am excited to learn more. :)


So want to learn what a CSS Media Query is? Check out this tutorial on CSS Tricks.

Get Light Sensor of Android device

Get Light Sensor of HTC wildfire

package com.exercise.AndroidLightSensor;

import android.app.Activity;
import android.content.Context;
import android.hardware.Sensor;
import android.hardware.SensorManager;
import android.os.Bundle;
import android.widget.TextView;

public class AndroidLightSensor extends Activity {

SensorManager mySensorManager;
Sensor myLightSensor;

/** Called when the activity is first created. */
@Override
public void onCreate(Bundle savedInstanceState) {

super.onCreate(savedInstanceState);
setContentView(R.layout.main);
TextView textLightSensor = (TextView)findViewById(R.id.lightsensor);

mySensorManager = (SensorManager)getSystemService(Context.SENSOR_SERVICE);
myLightSensor = mySensorManager.getDefaultSensor(Sensor.TYPE_LIGHT);

if (myLightSensor == null){
textLightSensor.setText("No Light Sensor!");
}else{
textLightSensor.setText(myLightSensor.getName());
}
}
}


layout
<?xml version="1.0" encoding="utf-8"?>
<LinearLayout xmlns:android="http://schemas.android.com/apk/res/android"
android:orientation="vertical"
android:layout_width="fill_parent"
android:layout_height="fill_parent"
>
<TextView
android:layout_width="fill_parent"
android:layout_height="wrap_content"
android:text="@string/hello"
/>
<TextView
android:id="@+id/lightsensor"
android:layout_width="fill_parent"
android:layout_height="wrap_content"
/>
</LinearLayout>


Download the files.

Next:
- Implement SensorEventListener to monitor Android light sensor

Sunday 30 January 2011

Updating How To Pages

While creating the immutability content I realized that my How To templates were a little out of date. So I will be updating all the how to content to new templates over the coming days. Right now, only the Java How To topics have been updated. If you see anything out of whack please let me know. Just comment on this post. Thanks. Mike W.

Java and Immutability Explained

Duke WavingImmutability is a topic that has come up a lot at work in regard to threading. Since I really didn't understand what that meant in a programming context, I did what any aspiring developer should do. I wrote some code. So you can read my little write ups on the subject at the following links.


Java and Immutability Part I

Java and Immutability Part II


So what did I learn? That an immutable object is really just a read only object. But when it comes to reference variables, read only is a little tougher to achieve than one might think.


Source code is included. Please let me know if I screwed anything up. :)

TinyRestore progress...

As many of you know, I'm working on an app that will allow us to restore devices with (or rather without) iTunes. The plan is to allow the functionality that iTunes currently gives. I've made some progress but the process is slow-going. This is no small project and when it is finished I want it to do more than just restore signed firmware. Thank you all for your patience and support. As far as ETAs go, I'm tentatively looking at Feb / Apr... Yes that's a long way away but this isn't a simple app. It'll work on windows, osx, and linux. It'll restore without needing iTunes (much like idevicerestore from p0sixninja). (I will possibly use some of his awesome code). Again bear with me as this is a huge project.

Thanks!

BlogBooster-The most productive way for mobile blogging. BlogBooster is a multi-service blog editor for iPhone, Android, WebOs and your desktop

Wednesday 26 January 2011

Android 3.0 Platform Preview and Updated SDK Tools is available

Note that applications developed with the Android 3.0 Platform Preview cannot be published on Android Market. We�ll be releasing a final SDK in the weeks ahead that you can use to build and publish applications for Android 3.0.

Here are some of the highlights of Android 3.0 SDK Preview:

UI framework for creating great apps for larger screen devices: Developers can use a new UI components, new themes, richer widgets and notifications, drag and drop, and other new features to create rich and engaging apps for users on larger screen devices.

High-performance 2D and 3D graphics: A new property-based animation framework lets developers add great visual effects to their apps. A built-in GL renderer lets developers request hardware-acceleration of common 2D rendering operations in their apps, across the entire app or only in specific activities or views. For adding rich 3D scenes, developers take advantage of a new 3D graphics engine called Renderscript.

Support for multicore processor architectures: Android 3.0 is optimized to run on either single- or dual-core processors, so that applications run with the best possible performance.

Rich multimedia: New multimedia features such as HTTP Live streaming support, a pluggable DRM framework, and easy media file transfer through MTP/PTP, give developers new ways to bring rich content to users.

New types of connectivity: New APIs for Bluetooth A2DP and HSP let applications offer audio streaming and headset control. Support for Bluetooth insecure socket connection lets applications connect to simple devices that may not have a user interface.

Enhancements for enterprise: New administrative policies, such as for encrypted storage and password expiration, help enterprise administrators manage devices more effectively.

For an complete overview of the new user and developer features, see the Android 3.0 Platform Highlights.

Additionally, we are releasing updates to our SDK Tools (r9), NDK (r5b), and ADT Plugin for Eclipse (9.0.0). Key features include:

  • UI Builder improvements in the ADT Plugin:
    • Improved drag-and-drop in the editor, with better support for included layouts.
    • In-editor preview of objects animated with the new animation framework.
    • Visualization of UI based on any version of the platform. independent of project target. Improved rendering, with better support for custom views.

To find out how to get started developing or testing applications using the Android 3.0 Preview SDK, see the Preview SDK Introduction. Details about the changes in the latest versions of the tools are available on the SDK Tools, the ADT Plugin, and NDK pages on the site.

Source: http://android-developers.blogspot.com/2011/01/android-30-platform-preview-and-updated.html

Tuesday 25 January 2011

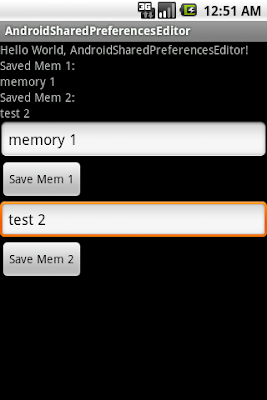
Use getSharedPreferences() to retrieve a preferences object shared across multiple activity

Last exercise "Example of using SharedPreferences.Editor" get SharedPreferences object using the method getPreferences(), it allow accessing preferences associated with the activity. To use preferences that are shared across multiple application components (activities, receivers, services, providers), you can use the underlying Context.getSharedPreferences() method to retrieve a preferences object stored under a specific name.

Use getSharedPreferences() to retrieve a preferences object to shared across multiple activity

In this exercise, SharedPreferences is saved in main activity, it can be retrieved in the second activity.

Main activity, AndroidSharedPreferencesEditor.java
package com.exercise.AndroidSharedPreferencesEditor;

import android.app.Activity;
import android.content.Intent;
import android.content.SharedPreferences;
import android.os.Bundle;
import android.view.View;
import android.widget.Button;
import android.widget.EditText;
import android.widget.TextView;

public class AndroidSharedPreferencesEditor extends Activity {

EditText editText1, editText2;
TextView textSavedMem1, textSavedMem2;
Button buttonSaveMem1, buttonSaveMem2;

/** Called when the activity is first created. */
@Override
public void onCreate(Bundle savedInstanceState) {
super.onCreate(savedInstanceState);
setContentView(R.layout.main);

textSavedMem1 = (TextView)findViewById(R.id.savedmem1);
textSavedMem2 = (TextView)findViewById(R.id.savedmem2);
editText1 = (EditText)findViewById(R.id.edittext1);
editText2 = (EditText)findViewById(R.id.edittext2);
buttonSaveMem1 = (Button)findViewById(R.id.save_mem1);
buttonSaveMem2 = (Button)findViewById(R.id.save_mem2);

buttonSaveMem1.setOnClickListener(buttonSaveMem1OnClickListener);
buttonSaveMem2.setOnClickListener(buttonSaveMem2OnClickListener);

Button buttonStartAnother = (Button)findViewById(R.id.startanother);
buttonStartAnother.setOnClickListener(new Button.OnClickListener(){

@Override
public void onClick(View arg0) {
// TODO Auto-generated method stub
Intent intent = new Intent();
intent.setClass(AndroidSharedPreferencesEditor.this, another.class);
startActivity(intent);
}});

LoadPreferences();
}


Button.OnClickListener buttonSaveMem1OnClickListener
= new Button.OnClickListener(){

@Override
public void onClick(View arg0) {
// TODO Auto-generated method stub
SavePreferences("MEM1", editText1.getText().toString());
LoadPreferences();
}

};

Button.OnClickListener buttonSaveMem2OnClickListener
= new Button.OnClickListener(){

@Override
public void onClick(View arg0) {
// TODO Auto-generated method stub
SavePreferences("MEM2", editText2.getText().toString());
LoadPreferences();
}

};

private void SavePreferences(String key, String value){
SharedPreferences sharedPreferences = getSharedPreferences("MY_SHARED_PREF", MODE_PRIVATE);
SharedPreferences.Editor editor = sharedPreferences.edit();
editor.putString(key, value);
editor.commit();
}

private void LoadPreferences(){
SharedPreferences sharedPreferences = getSharedPreferences("MY_SHARED_PREF", MODE_PRIVATE);
String strSavedMem1 = sharedPreferences.getString("MEM1", "");
String strSavedMem2 = sharedPreferences.getString("MEM2", "");
textSavedMem1.setText(strSavedMem1);
textSavedMem2.setText(strSavedMem2);
}
}


layout for main activity, main.xml
<?xml version="1.0" encoding="utf-8"?>
<LinearLayout xmlns:android="http://schemas.android.com/apk/res/android"
android:orientation="vertical"
android:layout_width="fill_parent"
android:layout_height="fill_parent"
>
<TextView
android:layout_width="fill_parent"
android:layout_height="wrap_content"
android:text="@string/hello"
/>
<TextView
android:layout_width="fill_parent"
android:layout_height="wrap_content"
android:text="Saved Mem 1:"
/>
<TextView
android:id="@+id/savedmem1"
android:layout_width="fill_parent"
android:layout_height="wrap_content"
/>
<TextView
android:layout_width="fill_parent"
android:layout_height="wrap_content"
android:text="Saved Mem 2:"
/>
<TextView
android:id="@+id/savedmem2"
android:layout_width="fill_parent"
android:layout_height="wrap_content"
/>
<EditText
android:id="@+id/edittext1"
android:layout_width="fill_parent"
android:layout_height="wrap_content"
/>
<Button
android:id="@+id/save_mem1"
android:layout_width="wrap_content"
android:layout_height="wrap_content"
android:text="Save Mem 1"
/>
<EditText
android:id="@+id/edittext2"
android:layout_width="fill_parent"
android:layout_height="wrap_content"
/>
<Button
android:id="@+id/save_mem2"
android:layout_width="wrap_content"
android:layout_height="wrap_content"
android:text="Save Mem 2"
/>
<Button
android:id="@+id/startanother"
android:layout_width="fill_parent"
android:layout_height="wrap_content"
android:text="Start Another"
/>
</LinearLayout>


The second activity, another.java
package com.exercise.AndroidSharedPreferencesEditor;

import android.app.Activity;
import android.content.SharedPreferences;
import android.os.Bundle;
import android.view.View;
import android.widget.Button;
import android.widget.TextView;

public class another extends Activity {

@Override
protected void onCreate(Bundle savedInstanceState) {
// TODO Auto-generated method stub
super.onCreate(savedInstanceState);
setContentView(R.layout.anothermain);

TextView textSavedMem1 = (TextView)findViewById(R.id.savedmem1);
TextView textSavedMem2 = (TextView)findViewById(R.id.savedmem2);

SharedPreferences sharedPreferences = getSharedPreferences("MY_SHARED_PREF", MODE_PRIVATE);
String strSavedMem1 = sharedPreferences.getString("MEM1", "");
String strSavedMem2 = sharedPreferences.getString("MEM2", "");
textSavedMem1.setText(strSavedMem1);
textSavedMem2.setText(strSavedMem2);

Button buttonFinish = (Button)findViewById(R.id.finish);
buttonFinish.setOnClickListener(new Button.OnClickListener(){

@Override
public void onClick(View arg0) {
// TODO Auto-generated method stub
finish();
}});
}
}


layout for the second activity, anothermain.xml
<?xml version="1.0" encoding="utf-8"?>
<LinearLayout xmlns:android="http://schemas.android.com/apk/res/android"
android:orientation="vertical"
android:layout_width="fill_parent"
android:layout_height="fill_parent"
>
<TextView
android:layout_width="fill_parent"
android:layout_height="wrap_content"
android:text="The Another Activity"
/>
<TextView
android:layout_width="fill_parent"
android:layout_height="wrap_content"
android:text="Saved Mem 1:"
/>
<TextView
android:id="@+id/savedmem1"
android:layout_width="fill_parent"
android:layout_height="wrap_content"
/>
<TextView
android:layout_width="fill_parent"
android:layout_height="wrap_content"
android:text="Saved Mem 2:"
/>
<TextView
android:id="@+id/savedmem2"
android:layout_width="fill_parent"
android:layout_height="wrap_content"
/>

<Button
android:id="@+id/finish"
android:layout_width="fill_parent"
android:layout_height="wrap_content"
android:text="Finish"
/>
</LinearLayout>


Modify AndroidManifest.xml to incude another.java.
<?xml version="1.0" encoding="utf-8"?>
<manifest xmlns:android="http://schemas.android.com/apk/res/android"
package="com.exercise.AndroidSharedPreferencesEditor"
android:versionCode="1"
android:versionName="1.0">
<application android:icon="@drawable/icon" android:label="@string/app_name">
<activity android:name=".AndroidSharedPreferencesEditor"
android:label="@string/app_name">
<intent-filter>
<action android:name="android.intent.action.MAIN" />
<category android:name="android.intent.category.LAUNCHER" />
</intent-filter>
</activity>
<activity android:name=".another" />
</application>
<uses-sdk android:minSdkVersion="4" />

</manifest>


Download the files.

Monday 24 January 2011

Example of using SharedPreferences.Editor

Example of using SharedPreferences.Editor

main.xml
<?xml version="1.0" encoding="utf-8"?>
<LinearLayout xmlns:android="http://schemas.android.com/apk/res/android"
android:orientation="vertical"
android:layout_width="fill_parent"
android:layout_height="fill_parent"
>
<TextView
android:layout_width="fill_parent"
android:layout_height="wrap_content"
android:text="@string/hello"
/>
<TextView
android:layout_width="fill_parent"
android:layout_height="wrap_content"
android:text="Saved Mem 1:"
/>
<TextView
android:id="@+id/savedmem1"
android:layout_width="fill_parent"
android:layout_height="wrap_content"
/>
<TextView
android:layout_width="fill_parent"
android:layout_height="wrap_content"
android:text="Saved Mem 2:"
/>
<TextView
android:id="@+id/savedmem2"
android:layout_width="fill_parent"
android:layout_height="wrap_content"
/>
<EditText
android:id="@+id/edittext1"
android:layout_width="fill_parent"
android:layout_height="wrap_content"
/>
<Button
android:id="@+id/save_mem1"
android:layout_width="wrap_content"
android:layout_height="wrap_content"
android:text="Save Mem 1"
/>
<EditText
android:id="@+id/edittext2"
android:layout_width="fill_parent"
android:layout_height="wrap_content"
/>
<Button
android:id="@+id/save_mem2"
android:layout_width="wrap_content"
android:layout_height="wrap_content"
android:text="Save Mem 2"
/>
</LinearLayout>


AndroidSharedPreferencesEditor.java
package com.exercise.AndroidSharedPreferencesEditor;

import android.app.Activity;
import android.content.SharedPreferences;
import android.os.Bundle;
import android.view.View;
import android.widget.Button;
import android.widget.EditText;
import android.widget.TextView;

public class AndroidSharedPreferencesEditor extends Activity {

EditText editText1, editText2;
TextView textSavedMem1, textSavedMem2;
Button buttonSaveMem1, buttonSaveMem2;

/** Called when the activity is first created. */
@Override
public void onCreate(Bundle savedInstanceState) {
super.onCreate(savedInstanceState);
setContentView(R.layout.main);

textSavedMem1 = (TextView)findViewById(R.id.savedmem1);
textSavedMem2 = (TextView)findViewById(R.id.savedmem2);
editText1 = (EditText)findViewById(R.id.edittext1);
editText2 = (EditText)findViewById(R.id.edittext2);
buttonSaveMem1 = (Button)findViewById(R.id.save_mem1);
buttonSaveMem2 = (Button)findViewById(R.id.save_mem2);

buttonSaveMem1.setOnClickListener(buttonSaveMem1OnClickListener);
buttonSaveMem2.setOnClickListener(buttonSaveMem2OnClickListener);

LoadPreferences();
}

Button.OnClickListener buttonSaveMem1OnClickListener
= new Button.OnClickListener(){

@Override
public void onClick(View arg0) {
// TODO Auto-generated method stub
SavePreferences("MEM1", editText1.getText().toString());
LoadPreferences();
}

};

Button.OnClickListener buttonSaveMem2OnClickListener
= new Button.OnClickListener(){

@Override
public void onClick(View arg0) {
// TODO Auto-generated method stub
SavePreferences("MEM2", editText2.getText().toString());
LoadPreferences();
}

};

private void SavePreferences(String key, String value){
SharedPreferences sharedPreferences = getPreferences(MODE_PRIVATE);
SharedPreferences.Editor editor = sharedPreferences.edit();
editor.putString(key, value);
editor.commit();
}

private void LoadPreferences(){
SharedPreferences sharedPreferences = getPreferences(MODE_PRIVATE);
String strSavedMem1 = sharedPreferences.getString("MEM1", "");
String strSavedMem2 = sharedPreferences.getString("MEM2", "");
textSavedMem1.setText(strSavedMem1);
textSavedMem2.setText(strSavedMem2);
}
}


Download the files.

Related Article:
- Use getSharedPreferences() to retrieve a preferences object to shared across multiple activity

W3C Creates a Logo for HTML 5

From Mashable, the WC3 has created a logo program for HTML 5. Anyone can use the logo to highlight HTML 5 development or features. In addition, they have stickers and t-shirts. I'll be using the logos for HTML stories I find and content I create.


Want the logo? Get it for yourself here.

Sunday 23 January 2011

Turn Wifi On/Off using WifiManager.setWifiEnabled()

Last exercise show how to "Detect Wifi ON/OFF state", this exercise show how to Turn Wifi On and Off.

Turn Wifi On/Off using WifiManager.setWifiEnabled()

To Turn Wifi On/Off, WifiManager.setWifiEnabled() can be used.

First of off, modify main.xml to add to button.
<?xml version="1.0" encoding="utf-8"?>
<LinearLayout xmlns:android="http://schemas.android.com/apk/res/android"
android:orientation="vertical"
android:layout_width="fill_parent"
android:layout_height="fill_parent"
>
<TextView
android:layout_width="fill_parent"
android:layout_height="wrap_content"
android:text="@string/hello"
/>
<TextView
android:id="@+id/wifistate"
android:layout_width="fill_parent"
android:layout_height="wrap_content"
/>
<Button
android:id="@+id/onwifi"
android:layout_width="fill_parent"
android:layout_height="wrap_content"
android:text="Turn Wifi On"
/>
<Button
android:id="@+id/offwifi"
android:layout_width="fill_parent"
android:layout_height="wrap_content"
android:text="Turn Wifi Off"
/>
</LinearLayout>


Modify the code to call WifiManager.setWifiEnabled().
package com.exercise.AndroidWifiStateChangedDetect;

import android.app.Activity;
import android.content.BroadcastReceiver;
import android.content.Context;
import android.content.Intent;
import android.content.IntentFilter;
import android.net.wifi.WifiManager;
import android.os.Bundle;
import android.view.View;
import android.widget.Button;
import android.widget.TextView;

public class AndroidWifiStateChangedDetect extends Activity {

TextView WifiState;

/** Called when the activity is first created. */
@Override
public void onCreate(Bundle savedInstanceState) {
super.onCreate(savedInstanceState);
setContentView(R.layout.main);
WifiState = (TextView)findViewById(R.id.wifistate);
Button OnWifi = (Button)findViewById(R.id.onwifi);
Button OffWifi = (Button)findViewById(R.id.offwifi);

this.registerReceiver(this.WifiStateChangedReceiver,
new IntentFilter(WifiManager.WIFI_STATE_CHANGED_ACTION));

OnWifi.setOnClickListener(new Button.OnClickListener(){

@Override
public void onClick(View arg0) {
// TODO Auto-generated method stub
WifiManager wifiManager = (WifiManager)getBaseContext().getSystemService(Context.WIFI_SERVICE);
wifiManager.setWifiEnabled(true);
}});

OffWifi.setOnClickListener(new Button.OnClickListener(){

@Override
public void onClick(View arg0) {
// TODO Auto-generated method stub
WifiManager wifiManager = (WifiManager)getBaseContext().getSystemService(Context.WIFI_SERVICE);
wifiManager.setWifiEnabled(false);
}});
}

private BroadcastReceiver WifiStateChangedReceiver
= new BroadcastReceiver(){

@Override
public void onReceive(Context context, Intent intent) {
// TODO Auto-generated method stub

int extraWifiState = intent.getIntExtra(WifiManager.EXTRA_WIFI_STATE ,
WifiManager.WIFI_STATE_UNKNOWN);

switch(extraWifiState){
case WifiManager.WIFI_STATE_DISABLED:
WifiState.setText("WIFI STATE DISABLED");
break;
case WifiManager.WIFI_STATE_DISABLING:
WifiState.setText("WIFI STATE DISABLING");
break;
case WifiManager.WIFI_STATE_ENABLED:
WifiState.setText("WIFI STATE ENABLED");
break;
case WifiManager.WIFI_STATE_ENABLING:
WifiState.setText("WIFI STATE ENABLING");
break;
case WifiManager.WIFI_STATE_UNKNOWN:
WifiState.setText("WIFI STATE UNKNOWN");
break;
}

}};
}


In order to change Wifi state, we have to grant permission of "android.permission.CHANGE_WIFI_STATE".
AndroidManifest.xml
<?xml version="1.0" encoding="utf-8"?>
<manifest xmlns:android="http://schemas.android.com/apk/res/android"
package="com.exercise.AndroidWifiStateChangedDetect"
android:versionCode="1"
android:versionName="1.0">
<application android:icon="@drawable/icon" android:label="@string/app_name">
<activity android:name=".AndroidWifiStateChangedDetect"
android:label="@string/app_name">
<intent-filter>
<action android:name="android.intent.action.MAIN" />
<category android:name="android.intent.category.LAUNCHER" />
</intent-filter>
</activity>

</application>
<uses-sdk android:minSdkVersion="4" />
<uses-permission android:name="android.permission.CHANGE_WIFI_STATE" />
</manifest>


Download the files.

Friday 21 January 2011

iOS 4.3b2 Support Added

Though I have been busy, I have not forgotten you. I've just added iOS 4.3b2 support. For those of you with Apple Developer accounts, this means you can save your SHSH's for that version and restore to it permanently. Keep me posted of any issues. I'm still working on my next big contribution to the scene... :)

EDIT: Ok so I had a FEW bugs. 4.21.05 should work peachy :)


Detect Wifi ON/OFF state

To detect Android Wifi ON/OFF (Enable/Disable) state, we can implement a BroadcastReceiver to register with the intent WifiManager.WIFI_STATE_CHANGED_ACTION. IN the BroadcastReceiver, the Wifi state can be retrieved using the code intent.getIntExtra(WifiManager.EXTRA_WIFI_STATE, WifiManager.WIFI_STATE_UNKNOWN).

Detect Wifi ON/OFF state

package com.exercise.AndroidWifiStateChangedDetect;

import android.app.Activity;
import android.content.BroadcastReceiver;
import android.content.Context;
import android.content.Intent;
import android.content.IntentFilter;
import android.net.wifi.WifiManager;
import android.os.Bundle;
import android.widget.TextView;

public class AndroidWifiStateChangedDetect extends Activity {

TextView WifiState;

/** Called when the activity is first created. */
@Override
public void onCreate(Bundle savedInstanceState) {
super.onCreate(savedInstanceState);
setContentView(R.layout.main);
WifiState = (TextView)findViewById(R.id.wifistate);

this.registerReceiver(this.WifiStateChangedReceiver,
new IntentFilter(WifiManager.WIFI_STATE_CHANGED_ACTION));
}

private BroadcastReceiver WifiStateChangedReceiver
= new BroadcastReceiver(){

@Override
public void onReceive(Context context, Intent intent) {
// TODO Auto-generated method stub

int extraWifiState = intent.getIntExtra(WifiManager.EXTRA_WIFI_STATE ,
WifiManager.WIFI_STATE_UNKNOWN);

switch(extraWifiState){
case WifiManager.WIFI_STATE_DISABLED:
WifiState.setText("WIFI STATE DISABLED");
break;
case WifiManager.WIFI_STATE_DISABLING:
WifiState.setText("WIFI STATE DISABLING");
break;
case WifiManager.WIFI_STATE_ENABLED:
WifiState.setText("WIFI STATE ENABLED");
break;
case WifiManager.WIFI_STATE_ENABLING:
WifiState.setText("WIFI STATE ENABLING");
break;
case WifiManager.WIFI_STATE_UNKNOWN:
WifiState.setText("WIFI STATE UNKNOWN");
break;
}

}};
}


Download the files.

Related:
- Get Wifi IP of Android device, using WifiManager
- Monitor Wifi status and information with BroadcastReceiver
- Check RSSI by monitoring of WifiManager.RSSI_CHANGED_ACTION
- Turn Wifi On/Off using WifiManager.setWifiEnabled()

Wednesday 19 January 2011

Check RSSI by monitoring of WifiManager.RSSI_CHANGED_ACTION


In last exercise, the app "Monitor Wifi status and information with BroadcastReceiver" by monitoring of ConnectivityManager.CONNECTIVITY_ACTION, it will be broadcasted when change in network connectivity has occurred; connection has either been established or lost. In case of RSSI change will not trigger the event.

In order to monitor RSSI change, we have to monitor WifiManager.RSSI_CHANGED_ACTION. In this exercise, another BroadcastReceiver, myRssiChangeReceiver, will be implemented to monitor the broadcast of WifiManager.RSSI_CHANGED_ACTION, to update RSSI if any change.

Modify AndroidWifiMonitor.java only, the other files are same as last exercise "Monitor Wifi status and information with BroadcastReceiver".
package com.exercise.AndroidWifiMonitor;

import android.app.Activity;
import android.content.BroadcastReceiver;
import android.content.Context;
import android.content.Intent;
import android.content.IntentFilter;
import android.net.ConnectivityManager;
import android.net.NetworkInfo;
import android.net.wifi.WifiInfo;
import android.net.wifi.WifiManager;
import android.os.Bundle;
import android.widget.TextView;

public class AndroidWifiMonitor extends Activity {

TextView textConnected, textIp, textSsid, textBssid, textMac, textSpeed, textRssi;

/** Called when the activity is first created. */
@Override
public void onCreate(Bundle savedInstanceState) {
super.onCreate(savedInstanceState);
setContentView(R.layout.main);

textConnected = (TextView)findViewById(R.id.Connected);
textIp = (TextView)findViewById(R.id.Ip);

textSsid = (TextView)findViewById(R.id.Ssid);
textBssid = (TextView)findViewById(R.id.Bssid);
textMac = (TextView)findViewById(R.id.Mac);
textSpeed = (TextView)findViewById(R.id.Speed);
textRssi = (TextView)findViewById(R.id.Rssi);

DisplayWifiState();

this.registerReceiver(this.myWifiReceiver,
new IntentFilter(ConnectivityManager.CONNECTIVITY_ACTION));

this.registerReceiver(this.myRssiChangeReceiver,
new IntentFilter(WifiManager.RSSI_CHANGED_ACTION));

}

private BroadcastReceiver myRssiChangeReceiver
= new BroadcastReceiver(){

@Override
public void onReceive(Context arg0, Intent arg1) {
// TODO Auto-generated method stub
int newRssi = arg1.getIntExtra(WifiManager.EXTRA_NEW_RSSI, 0);
textRssi.setText(String.valueOf(newRssi));
}};

private BroadcastReceiver myWifiReceiver
= new BroadcastReceiver(){

@Override
public void onReceive(Context arg0, Intent arg1) {
// TODO Auto-generated method stub
NetworkInfo networkInfo = (NetworkInfo) arg1.getParcelableExtra(ConnectivityManager.EXTRA_NETWORK_INFO);
if(networkInfo.getType() == ConnectivityManager.TYPE_WIFI){
DisplayWifiState();
}
}};

private void DisplayWifiState(){

ConnectivityManager myConnManager = (ConnectivityManager) getSystemService(CONNECTIVITY_SERVICE);
NetworkInfo myNetworkInfo = myConnManager.getNetworkInfo(ConnectivityManager.TYPE_WIFI);
WifiManager myWifiManager = (WifiManager)getSystemService(Context.WIFI_SERVICE);
WifiInfo myWifiInfo = myWifiManager.getConnectionInfo();

textMac.setText(myWifiInfo.getMacAddress());

if (myNetworkInfo.isConnected()){
int myIp = myWifiInfo.getIpAddress();

textConnected.setText("--- CONNECTED ---");

int intMyIp3 = myIp/0x1000000;
int intMyIp3mod = myIp%0x1000000;

int intMyIp2 = intMyIp3mod/0x10000;
int intMyIp2mod = intMyIp3mod%0x10000;

int intMyIp1 = intMyIp2mod/0x100;
int intMyIp0 = intMyIp2mod%0x100;

textIp.setText(String.valueOf(intMyIp0)
+ "." + String.valueOf(intMyIp1)
+ "." + String.valueOf(intMyIp2)
+ "." + String.valueOf(intMyIp3)
);

textSsid.setText(myWifiInfo.getSSID());
textBssid.setText(myWifiInfo.getBSSID());

textSpeed.setText(String.valueOf(myWifiInfo.getLinkSpeed()) + " " + WifiInfo.LINK_SPEED_UNITS);
textRssi.setText(String.valueOf(myWifiInfo.getRssi()));
}
else{
textConnected.setText("--- DIS-CONNECTED! ---");
textIp.setText("---");
textSsid.setText("---");
textBssid.setText("---");
textSpeed.setText("---");
textRssi.setText("---");
}

}
}


Download the files.

Related Article:
- Detect Wifi ON/OFF state


Tuesday 18 January 2011

Monitor Wifi status and information with BroadcastReceiver

Monitor Wifi status and information with BroadcastReceiver

Last exercise show how to "Get Wifi IP using WifiManager". This exercise it will be further extended to monitor Wifi Connectivity status, and show more information also; such as SSID, BSSID, Speed, Rssi and MAC address.

Monitor Wifi status and information with BroadcastReceiver

In order to monitor the Wifi Connectivity status, we have to implement a BroadcastReceiver to receive "ConnectivityManager.CONNECTIVITY_ACTION" intent.
AndroidWifiMonitor.java
package com.exercise.AndroidWifiMonitor;

import android.app.Activity;
import android.content.BroadcastReceiver;
import android.content.Context;
import android.content.Intent;
import android.content.IntentFilter;
import android.net.ConnectivityManager;
import android.net.NetworkInfo;
import android.net.wifi.WifiInfo;
import android.net.wifi.WifiManager;
import android.os.Bundle;
import android.widget.TextView;

public class AndroidWifiMonitor extends Activity {

TextView textConnected, textIp, textSsid, textBssid, textMac, textSpeed, textRssi;

/** Called when the activity is first created. */
@Override
public void onCreate(Bundle savedInstanceState) {
super.onCreate(savedInstanceState);
setContentView(R.layout.main);

textConnected = (TextView)findViewById(R.id.Connected);
textIp = (TextView)findViewById(R.id.Ip);

textSsid = (TextView)findViewById(R.id.Ssid);
textBssid = (TextView)findViewById(R.id.Bssid);
textMac = (TextView)findViewById(R.id.Mac);
textSpeed = (TextView)findViewById(R.id.Speed);
textRssi = (TextView)findViewById(R.id.Rssi);

DisplayWifiState();

this.registerReceiver(this.myWifiReceiver,
new IntentFilter(ConnectivityManager.CONNECTIVITY_ACTION));

}

private BroadcastReceiver myWifiReceiver
= new BroadcastReceiver(){

@Override
public void onReceive(Context arg0, Intent arg1) {
// TODO Auto-generated method stub
NetworkInfo networkInfo = (NetworkInfo) arg1.getParcelableExtra(ConnectivityManager.EXTRA_NETWORK_INFO);
if(networkInfo.getType() == ConnectivityManager.TYPE_WIFI){
DisplayWifiState();
}
}};

private void DisplayWifiState(){

ConnectivityManager myConnManager = (ConnectivityManager) getSystemService(CONNECTIVITY_SERVICE);
NetworkInfo myNetworkInfo = myConnManager.getNetworkInfo(ConnectivityManager.TYPE_WIFI);
WifiManager myWifiManager = (WifiManager)getSystemService(Context.WIFI_SERVICE);
WifiInfo myWifiInfo = myWifiManager.getConnectionInfo();

textMac.setText(myWifiInfo.getMacAddress());

if (myNetworkInfo.isConnected()){
int myIp = myWifiInfo.getIpAddress();

textConnected.setText("--- CONNECTED ---");

int intMyIp3 = myIp/0x1000000;
int intMyIp3mod = myIp%0x1000000;

int intMyIp2 = intMyIp3mod/0x10000;
int intMyIp2mod = intMyIp3mod%0x10000;

int intMyIp1 = intMyIp2mod/0x100;
int intMyIp0 = intMyIp2mod%0x100;

textIp.setText(String.valueOf(intMyIp0)
+ "." + String.valueOf(intMyIp1)
+ "." + String.valueOf(intMyIp2)
+ "." + String.valueOf(intMyIp3)
);

textSsid.setText(myWifiInfo.getSSID());
textBssid.setText(myWifiInfo.getBSSID());

textSpeed.setText(String.valueOf(myWifiInfo.getLinkSpeed()) + " " + WifiInfo.LINK_SPEED_UNITS);
textRssi.setText(String.valueOf(myWifiInfo.getRssi()));
}
else{
textConnected.setText("--- DIS-CONNECTED! ---");
textIp.setText("---");
textSsid.setText("---");
textBssid.setText("---");
textSpeed.setText("---");
textRssi.setText("---");
}

}
}


Modify AndroidManifest.xml to add permission of ACCESS_WIFI_STATE and ACCESS_NETWORK_STATE.
<?xml version="1.0" encoding="utf-8"?>
<manifest xmlns:android="http://schemas.android.com/apk/res/android"
package="com.exercise.AndroidWifiMonitor"
android:versionCode="1"
android:versionName="1.0">
<application android:icon="@drawable/icon" android:label="@string/app_name">
<activity android:name=".AndroidWifiMonitor"
android:label="@string/app_name">
<intent-filter>
<action android:name="android.intent.action.MAIN" />
<category android:name="android.intent.category.LAUNCHER" />
</intent-filter>
</activity>
</application>
<uses-sdk android:minSdkVersion="4" />
<uses-permission android:name="android.permission.ACCESS_WIFI_STATE" />
<uses-permission android:name="android.permission.ACCESS_NETWORK_STATE" />
</manifest>


main.xml
<?xml version="1.0" encoding="utf-8"?>
<LinearLayout xmlns:android="http://schemas.android.com/apk/res/android"
android:orientation="vertical"
android:layout_width="fill_parent"
android:layout_height="fill_parent"
>
<TextView
android:layout_width="fill_parent"
android:layout_height="wrap_content"
android:text="@string/hello"
/>

<TextView
android:id="@+id/Connected"
android:layout_width="fill_parent"
android:layout_height="wrap_content"
/>

<TextView
android:layout_width="fill_parent"
android:layout_height="wrap_content"
android:text="My Wifi IP:"
/>
<TextView
android:id="@+id/Ip"
android:layout_width="fill_parent"
android:layout_height="wrap_content"
/>
<TextView
android:layout_width="fill_parent"
android:layout_height="wrap_content"
android:text="SSID:"
/>
<TextView
android:id="@+id/Ssid"
android:layout_width="fill_parent"
android:layout_height="wrap_content"
/>
<TextView
android:layout_width="fill_parent"
android:layout_height="wrap_content"
android:text="BSSID:"
/>
<TextView
android:id="@+id/Bssid"
android:layout_width="fill_parent"
android:layout_height="wrap_content"
/>

<TextView
android:layout_width="fill_parent"
android:layout_height="wrap_content"
android:text="Speed:"
/>
<TextView
android:id="@+id/Speed"
android:layout_width="fill_parent"
android:layout_height="wrap_content"
/>
<TextView
android:layout_width="fill_parent"
android:layout_height="wrap_content"
android:text="Rssi:"
/>
<TextView
android:id="@+id/Rssi"
android:layout_width="fill_parent"
android:layout_height="wrap_content"
/>

<TextView
android:layout_width="fill_parent"
android:layout_height="wrap_content"
android:text="MAC:"
/>
<TextView
android:id="@+id/Mac"
android:layout_width="fill_parent"
android:layout_height="wrap_content"
/>
</LinearLayout>


Download the files.

This exercise, the app "Monitor Wifi status and information with BroadcastReceiver" by monitoring of ConnectivityManager.CONNECTIVITY_ACTION, it will be broadcasted when change in network connectivity has occurred; connection has either been established or lost.

In case of RSSI change will not trigger the event. To detect RSSI change, refer to another article "Check RSSI by monitoring of WifiManager.RSSI_CHANGED_ACTION".


Sunday 16 January 2011

Get Wifi IP of Android device, using WifiManager

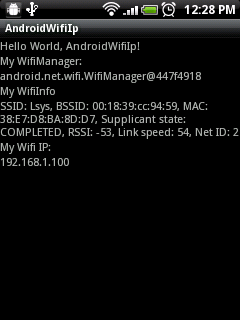
It's a simple exercise to retrieve my Wifi Ip address using WifiManager.

Get Wifi IP of Android device, using WifiManager

main.xml
<?xml version="1.0" encoding="utf-8"?>
<LinearLayout xmlns:android="http://schemas.android.com/apk/res/android"
android:orientation="vertical"
android:layout_width="fill_parent"
android:layout_height="fill_parent"
>
<TextView
android:layout_width="fill_parent"
android:layout_height="wrap_content"
android:text="@string/hello"
/>

<TextView
android:layout_width="fill_parent"
android:layout_height="wrap_content"
android:text="My WifiManager:"
/>
<TextView
android:id="@+id/WifiManager"
android:layout_width="fill_parent"
android:layout_height="wrap_content"
/>

<TextView
android:layout_width="fill_parent"
android:layout_height="wrap_content"
android:text="My WifiInfo"
/>
<TextView
android:id="@+id/WifiInfo"
android:layout_width="fill_parent"
android:layout_height="wrap_content"
/>

<TextView
android:layout_width="fill_parent"
android:layout_height="wrap_content"
android:text="My Wifi IP:"
/>
<TextView
android:id="@+id/Ip"
android:layout_width="fill_parent"
android:layout_height="wrap_content"
/>
</LinearLayout>


AndroidWifiIp.java
package com.exercise.AndroidWifiIp;

import android.app.Activity;
import android.content.Context;
import android.net.wifi.WifiInfo;
import android.net.wifi.WifiManager;
import android.os.Bundle;
import android.widget.TextView;

public class AndroidWifiIp extends Activity {
/** Called when the activity is first created. */
@Override
public void onCreate(Bundle savedInstanceState) {
super.onCreate(savedInstanceState);
setContentView(R.layout.main);
TextView textWifiManager = (TextView)findViewById(R.id.WifiManager);
TextView textWifiInfo = (TextView)findViewById(R.id.WifiInfo);
TextView textIp = (TextView)findViewById(R.id.Ip);

WifiManager myWifiManager = (WifiManager)getSystemService(Context.WIFI_SERVICE);

WifiInfo myWifiInfo = myWifiManager.getConnectionInfo();
int myIp = myWifiInfo.getIpAddress();

textWifiManager.setText(myWifiManager.toString());
textWifiInfo.setText(myWifiInfo.toString());

int intMyIp3 = myIp/0x1000000;
int intMyIp3mod = myIp%0x1000000;

int intMyIp2 = intMyIp3mod/0x10000;
int intMyIp2mod = intMyIp3mod%0x10000;

int intMyIp1 = intMyIp2mod/0x100;
int intMyIp0 = intMyIp2mod%0x100;

textIp.setText(String.valueOf(intMyIp0)
+ "." + String.valueOf(intMyIp1)
+ "." + String.valueOf(intMyIp2)
+ "." + String.valueOf(intMyIp3)
);
}
}


Also have to modify AndroidManifest.xml to grant permission of android.permission.ACCESS_WIFI_STATE.
 <uses-permission android:name="android.permission.ACCESS_WIFI_STATE" />


Download the files.

Related article: Monitor Wifi status and information with BroadcastReceiver


ListActivity and onListItemClick()

ListActivity is an activity that displays a list of items by binding to a data source such as an array or Cursor, and exposes event handlers when the user selects an item.
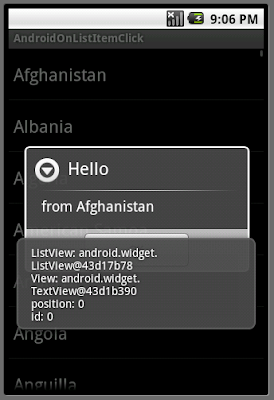
ListActivity and onListItemClick()

protected void onListItemClick(ListView l, View v, int position, long id)
This method will be called when an item in the list is selected. Subclasses should override. Subclasses can call getListView().getItemAtPosition(position) if they need to access the data associated with the selected item.
Parameters
l: The ListView where the click happened
v: The view that was clicked within the ListView
position: The position of the view in the list
id: The row id of the item that was clicked

package com.exercise.AndroidOnListItemClick;

import android.app.AlertDialog;
import android.app.ListActivity;
import android.content.DialogInterface;
import android.os.Bundle;
import android.view.View;
import android.widget.ArrayAdapter;
import android.widget.ListView;
import android.widget.Toast;

public class AndroidOnListItemClick extends ListActivity {

static final String[] COUNTRIES = new String[] {
"Afghanistan", "Albania", "Algeria", "American Samoa",
"Andorra", "Angola", "Anguilla", "Antarctica",
"Antigua and Barbuda", "Argentina", "Armenia", "Aruba",
"Australia", "Austria", "Azerbaijan", "Bahrain",
"Bangladesh", "Barbados", "Belarus", "Belgium", "Belize",
"Benin", "Bermuda", "Bhutan", "Bolivia",
"Bosnia and Herzegovina", "Botswana", "Bouvet Island",
"Brazil", "British Indian Ocean Territory",
"British Virgin Islands", "Brunei", "Bulgaria",
"Burkina Faso", "Burundi", "Cote d'Ivoire", "Cambodia",
"Cameroon", "Canada", "Cape Verde", "Cayman Islands",
"Central African Republic", "Chad", "Chile", "China",
"Christmas Island", "Cocos (Keeling) Islands", "Colombia",
"Comoros", "Congo", "Cook Islands", "Costa Rica", "Croatia",
"Cuba", "Cyprus", "Czech Republic",
"Democratic Republic of the Congo", "Denmark", "Djibouti",
"Dominica", "Dominican Republic", "East Timor", "Ecuador",
"Egypt", "El Salvador", "Equatorial Guinea", "Eritrea",
"Estonia", "Ethiopia", "Faeroe Islands", "Falkland Islands",
"Fiji", "Finland", "Former Yugoslav Republic of Macedonia",
"France", "French Guiana", "French Polynesia",
"French Southern Territories", "Gabon", "Georgia", "Germany",
"Ghana", "Gibraltar", "Greece", "Greenland", "Grenada",
"Guadeloupe", "Guam", "Guatemala", "Guinea", "Guinea-Bissau",
"Guyana", "Haiti", "Heard Island and McDonald Islands",
"Honduras", "Hong Kong", "Hungary", "Iceland", "India",
"Indonesia", "Iran", "Iraq", "Ireland", "Israel", "Italy",
"Jamaica", "Japan", "Jordan", "Kazakhstan", "Kenya", "Kiribati",
"Kuwait", "Kyrgyzstan", "Laos", "Latvia", "Lebanon", "Lesotho",
"Liberia", "Libya", "Liechtenstein", "Lithuania", "Luxembourg",
"Macau", "Madagascar", "Malawi", "Malaysia", "Maldives", "Mali",
"Malta", "Marshall Islands", "Martinique", "Mauritania",
"Mauritius", "Mayotte", "Mexico", "Micronesia", "Moldova",
"Monaco", "Mongolia", "Montserrat", "Morocco", "Mozambique",
"Myanmar", "Namibia", "Nauru", "Nepal", "Netherlands",
"Netherlands Antilles", "New Caledonia", "New Zealand",
"Nicaragua", "Niger", "Nigeria", "Niue", "Norfolk Island",
"North Korea", "Northern Marianas", "Norway", "Oman", "Pakistan",
"Palau", "Panama", "Papua New Guinea", "Paraguay", "Peru",
"Philippines", "Pitcairn Islands", "Poland", "Portugal",
"Puerto Rico", "Qatar", "Reunion", "Romania", "Russia", "Rwanda",
"Sqo Tome and Principe", "Saint Helena", "Saint Kitts and Nevis",
"Saint Lucia", "Saint Pierre and Miquelon",
"Saint Vincent and the Grenadines", "Samoa", "San Marino",
"Saudi Arabia", "Senegal", "Seychelles", "Sierra Leone",
"Singapore", "Slovakia", "Slovenia", "Solomon Islands", "Somalia",
"South Africa", "South Georgia and the South Sandwich Islands",
"South Korea", "Spain", "Sri Lanka", "Sudan", "Suriname",
"Svalbard and Jan Mayen", "Swaziland", "Sweden", "Switzerland",
"Syria", "Taiwan", "Tajikistan", "Tanzania", "Thailand",
"The Bahamas", "The Gambia", "Togo", "Tokelau", "Tonga",
"Trinidad and Tobago", "Tunisia", "Turkey", "Turkmenistan",
"Turks and Caicos Islands", "Tuvalu", "Virgin Islands", "Uganda",
"Ukraine", "United Arab Emirates", "United Kingdom",
"United States", "United States Minor Outlying Islands",
"Uruguay", "Uzbekistan", "Vanuatu", "Vatican City", "Venezuela",
"Vietnam", "Wallis and Futuna", "Western Sahara", "Yemen",
"Yugoslavia", "Zambia", "Zimbabwe"
};

/** Called when the activity is first created. */
@Override
public void onCreate(Bundle savedInstanceState) {
super.onCreate(savedInstanceState);
setListAdapter(new ArrayAdapter<String>(this,
android.R.layout.simple_list_item_1, COUNTRIES));
getListView().setTextFilterEnabled(true);
}

@Override
protected void onListItemClick(ListView l, View v, int position, long id) {
// TODO Auto-generated method stub
super.onListItemClick(l, v, position, id);

new AlertDialog.Builder(this)
.setTitle("Hello")
.setMessage("from " + getListView().getItemAtPosition(position))
.setPositiveButton("OK",
new DialogInterface.OnClickListener() {
public void onClick(DialogInterface dialog, int which) {}}
)
.show();

Toast.makeText(AndroidOnListItemClick.this,
"ListView: " + l.toString() + "\n" +
"View: " + v.toString() + "\n" +
"position: " + String.valueOf(position) + "\n" +
"id: " + String.valueOf(id),
Toast.LENGTH_LONG).show();
}


}


Download the files.

Saturday 15 January 2011

Pass attributes to custom Button

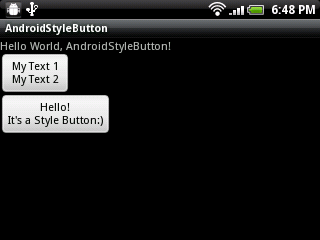
In this exercise, a custom Button class with custom attributes will be implemented. It show how to define custom attributes, and how to define the attributes values in main.xml.

custom Button with declare-styleable

First of all, create a attrs.xml in /xml/values/ folder. It define our declare-styleable attributes.

<?xml version="1.0" encoding="utf-8"?>
<resources>
<declare-styleable name="style_Button">
<attr name="myText_1" format="string" />
<attr name="myText_2" format="string" />
</declare-styleable>
</resources>


Create a new class StyleButton.java, it is our custom Button.
Override the constructor to retrieve the attributes, initStyleButton() method show how to obtain styled attributes via TypedArray. Be sure to call recycle() when done with them.
package com.exercise.AndroidStyleButton;

import android.content.Context;
import android.content.res.TypedArray;
import android.util.AttributeSet;
import android.widget.Button;

public class StyleButton extends Button {

public StyleButton(Context context) {
super(context);
// TODO Auto-generated constructor stub
}

public StyleButton(Context context, AttributeSet attrs) {
super(context, attrs);
// TODO Auto-generated constructor stub
initStyleButton(attrs);
}

public StyleButton(Context context, AttributeSet attrs, int defStyle) {
super(context, attrs, defStyle);
// TODO Auto-generated constructor stub
initStyleButton(attrs);
}

private void initStyleButton(AttributeSet attrs){
TypedArray a = getContext().obtainStyledAttributes(attrs,R.styleable.style_Button);
String Text1 = a.getString(R.styleable.style_Button_myText_1);
String Text2 = a.getString(R.styleable.style_Button_myText_2);
setText(Text1 + "\n" + Text2);
a.recycle();
}

}


Finally, modify main.xml to add our custom buttons with our own attributes.
<?xml version="1.0" encoding="utf-8"?>
<LinearLayout xmlns:android="http://schemas.android.com/apk/res/android"
xmlns:stylebutton= "http://schemas.android.com/apk/res/com.exercise.AndroidStyleButton"
android:orientation="vertical"
android:layout_width="fill_parent"
android:layout_height="fill_parent"
>
<TextView
android:layout_width="fill_parent"
android:layout_height="wrap_content"
android:text="@string/hello"/>
<com.exercise.AndroidStyleButton.StyleButton
android:layout_width="wrap_content"
android:layout_height="wrap_content"
stylebutton:myText_1="My Text 1"
stylebutton:myText_2="My Text 2"
/>
<com.exercise.AndroidStyleButton.StyleButton
android:layout_width="wrap_content"
android:layout_height="wrap_content"
stylebutton:myText_1="Hello!"
stylebutton:myText_2="It's a Style Button:)"
/>
</LinearLayout>


Download the files.


Friday 14 January 2011

Windows XP Environment Variable equivalents in Windows 7

Microsoft Logo

Today I had to install some software that uses default Windows XP paths. However, I am running Windows 7 64 bit, so the locations are different. What are the new paths in Windows 7?


Doing a quick Google, I found this: Recognized Environment Variables


This is a Microsoft tech note that maps/translates default Windows XP paths to Windows 7 paths. Very, very useful.


In my case, I need to know what are the default paths for user templates and all user templates. Here is the scoop.


Templates for All Users

Windows XP Location: C:\Documents and Settings\All Users\Templates

Windows 7 Location: C:\ProgramData\Microsoft\Windows\Templates


Templates for a User Account

Windows XP Location: C:\Documents and Settings\username\Templates

Windows 7 Location: C:\Users\username\AppData\Roaming\Microsoft\Windows\Templates

Stable Android-x86 2.2 (Froyo-x86) released

Android-x86 is a project to port Android open source project to x86 platform. Stable Android-x86 2.2 (Froyo-x86) released. Live CD ISOs are available.

Link: http://www.android-x86.org/releases/release_2_2

The is based on the Android 2.2.1 (Froyo branch). We fixed and added many x86 specified code to let the system runs smoothly on x86 platforms, especially for netbooks or tablets. The key features contain
  • Kernel 2.6.35.7 with KMS enabled. Most netbooks can run Android-x86 in the native resolution.
  • Hardware OpenGL acceleration for Intel integrated graphic chipsets. It is turned on by default if the i915 driver is available. However, if you have trouble with it, you can disable it by adding HWACCEL=0 to the cmdline. (by olv from 0xlab)
  • Wifi and Ethernet support. Both are configured from the GUI.
  • Support 3G USB modem with auto-configuration.
  • A text based GUI installer which supports ext3/ext2/ntfs/fat32 filesystems.
  • The installer is improved to support read-write mode, as well as a tool to create a fake sdcard.
  • Bluetooth support for builtin device and external bluetooth dongle.
  • Keyboard layout is configurable. To use it, you have to install Android-x86 to harddisk and reboot after changing the setting.
  • External usb drive and sdcard are auto mounted on plugging.
  • Add touch features to simulate Home/Menu/Back keys, useful for touchscreen only devices.
  • Add software mouse cursor. Mouse wheel is also supported.
  • Compressed filesystem (squashfs).
  • MirBSD Korn Shell (mksh) is added to replace android's dumb sh.
  • Touchscreen calibration.
  • Battery status percentage.
  • AndAppStore client 1.6.8.
  • Atom optimization for dalvik and bionic.


Thursday 13 January 2011

Implement a simple Socket Server in Eclipse

Implement a simple Socket Server in Eclipse

In last exercise "Simple communication using java.net.Socket", a simple client app have be implemented. Here I will implement the a simple Socket Server in Eclipse.

- In Eclipse, start a normal Java project.

- Create a new class, say MyServer.java in my case.
MyServer.java
import java.io.DataInputStream;
import java.io.DataOutputStream;
import java.io.IOException;
import java.net.ServerSocket;
import java.net.Socket;


public class MyServer {

public static void main(String[] args){
ServerSocket serverSocket = null;
Socket socket = null;
DataInputStream dataInputStream = null;
DataOutputStream dataOutputStream = null;

try {
serverSocket = new ServerSocket(8888);
System.out.println("Listening :8888");
} catch (IOException e) {
// TODO Auto-generated catch block
e.printStackTrace();
}

while(true){
try {
socket = serverSocket.accept();
dataInputStream = new DataInputStream(socket.getInputStream());
dataOutputStream = new DataOutputStream(socket.getOutputStream());
System.out.println("ip: " + socket.getInetAddress());
System.out.println("message: " + dataInputStream.readUTF());
dataOutputStream.writeUTF("Hello!");
} catch (IOException e) {
// TODO Auto-generated catch block
e.printStackTrace();
}
finally{
if( socket!= null){
try {
socket.close();
} catch (IOException e) {
// TODO Auto-generated catch block
e.printStackTrace();
}
}

if( dataInputStream!= null){
try {
dataInputStream.close();
} catch (IOException e) {
// TODO Auto-generated catch block
e.printStackTrace();
}
}

if( dataOutputStream!= null){
try {
dataOutputStream.close();
} catch (IOException e) {
// TODO Auto-generated catch block
e.printStackTrace();
}
}
}
}
}
}


- Now you can run the server by clicking the Run (Green arrow) button.


- If the app of last exercise is running at the same time, this Socket Server and the Client App can communicate with each other.

(Remember to check your ip and update in "Simple communication using java.net.Socket".)

Download the files.

Learn Java for Android Development


Product Description

Android development is hot, and many programmers are interested in joining the fun. However, because this technology is based on Java, you should first obtain a solid grasp of the Java language and its foundational APIs to improve your chances of succeeding as an Android app developer. After all, you will be busy learning the architecture of an Android app, the various Android-specific APIs, and Android-specific tools. If you do not already know Java fundamentals, you will probably end up with a massive headache from also having to quickly cram those fundamentals into your knowledge base.

Learn Java for Android Development
teaches programmers of any skill level the essential Java language and foundational Java API skills that must be learned to improve the programmer�s chances of succeeding as an Android app developer. Each of the book�s 10 chapters provides an exercise section that gives you the opportunity to reinforce your understanding of the chapter�s material. Answers to the book�s more than 300 exercises are provided in an appendix. Once you complete this book, you will be ready to dive into Android, and you can start that journey by obtaining a copy of Beginning Android 2.

Additionally, author Jeff Friesen will provide supplementary material (such as 6 more chapters) on his javajeff.mb.ca website, available over the next few months following this book's release.

What you�ll learn

  • The Java language: This book provides complete coverage of nearly every pre-Java version 7 language feature (native methods are briefly mentioned but not formally covered). Starting with those features related to classes and objects, you progress to object-oriented features related to inheritance, polymorphism, and interfaces. You then explore the advanced language features for nested types, packages, static imports, exceptions, assertions, annotations, generics, and enums. Continuing, you investigate strictfp, class literals, synchronized, volatile, the enhanced for loop statement, autoboxing/unboxing, and transient fields. The book also briefly presents most (if not all) of Java version 7�s language features, although not much is said about closures or modules (which were not finalized at the time of writing).
  • Java APIs: In addition to Object and APIs related to exceptions, you explore Math, StrictMath, BigDecimal, BigInteger, Package, Boolean, Character, Byte, Short, Integer, Long, Float, Double, Number, the References API, the Reflection API, String, StringBuffer, System, the Threading API, the collections framework, the concurrency utilities, the internationalization APIs, the Preferences API, Random, the Regular Expressions API, File, RandomAccessFile, stream classes, and writer/reader classes. You will also get a tiny taste of Swing in the context of internationalization.
  • Tools: You will learn how to use the JDK�s javac (compiler), java (application launcher), javadoc (Java documentation generator), and jar (Java archive creator, updater, and extractor) tools. You will also receive an introduction to the NetBeans and Eclipse integrated development environments. Although you can develop Android apps without NetBeans or Eclipse, working with these IDEs is much more pleasant.

Who this book is for

This book is for any programmer (including existing Java programmers and Objective-C (iPhone/iPad) programmers) of any skill level who needs to obtain a solid understanding of the Java language and foundational Java APIs before jumping into Android app development.

Table of Contents

  1. Getting Started with Java
  2. Learning Language Fundamentals
  3. Learning Object-Oriented Language Features
  4. Mastering Advanced Language Features Part 1
  5. Mastering Advanced Language Features Part 2
  6. Exploring the Basic APIs Part 1
  7. Exploring the Basic APIs Part 2
  8. Discovering the Collections Framework
  9. Discovering Additional Utility APIs
  10. Performing I/O
  11. Solutions to Exercises

About the Author

Jeff ""JavaJeff"" Friesen is a freelance software developer and educator specializing in Java and now Android technology. In addition to teaching Java at a local college, he's written several books on Java, with Learn Java for Android and Beginning Java SE 6 Platform: From Novice to Professional being his most recent books. Jeff has also written numerous articles for java.net, InformIT.com and JavaWorld.com. Check out his javajeff.mb.ca website to discover these articles, as well as additional material on Java, JavaFX, and other software technologies.

Wednesday 12 January 2011

Simple communication using java.net.Socket

java.net.Socket provides a client-side TCP socket. It's a simple exercise to implement Socket communication, on Android as a client.

Simple communication using java.net.Socket

In the next exercises, I will implement a local Socket Server in Eclipse. Such that you can try the linking between Android device/emulator and the local socket server.

The server runs in local, so I have to know my IP, refer to last article "How to check my ip in Linux" to check your own ip. It's 192.168.1.101 in my case. Modify the code with your own ip.

socket = new Socket(< Your ip >, 8888);

package com.exercise.AndroidClient;

import java.io.DataInputStream;
import java.io.DataOutputStream;
import java.io.IOException;
import java.net.Socket;
import java.net.UnknownHostException;

import android.app.Activity;
import android.os.Bundle;
import android.view.View;
import android.widget.Button;
import android.widget.EditText;
import android.widget.TextView;

public class AndroidClient extends Activity {

EditText textOut;
TextView textIn;

/** Called when the activity is first created. */
@Override
public void onCreate(Bundle savedInstanceState) {
super.onCreate(savedInstanceState);
setContentView(R.layout.main);

textOut = (EditText)findViewById(R.id.textout);
Button buttonSend = (Button)findViewById(R.id.send);
textIn = (TextView)findViewById(R.id.textin);
buttonSend.setOnClickListener(buttonSendOnClickListener);
}

Button.OnClickListener buttonSendOnClickListener
= new Button.OnClickListener(){

@Override
public void onClick(View arg0) {
// TODO Auto-generated method stub
Socket socket = null;
DataOutputStream dataOutputStream = null;
DataInputStream dataInputStream = null;

try {
socket = new Socket("192.168.1.101", 8888);
dataOutputStream = new DataOutputStream(socket.getOutputStream());
dataInputStream = new DataInputStream(socket.getInputStream());
dataOutputStream.writeUTF(textOut.getText().toString());
textIn.setText(dataInputStream.readUTF());
} catch (UnknownHostException e) {
// TODO Auto-generated catch block
e.printStackTrace();
} catch (IOException e) {
// TODO Auto-generated catch block
e.printStackTrace();
}
finally{
if (socket != null){
try {
socket.close();
} catch (IOException e) {
// TODO Auto-generated catch block
e.printStackTrace();
}
}

if (dataOutputStream != null){
try {
dataOutputStream.close();
} catch (IOException e) {
// TODO Auto-generated catch block
e.printStackTrace();
}
}

if (dataInputStream != null){
try {
dataInputStream.close();
} catch (IOException e) {
// TODO Auto-generated catch block
e.printStackTrace();
}
}
}
}};
}


main.xml
<?xml version="1.0" encoding="utf-8"?>
<LinearLayout xmlns:android="http://schemas.android.com/apk/res/android"
android:orientation="vertical"
android:layout_width="fill_parent"
android:layout_height="fill_parent"
>
<TextView
android:layout_width="fill_parent"
android:layout_height="wrap_content"
android:text="@string/hello"
/>
<EditText
android:id="@+id/textout"
android:layout_width="fill_parent"
android:layout_height="wrap_content"
/>
<Button
android:id="@+id/send"
android:layout_width="fill_parent"
android:layout_height="wrap_content"
android:text="Send"
/>
<TextView
android:id="@+id/textin"
android:layout_width="fill_parent"
android:layout_height="wrap_content"
/>
</LinearLayout>


Also, you have to grand permission for the App to access internet, by adding the code in AndroidManifest.xml

<uses-permission android:name="android.permission.INTERNET"/>

Download the files.

How to check my ip in Linux

In my next exercise, I have to know my IP. In order to know my IP, use the command:

$ifconfig -a


The inet addr under eth0 is my IP address. It's the IP behind router, not to the public.


Tuesday 11 January 2011

Verizon iPhone 4 Coverage

iPhone iPad pictureHop on over to Engadget for full coverage of the Verizon iPhone 4.


The big news in my mind is support for iPhone 4 as a mobile hot spot. Me wants!!!! I have a Verizon Mifi, but it is very expensive to use.


My guess is AT&T will have to respond with feature parity on this one, or they are gonna lose a lot of customers (including me). If AT&T does come out with the feature, then why have they been waiting? To force the purchase of 3G iPads possibly? Hmm.

Monday 10 January 2011

PowerPoint Crashes when Typing Anything on a Mac Running Windows 7 and Bootcamp

OS X pictureProblem: PowerPoint Crashes when Typing Anything on a Mac Running Windows 7 and Bootcamp 3.2


This problem is bizarre. About an hour ago, I tried to start working on a PowerPoint presentation I started on Friday. Whenever I type anything PowerPoint 2007 crashes. Everything worked fine on Friday. (Ahhh!!!! Sometimes I really hate computers.) I'm using a MacBook Pro running Windows 7 64bit and Bootcamp 3.2.


Solution:

The bug appears to be with BootCamp 3.2 and Windows 7. My HP laptop has no such problem. Only my Mac.


Thanks to some smart folks on the Apple forums, there are workaround solutions to this bug. The problem seems to be with Windows, Bootcamp, PowerPoint, and the keyboard driver.


PowerPoint 2007

For PowerPoint 2007 on Windows 7....


  1. Open Control Panel

  2. Press "Change keyboards or other input methods" from "Clock, Language, and Region"

  3. Press "Change keyboards..."

  4. Press "Add..."

  5. Scroll down to and expand "English (United States)" (if it's not already expanded)

  6. Select "US"

  7. Press "OK"

  8. Press "OK"

  9. Press "OK"

  10. Close the Control Panel


See Forum Post Here


PowerPoint 2010

Another user performed these steps to fix the problem on PowerPoint 2010.


In PowerPoint 2010..


  1. Go to "File", "Options", "Language"

  2. Under a the heading "keyboard layout" note the hyperlink which says "not enabled".

  3. Click on the hyperlink and select a keyboard layout and the keyboard's language.

  4. Once you complete the process it will say "enabled" under the keyboard layout heading.


This should fix the problem.


I can confirm the PowerPoint 2007 fix worked for me. Given the Posts date back to late November it appears this bug has been around a while.

Verizon iPhone will have Unlimited Data Plan

iPhone iPad pictureAll Things D is reporting that the Verizon iPhone will have an unlimited Internet data plan. This differs from the AT&T which now as a monthly cap of 2G.


This will be another reason for the AT&T haters to make the switch. On the flip side, maybe AT&T will change its plan back or increase the data cap a bit. One can hope. :)


Practically speaking, it is actually pretty hard to reach that 2G cap. My iPhone is almost always on Wifi and I have found my usage is normally under 100 Megabytes. I supposed if you streamed music and video all the time, you could eat that up pretty fast. But I think you would be recharging your iPhone all the time if that were the case. Anyway, I'm sure the free market will figure out an appropriate data cap.

Sunday 9 January 2011

Setting up IMAP for Yahoo Mail

Internet IconDid you know you can access your Yahoo Mail via IMAP? Well you can. You just need to know the mail server names. With this information, mail programs like Thunderbird, Outlook, or Mac Mail can be used to read and manage your Yahoo mail account. Here are the details.


IMAP Server: imap.mail.yahoo.com

Port: 993


SMTP Server: smtp.mail.yahoo.com

Port: 465


Both servers use the default ports for SSL. So when configuring the mail client, just select SSL as the encryption method and the ports values will default to the above. When asked for a user name, use your Yahoo mail address, e.g., yourname@yahoo.com. Use your regular password to log in.


That's it. Just fill in the information when asked and you can read mail, manage folders, and do anything you normally would using with e-mail.

Make an Android App for your Web Site

Webkit icon
Read Write Web has this story on feed.nu. This a web site you can use to build your own Android app for your web site. Pretty cool. I haven't tried it yet, but I intend to.