Tuesday 31 August 2010

Making money from Android Apps

Google LogoAndroidandme.com has this story on how much a developer is making from his Android Task Manager app. Right now, about $10,000 a month. Wow! Sounds pretty awesome to me.


Anyway, he really started to rake in the money once he released a free version that included ads. Definitely worth a quick read.

Monday 30 August 2010

Downgrade 4.0.2 -> 4.0.1: Of Myths and SHSHs

EDIT: Given the sheer number of people that are getting lucky with having their SHSH's on file with Cydia, I cannot stress enough how important it is to at least try to save your SHSH for 4.0 and 4.0.1. Remember to make sure Cydia is selected because Cydia is where your SHSHs would be. Who knows? You might be one of the lucky ones :)


There is much discussion on many blogs about a potential means of downgrading iOS 4.0.2 to 4.0.1 by simply changing a couple values in the buildmanifest.plist and copying all of the images from 4.0.1 into 4.0.2 and then deleting the files ending with 002. Following all of this, perform a DFU restore and somehow you will be on 4.0.1. 


There is a perfectly logical explanation for all of this and I will lay out exactly what is happening and explain why it is working for the folks that are the lucky ones.


Let me get this out first. 


  1. This is not a miracle, at least not in the sense you all hope for

  2. SHSHs are STILL required for any iPhone 4, iPhone 3GS, iPad, iPod Touch 3G, and iPod Touch 2G (MC Model)

  3. There is NO way around this... unfortunately this method included.

Let me start by explaining something very important. The buildmanifest is used by iTunes to build much of the TSS request that is used to obtain your SHSH for any given firmware revision. Unfortunately, the BuildNumber has no part to play in the request for SHSH. All that you ended up doing in following these directions is request 4.0.1 SHSH blobs. THAT IS ALL. Since every single one of you that got this to work changed your hosts file to point to Cydia, Cydia responded to the TSS request with an SHSH blob that was ALREADY "on-file". There was no magic. There was no miracle, apart from the lucky break that your device had been put on Cydia's SHSH request list at some time in the distant past.


That's it in a nutshell folks. There was no amazing technique for bypassing Apple's TSS. There was no amazing exploit that exists in DFU mode allowing for 4.0.2 -> 4.0.1 downgrading. It's simple; Cydia had your SHSH because at sometime in the past either:


  • Someone saved your SHSH with that device using TinyUmbrella and the default options

  • Someone restored that device with Cydia in the hosts pointing to gs.apple.com

  • Someone jailbroke the device and pressed 'Make my life easier'

That's it folks. Sorry to be a buzzkill but there was much confusion about this issue and many blog posts that simply didn't give the full story of what exactly was going on.

Farewell Netscape Campus

Firefox LogoLooks like the old Netscape campus is getting turned over to another company (Symantec). I am sure things haven't been like the were for some time. But as a Netscape Alumni, it still makes me sad.

Java Glassfish Security Annotations

Duke WavingHad to do a little research on setting up basic authentication on Glassfish v3. Here are the two best articles I ran across on the subject.


The Firmware Umbrella: Intense Debate Support

I've added Intense Debate support to my blog in hopes that folks can get answers to their questions by the growing TinyUmbrella community. There are many times that I am unable to answer your questions very quickly but there are helpful individuals that selflessly devote time to helping others with issues that are common.

As the posts become more numerous, I'll moderate them less and less eventually adding some few folks as moderators. Thank you all for your continued interest in this blog, TinyUmbrella, and helping your friends reserve their right to restore the firmware they want to restore!

Sunday 29 August 2010

A simple Home Screen App Widget to get Date/Time.

A simple Home Screen App Widget to get Date/Time.

In former exercise, "A dummy Android Home Screen App Widget" without any function have been implemented. Here, we add some code in the onUpdate() method to get and show the date/time on home screen in 30 minutes interval.

A simple Home Screen App Widget to get Date/Time.

Bascically the structure is same as the exercise of "Create a dummy Android Home Screen App Widget".

Modify android:updatePeriodMillis to "1800000" in /res/xml/hellowidgetproviderinfo.xml. Because "updatePeriodMillis will not be delivered more than once every 30 minutes".

Modify /res/layout/hellowidget_layout.xml
<?xml version="1.0" encoding="utf-8"?>
<LinearLayout xmlns:android="http://schemas.android.com/apk/res/android"
android:orientation="vertical"
android:layout_width="fill_parent"
android:layout_height="fill_parent"
>
<TextView
android:id="@+id/widgettext"
android:layout_width="fill_parent"
android:layout_height="wrap_content"
android:textColor="#000000"
/>
</LinearLayout>


Modify HelloWidgetProvider.java to override methods onDeleted(), onDisabled(), onEnabled(), and mainly in onUpdate().
package com.exercise.HelloWidget;

import java.text.SimpleDateFormat;
import java.util.Date;

import android.appwidget.AppWidgetManager;
import android.appwidget.AppWidgetProvider;
import android.content.Context;
import android.widget.RemoteViews;
import android.widget.Toast;

public class HelloWidgetProvider extends AppWidgetProvider {

private SimpleDateFormat formatter = new SimpleDateFormat("dd MMM yyyy hh:mm:ss a");
String strWidgetText = "";

@Override
public void onDeleted(Context context, int[] appWidgetIds) {
// TODO Auto-generated method stub
//super.onDeleted(context, appWidgetIds);
Toast.makeText(context, "onDeleted()", Toast.LENGTH_LONG).show();
}

@Override
public void onDisabled(Context context) {
// TODO Auto-generated method stub
//super.onDisabled(context);
Toast.makeText(context, "onDisabled()", Toast.LENGTH_LONG).show();
}

@Override
public void onEnabled(Context context) {
// TODO Auto-generated method stub
//super.onEnabled(context);
Toast.makeText(context, "onEnabled()", Toast.LENGTH_LONG).show();
}

@Override
public void onUpdate(Context context, AppWidgetManager appWidgetManager,
int[] appWidgetIds) {
// TODO Auto-generated method stub

String currentTime = formatter.format(new Date());
strWidgetText = strWidgetText + "\n" + currentTime;

RemoteViews updateViews = new RemoteViews(context.getPackageName(), R.layout.hellowidget_layout);
updateViews.setTextViewText(R.id.widgettext, strWidgetText);
appWidgetManager.updateAppWidget(appWidgetIds, updateViews);

super.onUpdate(context, appWidgetManager, appWidgetIds);
Toast.makeText(context, "onUpdate()", Toast.LENGTH_LONG).show();

}
}
CORRECTION@2010-10-03: The following statement should be moved to the first inside onUpdate() method.
super.onUpdate(context, appWidgetManager, appWidgetIds);

Download the files.

next: A simple Home Screen App Widget with configure activity

Related Article:
- Home Screen Battery Widget


Blog Template Updated

The template is updated I think. I'm not sure I like the logo. Otherwise, the new Picture Window template is installed. Let me know if you run into in problems with it.

Updating Blog Template

I'm updating my blogger template today. I have run into some issues lately because I think I have overcustomized. So if you see any oddities in the next couple of hours. That's why. :)


Update 8/24/11: This entry is getting a lot of hits lately. But there really isn't information about what I think people are looking for so here is a link to what I think people want:

Blogger Template Designer Now Available

minimum android:updatePeriodMillis

According to Android's document of AppWidgetProviderInfo, updatePeriodMillis define how often, in milliseconds, that this AppWidget wants to be updated.

Updates requested with updatePeriodMillis will not be delivered more than once every 30 minutes.

Ref: public int updatePeriodMillis in AppWidgetProviderInfo.

If you want to implement App Widget with higher rate, reference "App Widget using Alarm Manager".

Friday 27 August 2010

TinyUmbrella: New Features Coming Soon

I've been working on a few cool new features. I've heard some great ideas and have decided to put those ideas in place. Unfortunately, implementation of those ideas is taking a bit longer than I had anticipated. Heres a few of the great ideas I've gotten from all of you:


  • Device History: TinyUmbrella will remember device information of devices that have connected so that saving SHSH's for those devices in the future no longer requires you to connect the device.

  • Save All SHSH's Available "On-File" at Cydia: TinyUmbrella will now automatically check Cydia for ALL SHSHs for the connected device (or device from history :) )

  • TinyUmbrella will also help you detect what application is running on your computer that is taking up port 80 and will give you the option to kill that application. This should help many of you that don't know what application may be listening on port 80 (ie. Skype)

  • TinyUmbrella will also tell you what firmware versions you can safely downgrade or restore to whenever you connect the device (or select a device from history)

  • TinyUmbrella will be sporting a cleaner UI based on some of the great suggestions from @chpwn (a friend and fellow chronic dev team associate)

  • Support for PowerPC and more stable runtime for folks having problems running TinyUmbrella for odd and various reasons.

Looking down the road, I have some big things that I plan on doing with TinyUmbrella. Here are a couple of the things I'm looking at in the long term:
  • Activation Support: I've started looking into the way the phone requests (and obtains) activation from apple's servers. I'm confident I can duplicate this process but I have more investigation as the the process is incredibly complicated.

  • Full Restore Support without iTunes: I'm looking at implementing my own complete restore mechanism. I have not decided if I'll directly use @p0sixninja's libirestore or whether I'll try to do something that hasn't been done before... ie in java :)

Thank you all for your support and suggestions. I hope you all were able to save your 4.0.1/3.2.1 SHSH which enables you to restore to restore to that firmware revision indefinitely. Also, a HUGE thank you to all of you that have donated; you are all very generous and I greatly appreciate every single one of you.

Thursday 26 August 2010

Become a JavaScript Ninja

Ajaxian has an article on how to become a JavaScript ninja. A lot of good suggestions here. I would say join the right startup   or just regular company for that matter. Who knows, maybe the web development team at the local power utility is a fun bunch doing interesting work. Don't limit your options. Working with people you enjoy is the most important thing.


Build some tools you can use. Maybe other people can use them and who knows, maybe you will be employee #1. :)

Tuesday 24 August 2010

Marshalling

Duke WavingWell kids, today I learned about marshalling. No, not the old west kind where you put on a six gun and clean up the streets, the XML kind.


I found two really helpful links.


  1. A really concise marshalling example from java2s.com.

  2. How to marshall to a string from nabble.com.

If I have some time I'll write up my own example. In the mean time, maybe these links will help keep these two pages atop the Google rankings.

Create a dummy Android Home Screen App Widget

In this exercise, a dummy home screen app widget will be described; to show the simpliest element of a ndroid app widget.

Android Home Screen App Android

- Create a new project of ndroid application as normal, HelloWidget.

- Modify AndroidManifest.xml to have a receiver, with name of "HelloWidgetProvider", under Appliation.

<?xml version="1.0" encoding="utf-8"?>
<manifest xmlns:android="http://schemas.android.com/apk/res/android"
package="com.exercise.HelloWidget"
android:versionCode="1"
android:versionName="1.0">
<application android:icon="@drawable/icon" android:label="@string/app_name">
<activity android:name=".HelloWidget"
android:label="@string/app_name">
<intent-filter>
<action android:name="android.intent.action.MAIN" />
<category android:name="android.intent.category.LAUNCHER" />
</intent-filter>
</activity>
<receiver android:name="HelloWidgetProvider" >
<intent-filter>
<action android:name="android.appwidget.action.APPWIDGET_UPDATE" />
</intent-filter>
<meta-data android:name="android.appwidget.provider"
android:resource="@xml/hellowidgetproviderinfo" />
</receiver>
</application>
<uses-sdk android:minSdkVersion="4" />

</manifest>
The <receiver> element requires the android:name attribute, which specifies the AppWidgetProvider used by the App Widget.

The <intent-filter> element must include an <action> element with the android:name attribute. This attribute specifies that the AppWidgetProvider accepts the ACTION_APPWIDGET_UPDATE broadcast.

The <meta-data> element specifies the AppWidgetProviderInfo resource and requires the following attributes:

* android:name - Specifies the metadata name. Use android.appwidget.provider to identify the data as the AppWidgetProviderInfo descriptor.
* android:resource - Specifies the AppWidgetProviderInfo resource location.


- Create a new folder /res/xml, create a new hellowidgetproviderinfo.xml
<appwidget-provider xmlns:android="http://schemas.android.com/apk/res/android"
android:minWidth="146dp"
android:minHeight="72dp"
android:updatePeriodMillis="10000"
android:initialLayout="@layout/hellowidget_layout"
>
</appwidget-provider>
It define the AppWidgetProviderInfo object in an XML resource using a single <appwidget-provider>, include the essential qualities of an App Widget, such as its minimum layout dimensions, its initial layout resource, how often to update the App Widget, and (optionally) a configuration Activity to launch at create-time.


- Create a layout file /res/layout/hellowidget_layout.xml
<?xml version="1.0" encoding="utf-8"?>
<LinearLayout xmlns:android="http://schemas.android.com/apk/res/android"
android:orientation="vertical"
android:layout_width="fill_parent"
android:layout_height="fill_parent"
>
<TextView
android:layout_width="fill_parent"
android:layout_height="wrap_content"
android:text="@string/hello"
/>
</LinearLayout>
It's the layout of the widget. In this dummy exercisse, just copy the content of the auto-generated layout, main.xml.


- Create a class HelloWidgetProvider.java extends AppWidgetProvider. With nothing inside.
package com.exercise.HelloWidget;

import android.appwidget.AppWidgetProvider;

public class HelloWidgetProvider extends AppWidgetProvider {

}
It do nothing at all.


Now you can build and Install the application as normal, then close it after started. It's not own target in this exercise.

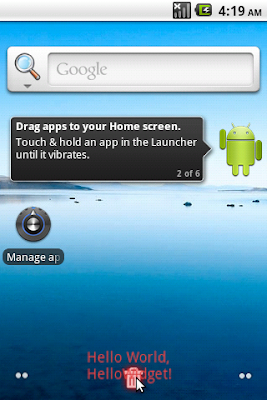
- Add the HelloWidget on Home Screen, as describe in article "Home Screen App Widget". It's a dummy widget without any function, just show how to create a app widget.

Download the files.


Related Article:
minimum android:updatePeriodMillis
A simple Home Screen App Widget to get Date/Time


Monday 23 August 2010

Live HTTP Headers

Firefox LogoWow did I run across a useful tool today. Live HTTP Headers is an add on for Firefox. It shows the actual HTTP headers for each browser request you make. This is very useful for a lot of stuff, but especially for working on RESTful web services.


Why didn't I find this 2 weeks ago! lol.


Get the add on here: https://addons.mozilla.org/en-US/firefox/addon/3829/

Web Site for the Add On: http://livehttpheaders.mozdev.org/

Sunday 22 August 2010

Home Screen App Widget

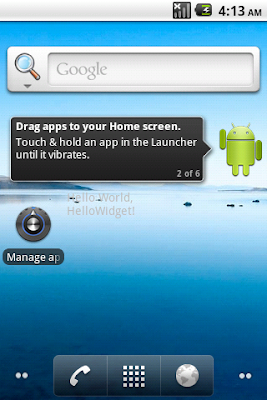
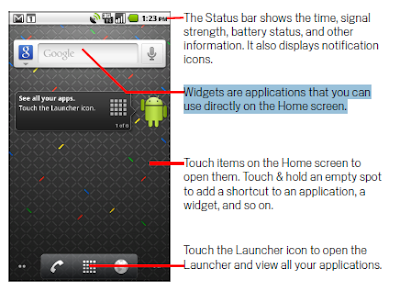
App Widgets are miniature application views that can be embedded in other applications (such as the Home screen) and receive periodic updates. These views are referred to as Widgets in the user interface. For example; a clock, a music player, a picture frame, the Google search bar...etc.

What is widget

How to add a App Widget on Home Screen

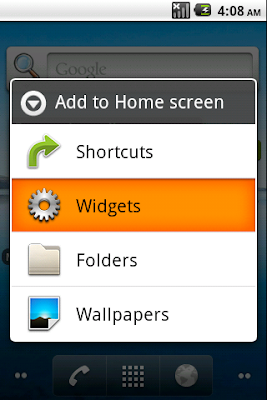
1 Touch & hold an empty location on a Home screen.

2 Touch Widgets in the Add to Home screen menu.
To add a widget on Home Screen

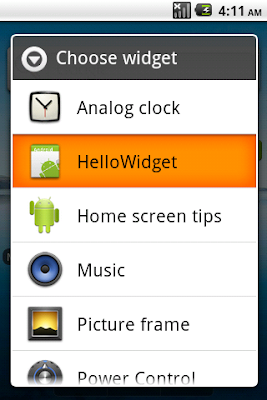
3 Touch the widget you want in the Choose widget menu.
Choose the widget to add

4. The Widget will be added on Home Screen.
App Widget is added

How to delete a App Widget on Home Screen

1. Touch & hold the widget on Home screen for a moment, a Trash will appear on the bottom of Home Screen.

2. Hold & move the widget over the trash, and release. The widget will deleted.
Delete a App Widget

Friday 20 August 2010

Thursday 19 August 2010

R.I.P - 4.0.1 / 3.2.1 iOS

Apple has stopped signing 4.0.1 and 3.2.1 SHSH requests for all devices now. If you missed your chance - I'm sorry. There's nothing that can be done now. If you had a 'Pending TSS Request' and DID NOT use TinyUmbrella to save your SHSH then I'm afraid you may not have your SHSH's saved on Cydia. If you DID use TinyUmbrella to save your SHSH then it's guaranteed that Cydia has your SHSh and is just processing them locally before they show up on your Cydia Home Page.

I'll be updating TinyUmbrella in the next day or so to reflect the new 4.0.2 / 3.2.2 defaults even though this iOS version is completely worthless for jailbreaking... However, it is ALWAYS important to save your SHSH because you will never know what the next iOS version will bring and what will and will not be possible with it.  

Wednesday 18 August 2010

Implement a Simple Horizontal Indicator using SensorManager and SensorEventListener

In the former articles, "Detect rotation around X, Y & Z axis, using SensorManager and SensorEventListener" and "Implement a Simple Compass using SensorManager and SensorEventListener" have been describe. In this article, I will show how to implement a Horizontal Indicator.

A point float on the screen to indicate horizontal of the phone.
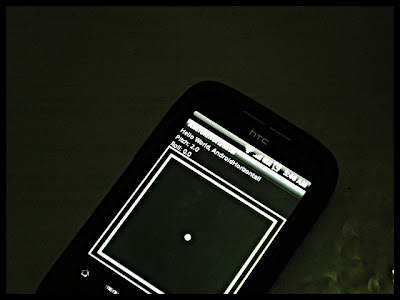
a Simple Horizontal Indicator

Create a custom view, HorizontalView.java, extends View. It display the drawing of our indicator.
package com.exercise.AndroidHorizontal;

import android.content.Context;
import android.graphics.Canvas;
import android.graphics.Color;
import android.graphics.Paint;
import android.util.AttributeSet;
import android.view.View;

public class HorizontalView extends View {

private float pitch = 0, roll = 0;
private Paint paint = new Paint(Paint.ANTI_ALIAS_FLAG);
private boolean firstDraw;
final float radiusPt = (float)3;

public HorizontalView(Context context) {
super(context);
// TODO Auto-generated constructor stub
init();
}

public HorizontalView(Context context, AttributeSet attrs) {
super(context, attrs);
// TODO Auto-generated constructor stub
init();
}

public HorizontalView(Context context, AttributeSet attrs, int defStyle) {
super(context, attrs, defStyle);
// TODO Auto-generated constructor stub
init();
}

private void init(){

paint.setStyle(Paint.Style.STROKE);
paint.setStrokeWidth(3);
paint.setColor(Color.WHITE);
paint.setTextSize(20);

firstDraw = true;
}

@Override
protected void onMeasure(int widthMeasureSpec, int heightMeasureSpec) {
// TODO Auto-generated method stub
setMeasuredDimension(MeasureSpec.getSize(widthMeasureSpec), MeasureSpec.getSize(heightMeasureSpec));
}

@Override
protected void onDraw(Canvas canvas) {
// TODO Auto-generated method stub

int cxPlan = getMeasuredWidth()/2;
int cyPlan = getMeasuredHeight()/2;

float fullLength, halfLength, ptPerDegree;

if(cxPlan > cyPlan){
fullLength = (float)(getMeasuredHeight() * 0.9);

}
else{
fullLength = (float)(getMeasuredWidth() * 0.9);
}
halfLength = fullLength/2;
ptPerDegree = fullLength/360;

canvas.drawRect(cxPlan-halfLength, cyPlan-halfLength,
cxPlan+halfLength, cyPlan+halfLength, paint);

canvas.drawRect(0, 0, getMeasuredWidth(), getMeasuredHeight(), paint);

if(!firstDraw){
float yPt = cyPlan + (pitch * ptPerDegree);
float xPt = cxPlan + (roll * ptPerDegree);
canvas.drawCircle(xPt, yPt, radiusPt, paint);
}
}

public void updateHorizontal(float tPitch, float tRoll)
{
firstDraw = false;
pitch = tPitch;
roll = tRoll;
invalidate();
}
}


Modify the layout file, main.xml, to add HorizontalView.
<?xml version="1.0" encoding="utf-8"?>
<LinearLayout xmlns:android="http://schemas.android.com/apk/res/android"
android:orientation="vertical"
android:layout_width="fill_parent"
android:layout_height="fill_parent"
>
<TextView
android:layout_width="fill_parent"
android:layout_height="wrap_content"
android:text="@string/hello"
/>
<TextView
android:id="@+id/textpitch"
android:layout_width="fill_parent"
android:layout_height="wrap_content"
/>
<TextView
android:id="@+id/textroll"
android:layout_width="fill_parent"
android:layout_height="wrap_content"
/>
<view
class="com.exercise.AndroidHorizontal.HorizontalView"
android:id="@+id/myhorizontalview"
android:layout_width="fill_parent"
android:layout_height="fill_parent"
/>
</LinearLayout>


Modify the main code, AndroidHorizontal.java, to handle SensorManager and SensorEventListener.
package com.exercise.AndroidHorizontal;

import java.util.List;

import android.app.Activity;
import android.content.Context;
import android.hardware.Sensor;
import android.hardware.SensorEvent;
import android.hardware.SensorEventListener;
import android.hardware.SensorManager;
import android.os.Bundle;
import android.widget.TextView;
import android.widget.Toast;

public class AndroidHorizontal extends Activity {

private static SensorManager mySensorManager;
private boolean sersorrunning;
private HorizontalView myHorizontalView;
private TextView textviewPitch, textviewRoll;

/** Called when the activity is first created. */
@Override
public void onCreate(Bundle savedInstanceState) {
super.onCreate(savedInstanceState);
setContentView(R.layout.main);

myHorizontalView = (HorizontalView)findViewById(R.id.myhorizontalview);
textviewPitch = (TextView)findViewById(R.id.textpitch);
textviewRoll = (TextView)findViewById(R.id.textroll);

mySensorManager = (SensorManager)getSystemService(Context.SENSOR_SERVICE);
List<Sensor> mySensors = mySensorManager.getSensorList(Sensor.TYPE_ORIENTATION);

if(mySensors.size() > 0){
mySensorManager.registerListener(mySensorEventListener, mySensors.get(0), SensorManager.SENSOR_DELAY_NORMAL);
sersorrunning = true;
Toast.makeText(this, "Start ORIENTATION Sensor", Toast.LENGTH_LONG).show();
}
else{
Toast.makeText(this, "No ORIENTATION Sensor", Toast.LENGTH_LONG).show();
sersorrunning = false;
finish();
}
}

private SensorEventListener mySensorEventListener = new SensorEventListener(){

@Override
public void onAccuracyChanged(Sensor sensor, int accuracy) {
// TODO Auto-generated method stub

}

@Override
public void onSensorChanged(SensorEvent event) {
// TODO Auto-generated method stub

textviewPitch.setText("Pitch: " + String.valueOf(event.values[1]));
textviewRoll.setText("Roll: " + String.valueOf(event.values[2]));

myHorizontalView.updateHorizontal(
(float)event.values[1], (float)event.values[2]);
}

};

@Override
protected void onDestroy() {
// TODO Auto-generated method stub
super.onDestroy();

if(sersorrunning){
mySensorManager.unregisterListener(mySensorEventListener);
}
}


}


Modify AndroidManifest.xml to disable the auto-rotate feature, otherwise it will point to wrong direction.

Download the files.


HTML 5 Book

Mark Pilgrims book is about to come out in print. You can buy the electronic version right now on the O'Reilly Web site. I picked it up over the weekend and look forward to reading it.

Tuesday 17 August 2010

Fake TinyUmbrella Sites & 4.0.2

I don't understand the fervor to obtain your 4.0.2 / 3.2.2 SHSH. But it's resulted in some well-meaning but ill-informed folks to create one-off updates of TinyUmbrella. One went to some extremes to try making a name for himself. The fact is this, while 4.0.1 and 3.2.1 are being signed, I'm going to keep those as the defaults for obtaining signatures. You can obtain your 4.0.2 / 3.2.2 but you will have to select it from the advanced options.

If you've put together a site with my application's name, take it down so that you do not confuse folks with your one-off changes.

Thanks.

ListPreference

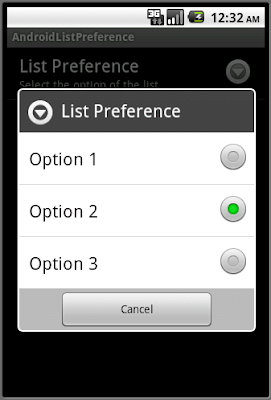
Compare with the old exercise "Preferences and SharedPreferences" and "EditTextPreference", ListPreference is little bit complicate.

ListPreference

Create a XML file arrays.xml in the folder /res/values/, to define the selection of the list. listDisplayWord define the words to be displayed, listReturnValue define the return value which will be used later.
<?xml version="1.0" encoding="utf-8"?>
<resources>
<string-array name="listDisplayWord">
<item>Option 1</item>
<item>Option 2</item>
<item>Option 3</item>
</string-array>
<string-array name="listReturnValue">
<item>1 is selected</item>
<item>2 is selected</item>
<item>3 is selected</item>
</string-array>
</resources>


Create a preferences.xml in the folder /res/xml/
<?xml version="1.0" encoding="utf-8"?>
<PreferenceScreen xmlns:android="http://schemas.android.com/apk/res/android">
<ListPreference
android:title="List Preference"
android:summary="Select the option of the list"
android:key="listPref"
android:entries="@array/listDisplayWord"
android:entryValues="@array/listReturnValue" />
</PreferenceScreen>


Create SetPreferences.java
package com.exercise.AndroidListPreference;
import com.exercise.AndroidListPreference.R;

import android.os.Bundle;
import android.preference.PreferenceActivity;

public class SetPreferences extends PreferenceActivity {

@Override
protected void onCreate(Bundle savedInstanceState) {
// TODO Auto-generated method stub
super.onCreate(savedInstanceState);
addPreferencesFromResource(R.xml.preferences);
}
}


Modify main.xml
<?xml version="1.0" encoding="utf-8"?>
<LinearLayout xmlns:android="http://schemas.android.com/apk/res/android"
android:orientation="vertical"
android:layout_width="fill_parent"
android:layout_height="fill_parent"
>
<TextView
android:layout_width="fill_parent"
android:layout_height="wrap_content"
android:text="@string/hello"
/>
<TextView
android:layout_width="fill_parent"
android:layout_height="wrap_content"
android:text="Preferences:"
/>
<TextView
android:id="@+id/list_pref"
android:layout_width="fill_parent"
android:layout_height="wrap_content"
/>
<Button
android:id="@+id/setpreference"
android:layout_width="fill_parent"
android:layout_height="wrap_content"
android:text="Set Preference"
/>
</LinearLayout>


Main code
package com.exercise.AndroidListPreference;

import android.app.Activity;
import android.content.Intent;
import android.content.SharedPreferences;
import android.os.Bundle;
import android.preference.PreferenceManager;
import android.view.View;
import android.widget.Button;
import android.widget.TextView;
import android.widget.Toast;

public class AndroidListPreference extends Activity {

TextView myListPref;

/** Called when the activity is first created. */
@Override
public void onCreate(Bundle savedInstanceState) {
super.onCreate(savedInstanceState);
setContentView(R.layout.main);
myListPref = (TextView)findViewById(R.id.list_pref);
Button buttonSetPreference = (Button)findViewById(R.id.setpreference);

buttonSetPreference.setOnClickListener(new Button.OnClickListener(){

@Override
public void onClick(View v) {
// TODO Auto-generated method stub
startActivity(new Intent(AndroidListPreference.this, SetPreferences.class));
}});
}

@Override
protected void onResume() {
// TODO Auto-generated method stub
super.onResume();
Toast.makeText(this, "onResume", Toast.LENGTH_LONG).show();
SharedPreferences myPreference=PreferenceManager.getDefaultSharedPreferences(this);
String myListPreference = myPreference.getString("listPref", "default choice");
myListPref.setText(myListPreference);
}
}


Also have to modify AndroidManifest.xml to include SetPreferences.java
<?xml version="1.0" encoding="utf-8"?>
<manifest xmlns:android="http://schemas.android.com/apk/res/android"
package="com.exercise.AndroidListPreference"
android:versionCode="1"
android:versionName="1.0">
<application android:icon="@drawable/icon" android:label="@string/app_name">
<activity android:name=".AndroidListPreference"
android:label="@string/app_name">
<intent-filter>
<action android:name="android.intent.action.MAIN" />
<category android:name="android.intent.category.LAUNCHER" />
</intent-filter>
</activity>
<activity android:name=".SetPreferences" />
</application>
<uses-sdk android:minSdkVersion="4" />

</manifest>


Download the files.

For Android 3.0 or higher, you should consider PreferenceFragment with ListPreference.


Monday 16 August 2010

Convert int to Extended ASCII

In my old exercise "ListView with more items on each entry, using SimpleAdapter", convertion of int to ASCII have been introduced:

//i is the int to be converted
byte[] data = {(byte) i};
CharSequence strSymbol = EncodingUtils.getAsciiString(data);


The follwing code show how to convert from int (0x80~0xFF) to extended ASCII of charset "windows-1252", using org.apache.http.util.EncodingUtils.

//i is the int to be converted
byte[] data = {(byte) i};
CharSequence strSymbol = EncodingUtils.getString(data, "windows-1252");


Sunday 15 August 2010

How to add a linkable text in Dialog

It's a example to add a linkable text in a dialog, using Linkify.

linkable text in Dialog

 private void openOptionsMySiteDialog()
{

final SpannableString stMyWeb = new SpannableString("http://android-er.blogspot.com/");
Linkify.addLinks(stMyWeb, Linkify.ALL);

final AlertDialog aboutDialog = new AlertDialog.Builder(MyActivity.this)
.setMessage(stMyWeb)
.setPositiveButton("OK", new DialogInterface.OnClickListener() {

@Override
public void onClick(DialogInterface dialog, int which) {
// TODO Auto-generated method stub
}})
.create();

aboutDialog.show();

((TextView)aboutDialog.findViewById(android.R.id.message))
.setMovementMethod(LinkMovementMethod.getInstance());

}

Saturday 14 August 2010

Multiple Account Support for GMail

Google LogoGoogle has announced support for switching between multiple GMail accounts. A welcome features for those of us with a few accounts.


Gizmodo has the details on how to make it work here.

Friday 13 August 2010

Implement a Simple Compass using SensorManager and SensorEventListener

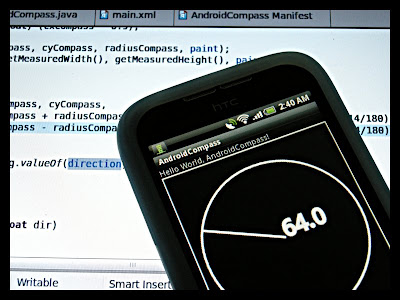
Refer to the last exercise "Detect rotation around X, Y & Z axis, using SensorManager and SensorEventListener", Azimuth can be used to implement compass.

Simple Compass SensorManager and SensorEventListener

Create a custom view, MyCompassView, extends View. It display the drawing of our compass.
MyCompassView.java
package com.exercise.AndroidCompass;

import android.content.Context;
import android.graphics.Canvas;
import android.graphics.Color;
import android.graphics.Paint;
import android.util.AttributeSet;
import android.view.View;

public class MyCompassView extends View {

private float direction = 0;
private Paint paint = new Paint(Paint.ANTI_ALIAS_FLAG);
private boolean firstDraw;

public MyCompassView(Context context) {
super(context);
// TODO Auto-generated constructor stub
init();
}

public MyCompassView(Context context, AttributeSet attrs) {
super(context, attrs);
// TODO Auto-generated constructor stub
init();
}

public MyCompassView(Context context, AttributeSet attrs, int defStyle) {
super(context, attrs, defStyle);
// TODO Auto-generated constructor stub
init();
}

private void init(){

paint.setStyle(Paint.Style.STROKE);
paint.setStrokeWidth(3);
paint.setColor(Color.WHITE);
paint.setTextSize(30);

firstDraw = true;
}

@Override
protected void onMeasure(int widthMeasureSpec, int heightMeasureSpec) {
// TODO Auto-generated method stub
setMeasuredDimension(MeasureSpec.getSize(widthMeasureSpec), MeasureSpec.getSize(heightMeasureSpec));
}

@Override
protected void onDraw(Canvas canvas) {
// TODO Auto-generated method stub

int cxCompass = getMeasuredWidth()/2;
int cyCompass = getMeasuredHeight()/2;
float radiusCompass;

if(cxCompass > cyCompass){
radiusCompass = (float) (cyCompass * 0.9);
}
else{
radiusCompass = (float) (cxCompass * 0.9);
}
canvas.drawCircle(cxCompass, cyCompass, radiusCompass, paint);
canvas.drawRect(0, 0, getMeasuredWidth(), getMeasuredHeight(), paint);

if(!firstDraw){

canvas.drawLine(cxCompass, cyCompass,
(float)(cxCompass + radiusCompass * Math.sin((double)(-direction) * 3.14/180)),
(float)(cyCompass - radiusCompass * Math.cos((double)(-direction) * 3.14/180)),
paint);

canvas.drawText(String.valueOf(direction), cxCompass, cyCompass, paint);
}

}

public void updateDirection(float dir)
{
firstDraw = false;
direction = dir;
invalidate();
}

}


Modify the layout file, main.xml, to add MyCompassView.
<?xml version="1.0" encoding="utf-8"?>
<LinearLayout xmlns:android="http://schemas.android.com/apk/res/android"
android:orientation="vertical"
android:layout_width="fill_parent"
android:layout_height="fill_parent"
>
<TextView
android:layout_width="fill_parent"
android:layout_height="wrap_content"
android:text="@string/hello"
/>
<view
class="com.exercise.AndroidCompass.MyCompassView"
android:id="@+id/mycompassview"
android:layout_width="fill_parent"
android:layout_height="fill_parent"
/>
</LinearLayout>


Modify the main code, AndroidCompass.java, to handle SensorManager and SensorEventListener.
package com.exercise.AndroidCompass;

import java.util.List;

import android.app.Activity;
import android.content.Context;
import android.hardware.Sensor;
import android.hardware.SensorEvent;
import android.hardware.SensorEventListener;
import android.hardware.SensorManager;
import android.os.Bundle;
import android.widget.Toast;

public class AndroidCompass extends Activity {

private static SensorManager mySensorManager;
private boolean sersorrunning;
private MyCompassView myCompassView;

/** Called when the activity is first created. */
@Override
public void onCreate(Bundle savedInstanceState) {
super.onCreate(savedInstanceState);
setContentView(R.layout.main);

myCompassView = (MyCompassView)findViewById(R.id.mycompassview);

mySensorManager = (SensorManager)getSystemService(Context.SENSOR_SERVICE);
List<Sensor> mySensors = mySensorManager.getSensorList(Sensor.TYPE_ORIENTATION);

if(mySensors.size() > 0){
mySensorManager.registerListener(mySensorEventListener, mySensors.get(0), SensorManager.SENSOR_DELAY_NORMAL);
sersorrunning = true;
Toast.makeText(this, "Start ORIENTATION Sensor", Toast.LENGTH_LONG).show();

}
else{
Toast.makeText(this, "No ORIENTATION Sensor", Toast.LENGTH_LONG).show();
sersorrunning = false;
finish();
}
}

private SensorEventListener mySensorEventListener = new SensorEventListener(){

@Override
public void onAccuracyChanged(Sensor sensor, int accuracy) {
// TODO Auto-generated method stub

}

@Override
public void onSensorChanged(SensorEvent event) {
// TODO Auto-generated method stub
myCompassView.updateDirection((float)event.values[0]);
}
};

@Override
protected void onDestroy() {
// TODO Auto-generated method stub
super.onDestroy();

if(sersorrunning){
mySensorManager.unregisterListener(mySensorEventListener);
}
}

}


Modify AndroidManifest.xml to disable the auto-rotate feature, otherwise it will point to wrong direction.

Download the files.

Related Article:
Implement a Simple Horizontal Indicator using SensorManager and SensorEventListener

Thursday 12 August 2010

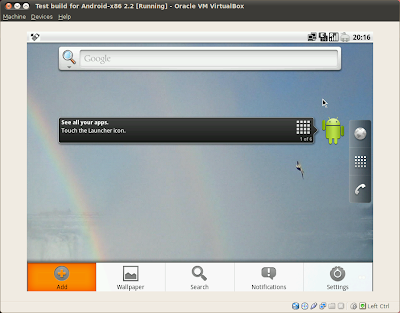
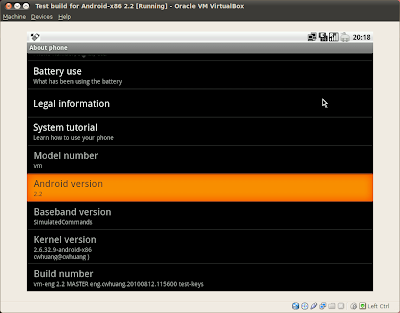
Test build for Android-x86 2.2 (Froyo-x86) on virtual machine is announced

The iso is intended for vm only (virtual box, qemu, vmware, ...). It may not work on any other real x86 machine.

Android-x86 2.2 (Froyo-x86) on virtual machine

Key Features

* Kernel 2.6.32.9
* Audio support for ICH AC97 and SB16
* Ethernet support
* Mouse cursor
* Persistent mode
* Some 3rd party apps updated

Details>> http://www.android-x86.org/releases/build-20100812

But the Mouse cursor is too slow to be used! as stated in the Known issues section. Looking for the next version to solve this problem.

Android-x86 is a project to port Android open source project to different x86 platforms, - Run Android on Your PC.

Wednesday 11 August 2010

HTC released kernel source code of EVO 4G, Droid Incredible, Wildfire, Aria, and also Nexus One system image.

The HTC Developer Center is a place for developers to obtain essential resources to help you in developing great applications on HTC's Android and Windows Mobile phones.

You can download Kernel Source Code and Binaries for HTC Android Phones from HTC Developer Center.

Monday 9 August 2010

Detect rotation around X, Y & Z axis, using SensorManager and SensorEventListener

SensorManager is a class that lets you access the device's sensors. SensorEventListener is used for receiving notifications from the SensorManager when sensor values have changed.


The method onSensorChanged(SensorEvent event) of SensorEventListener will be called when sensor values have changed. The rotation in degree can be retrieved from event.values[0], event.values[1] and event.values[2].

event.values[0]: azimuth, rotation around the Z axis.
event.values[1]: pitch, rotation around the X axis.
event.values[2]: roll, rotation around the Y axis.

Modify main.xml to have three TextView to display azimuth, pitch and roll.
<?xml version="1.0" encoding="utf-8"?>
<LinearLayout xmlns:android="http://schemas.android.com/apk/res/android"
android:orientation="vertical"
android:layout_width="fill_parent"
android:layout_height="fill_parent"
>
<TextView
android:layout_width="fill_parent"
android:layout_height="wrap_content"
android:text="@string/hello"
/>
<TextView
android:id="@+id/textazimuth"
android:layout_width="fill_parent"
android:layout_height="wrap_content"
android:text="Azimuth: "
/>
<TextView
android:id="@+id/textpitch"
android:layout_width="fill_parent"
android:layout_height="wrap_content"
android:text="Pitch: "
/>
<TextView
android:id="@+id/textroll"
android:layout_width="fill_parent"
android:layout_height="wrap_content"
android:text="Roll: "
/>
</LinearLayout>


AndroidSensorEventListener.java
package com.exercise.AndroidSensorEventListener;

import java.util.List;

import android.app.Activity;
import android.content.Context;
import android.hardware.Sensor;
import android.hardware.SensorEvent;
import android.hardware.SensorEventListener;
import android.hardware.SensorManager;
import android.os.Bundle;
import android.widget.TextView;
import android.widget.Toast;

public class AndroidSensorEventListener extends Activity {

TextView textviewAzimuth, textviewPitch, textviewRoll;
private static SensorManager mySensorManager;
private boolean sersorrunning;

/** Called when the activity is first created. */
@Override
public void onCreate(Bundle savedInstanceState) {
super.onCreate(savedInstanceState);
setContentView(R.layout.main);
textviewAzimuth = (TextView)findViewById(R.id.textazimuth);
textviewPitch = (TextView)findViewById(R.id.textpitch);
textviewRoll = (TextView)findViewById(R.id.textroll);

mySensorManager = (SensorManager)getSystemService(Context.SENSOR_SERVICE);
List<Sensor> mySensors = mySensorManager.getSensorList(Sensor.TYPE_ORIENTATION);

if(mySensors.size() > 0){
mySensorManager.registerListener(mySensorEventListener, mySensors.get(0), SensorManager.SENSOR_DELAY_NORMAL);
sersorrunning = true;
Toast.makeText(this, "Start ORIENTATION Sensor", Toast.LENGTH_LONG).show();
}
else{
Toast.makeText(this, "No ORIENTATION Sensor", Toast.LENGTH_LONG).show();
sersorrunning = false;
finish();
}

}

private SensorEventListener mySensorEventListener = new SensorEventListener() {

@Override
public void onSensorChanged(SensorEvent event) {
// TODO Auto-generated method stub

textviewAzimuth.setText("Azimuth: " + String.valueOf(event.values[0]));
textviewPitch.setText("Pitch: " + String.valueOf(event.values[1]));
textviewRoll.setText("Roll: " + String.valueOf(event.values[2]));

}

@Override
public void onAccuracyChanged(Sensor sensor, int accuracy) {
// TODO Auto-generated method stub

}
};

@Override
protected void onDestroy() {
// TODO Auto-generated method stub
super.onDestroy();

if(sersorrunning){
mySensorManager.unregisterListener(mySensorEventListener);
Toast.makeText(AndroidSensorEventListener.this, "unregisterListener", Toast.LENGTH_SHORT).show();
}
}
}


Download the files.

Related Article:
OrientationEventListener, detect orientation change from the SensorManager.
Implement a Simple Compass using SensorManager and SensorEventListener
Implement a Simple Horizontal Indicator using SensorManager and SensorEventListener


Sunday 8 August 2010

Blue To Do Beta is Live

Well I am happy to announce that one of my little side projects (well at least part of it) is ready for public consumption. Check it out at:


Blue To Do


What is it you ask?  Well a really simple To Do List tool. Most of the To Do List tools out there frustrate me because they are so complicated. I just want something super simple. That is what this is. Just a single list. You can add items, move items, and delete items. Data is stored locally in your browser using the LocalStorage mechanism.


In addition, the goal for the tool is it will work on a touch interface like the iPad. It works on the iPad, but see I have a lot to learn about how to make the page size itself when its rotated. lol.


Future Features Will Include


  • Offline operation

  • Support for multiple lists

  • Maybe a completion log

  • Storage in the cloud and syncing support

Anyway, play around with it and let me know what you think. Also, I haven't really tested on Internet Explorer much, so right now you are limited to Safari, Firefox, and Chrome. Enjoy!

OrientationEventListener, detect orientation change from the SensorManager.

android.view.OrientationEventListener is a Helper class for receiving notifications from the SensorManager when the orientation of the device has changed.

[Note: The another class OrientationListener is deprecated.]


The method onOrientationChanged(int orientation) will be called when the orientation of the device has changed. orientation parameter is in degrees, ranging from 0 to 359. orientation is 0 degrees when the device is oriented in its natural position, 90 degrees when its left side is at the top, 180 degrees when it is upside down, and 270 degrees when its right side is to the top. ORIENTATION_UNKNOWN is returned when the device is close to flat and the orientation cannot be determined.

Modify main.xml to have a TextView to display the updated orientation.
<?xml version="1.0" encoding="utf-8"?>
<LinearLayout xmlns:android="http://schemas.android.com/apk/res/android"
android:orientation="vertical"
android:layout_width="fill_parent"
android:layout_height="fill_parent"
>
<TextView
android:layout_width="fill_parent"
android:layout_height="wrap_content"
android:text="@string/hello"
/>
<TextView
android:id="@+id/textorientation"
android:layout_width="fill_parent"
android:layout_height="wrap_content"
android:text="Orientation: "
/>
</LinearLayout>


AndroidOrientationSensor.java
package com.exercise.AndroidOrientationSensor;

import android.app.Activity;
import android.hardware.SensorManager;
import android.os.Bundle;
import android.view.OrientationEventListener;
import android.widget.TextView;
import android.widget.Toast;

public class AndroidOrientationSensor extends Activity{

TextView textviewOrientation;
OrientationEventListener myOrientationEventListener;

/** Called when the activity is first created. */
@Override
public void onCreate(Bundle savedInstanceState) {
super.onCreate(savedInstanceState);
setContentView(R.layout.main);
textviewOrientation = (TextView)findViewById(R.id.textorientation);

myOrientationEventListener
= new OrientationEventListener(this, SensorManager.SENSOR_DELAY_NORMAL){

@Override
public void onOrientationChanged(int arg0) {
// TODO Auto-generated method stub
textviewOrientation.setText("Orientation: " + String.valueOf(arg0));
}};

if (myOrientationEventListener.canDetectOrientation()){
Toast.makeText(this, "Can DetectOrientation", Toast.LENGTH_LONG).show();
myOrientationEventListener.enable();
}
else{
Toast.makeText(this, "Can't DetectOrientation", Toast.LENGTH_LONG).show();
finish();
}


}

@Override
protected void onDestroy() {
// TODO Auto-generated method stub
super.onDestroy();
myOrientationEventListener.disable();
}
}

Download the files.

Related Article: Detect rotation around X, Y & Z axis, using SensorManager and SensorEventListener

Friday 6 August 2010

How to disable the auto-rotate feature?

In some case, we want our app run in portrait mode only, so we have to disable the auto-rotate feature. Simple add the statement android:screenOrientation="portrait" in your AndroidManifest.xml, inside <activity>

<activity android:name=".MyActivity"
android:label="@string/app_name"
android:screenOrientation="portrait">

Tuesday 3 August 2010

Developing Android application on HTC Wildfire, under Windows 7

In the article "Developing Android application on real phone", it's described how to develope Android Application on real phone (HTC Wildfire), under Linux Ubuntu.

How about that under Windows 7? I tried to install USB Driver for Windows, follow the instruction from Google. But, the phone cannot be detected, and cannot install the drivers finally.

Recently, HTC release HTC Sync�for HTC Wildfire, for Windows. The application come with all needed driver, include ADB. There are no extra works needed. Just follow the normal steps as described in "Developing Android application on real phone".

please note that you have to enable USB Debugging on phone, when install HTC Sync�for HTC Wildfire.

Tips 1:

If you cannot see the HTC Sync option when you connect your phone to the computer via USB, please follow the

Instructions below:

1. Make sure you select USB Debugging in Settings > Applications > Development before connecting your phone to the computer

2. Connect you Phone to the PC and wait 20 seconds for your phone to install HTC Sync on your phone.

3. Unplug the USB sync cable. Wait for 5 seconds. Reconnect the Phone to the PC using the USB cable.

4. Select �HTC sync� and wait for HTC Sync to recognize your Phone. This process could take up to a minute your first time connecting to the computer.

One more experience I want to point out here:
When the phone is connected to PC, the SD Card will be unmouted from the phone, and redirected to be mounted on PC. Such that if you develope a app on a connected phone, it cannot access the SD Card actually. You have to disconnect the phone from PC to make it run as normal.


Monday 2 August 2010

EditTextPreference

Further work on last exercise "Preferences and SharedPreferences", a EditTextPreference will be added here.

EditTextPreference

Modify mypreference.xml too add a EditTextPreference
<PreferenceScreen
xmlns:android="http://schemas.android.com/apk/res/android">
<CheckBoxPreference
android:key="checkboxvalue"
android:title="Checkbox"
android:defaultValue="true"
android:summary="CheckBoxPreference" />
<EditTextPreference
android:key="edittexvalue"
android:title="EditText"
android:summary="EditTextPreference" />
</PreferenceScreen>


Modify main.xml to have TextView for the EditTextPreference
<?xml version="1.0" encoding="utf-8"?>
<LinearLayout xmlns:android="http://schemas.android.com/apk/res/android"
android:orientation="vertical"
android:layout_width="fill_parent"
android:layout_height="fill_parent"
>
<TextView
android:layout_width="fill_parent"
android:layout_height="wrap_content"
android:text="@string/hello"
/>
<Button
android:id="@+id/setpreference"
android:layout_width="fill_parent"
android:layout_height="wrap_content"
android:text="Set Preference"
/>
<TextView
android:id="@+id/checkboxstatus"
android:layout_width="fill_parent"
android:layout_height="wrap_content"
/>
<TextView
android:id="@+id/edittextstatus"
android:layout_width="fill_parent"
android:layout_height="wrap_content"
/>
</LinearLayout>


Modify AndroidPreference.java
package com.exercise.AndroidPreference;

import android.app.Activity;
import android.content.Intent;
import android.content.SharedPreferences;
import android.os.Bundle;
import android.preference.PreferenceManager;
import android.view.View;
import android.widget.Button;
import android.widget.TextView;
import android.widget.Toast;

public class AndroidPreference extends Activity {

TextView checkBoxStatus, editTextStatus;

/** Called when the activity is first created. */
@Override
public void onCreate(Bundle savedInstanceState) {
super.onCreate(savedInstanceState);
setContentView(R.layout.main);

Button buttonSetPreference = (Button)findViewById(R.id.setpreference);
checkBoxStatus = (TextView)findViewById(R.id.checkboxstatus);
editTextStatus = (TextView)findViewById(R.id.edittextstatus);

buttonSetPreference.setOnClickListener(new Button.OnClickListener(){

@Override
public void onClick(View arg0) {
// TODO Auto-generated method stub
startActivity(new Intent(AndroidPreference.this, SetPreference.class));
}});
}

@Override
protected void onResume() {
// TODO Auto-generated method stub
super.onResume();
Toast.makeText(this, "onResume", Toast.LENGTH_LONG).show();

SharedPreferences myPreference=PreferenceManager.getDefaultSharedPreferences(this);
checkBoxStatus.setText("CheckBox Status: " + myPreference.getBoolean("checkboxvalue", true));
editTextStatus.setText("EditText Status: " + myPreference.getString("edittexvalue", ""));
}
}


Download the files.

Sunday 1 August 2010

Star - jailbreakme

For all of you impatient and waiting to save your 4.0.2 / 3.2.2 SHSHs keep this in mind.


1. 4.0.2 is a USELESS firmware. There is nothing worth saving. All it did was patch the exploit that allows you to jailbreak.

2. There is NO reason to EVER upgrade to 4.0.2. The patch that is available to protect you from malicious PDFs has been released in Cydia by saurik. Go get the 'PDF Patch' by Jay Freeman (saurik).


I'm going to assume that those of you still complaining about 4.0.2 signatures really have no clue so I'll give you a pass. The rest of you should just sit tight and encourage anyone you know with iDevices to save your 4.0.1 / 3.2.1 SHSH while you still can.


And in answer to some questions, no there is no way to get the application to make the 4.0.2 / 3.2.2 requests without an update. Don't post your mash-up code in the comments of this blog.


Jailbreakers can now enjoy the new jailbreak via @comex. Congrats bud. This jailbreak was the culmination of a ton of work by the guys involved. Great job guys.


Visit: http://jailbreakme.com on your device to start the process.


Enjoy


EDIT: Fixed the windows download - someone claimed a copyright violation and ifile took down the file and ofc mediafire just blows.

Preferences and SharedPreferences

Android provide Preferences and SharedPreferences classes, which provides a mechanism to store and access configuration data in a hierarchical way. Such that apps can keep preferences after apps closed and re-started.

Preferences and SharedPreferences

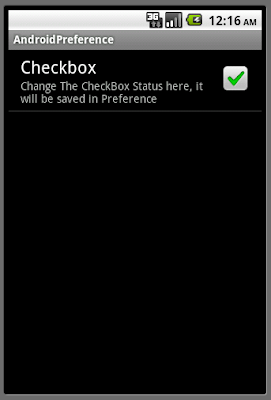
It's a simple example to show how to use Preferences and SharedPreferences classes. If user check/uncheck the CheckBox on the main activity, the setting will not be saved after the app exited (by BACK button), but the status in the SetPreference.java will be saved, it will be kept after app re-started.

- Create a XML file in /res/xml/ to define our PreferenceScreen; mypreference.xml in my example.
mypreference.xml
<PreferenceScreen
xmlns:android="http://schemas.android.com/apk/res/android">
<CheckBoxPreference
android:key="checkbox"
android:title="Checkbox"
android:defaultValue="true"
android:summary="Change The CheckBox Status here, it will be saved in Preference" />
</PreferenceScreen>


- Create a new Activity (SetPreference.java in my example) extends PreferenceActivity, to access the XML file.
SetPreference.java
package com.exercise.AndroidPreference;

import android.os.Bundle;
import android.preference.PreferenceActivity;

public class SetPreference extends PreferenceActivity {

@Override
protected void onCreate(Bundle savedInstanceState) {
// TODO Auto-generated method stub
super.onCreate(savedInstanceState);
addPreferencesFromResource(R.xml.mypreference);
}

}


- Modify main.xml to add a button to involve the new Activity.
<?xml version="1.0" encoding="utf-8"?>
<LinearLayout xmlns:android="http://schemas.android.com/apk/res/android"
android:orientation="vertical"
android:layout_width="fill_parent"
android:layout_height="fill_parent"
>
<TextView
android:layout_width="fill_parent"
android:layout_height="wrap_content"
android:text="@string/hello"
/>
<Button
android:id="@+id/setpreference"
android:layout_width="fill_parent"
android:layout_height="wrap_content"
android:text="Set Preference"
/>
<CheckBox
android:id="@+id/checkbox"
android:layout_width="fill_parent"
android:layout_height="wrap_content"
android:text="Check CheckBox status here will not be saved, it will be lost once activity exit."
/>
</LinearLayout>


- Call the new class from our main java code.
package com.exercise.AndroidPreference;

import android.app.Activity;
import android.content.Intent;
import android.content.SharedPreferences;
import android.os.Bundle;
import android.preference.PreferenceManager;
import android.view.View;
import android.widget.Button;
import android.widget.CheckBox;
import android.widget.Toast;

public class AndroidPreference extends Activity {

CheckBox checkBox;

/** Called when the activity is first created. */
@Override
public void onCreate(Bundle savedInstanceState) {
super.onCreate(savedInstanceState);
setContentView(R.layout.main);

Button buttonSetPreference = (Button)findViewById(R.id.setpreference);
checkBox = (CheckBox)findViewById(R.id.checkbox);

buttonSetPreference.setOnClickListener(new Button.OnClickListener(){

@Override
public void onClick(View arg0) {
// TODO Auto-generated method stub
startActivity(new Intent(AndroidPreference.this, SetPreference.class));
}});
}

@Override
protected void onResume() {
// TODO Auto-generated method stub
super.onResume();
Toast.makeText(this, "onResume", Toast.LENGTH_LONG).show();

SharedPreferences myPreference=PreferenceManager.getDefaultSharedPreferences(this);
checkBox.setChecked(myPreference.getBoolean("checkbox", true));
}
}


- Modify AndroidManifest.xml to add the new Activity.
<?xml version="1.0" encoding="utf-8"?>
<manifest xmlns:android="http://schemas.android.com/apk/res/android"
package="com.exercise.AndroidPreference"
android:versionCode="1"
android:versionName="1.0">
<application android:icon="@drawable/icon" android:label="@string/app_name">
<activity android:name=".AndroidPreference"
android:label="@string/app_name">
<intent-filter>
<action android:name="android.intent.action.MAIN" />
<category android:name="android.intent.category.LAUNCHER" />
</intent-filter>
</activity>
<activity android:name=".SetPreference" />
</application>
<uses-sdk android:minSdkVersion="4" />

</manifest>


Download the files.

Related Article:
EditTextPreference
ListPreference


*** This functionality should now be found in the new PreferenceFragment class.